Installing NNLS
| < Day Day Up > |
| Test Objective Covered:
The first task you must complete to start the NNLS installation process is to obtain a copy of the product. The manner in which NNLS is distributed is a bit different from other software products on the market today. You can't run down to your local computer store and buy a copy off the shelf. NNLS is distributed only through the Internet. To obtain a copy, you must visit http://www.novell.com or the website of an Authorized Novell Reseller. On these sites you will find a link that allows you to purchase a copy of the product. When you execute the purchase, you will receive an email containing links where NNLS can be downloaded. There are three separate items you need to make sure you receive:
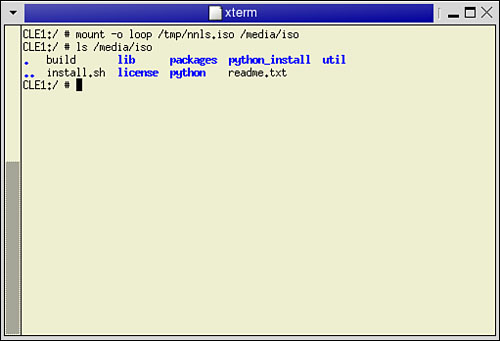
Once you've downloaded your ISO images, you need to decide how you want to use them to install NNLS. You have two options, the first of which is to use a CD burner to burn the ISO image to disc. This is a point of confusion for many. When I say, "burn the ISO image to disc," I'm not referring to putting the ISO image file itself on the CD. Instead, we mean using your CD-burning software to extract all the individual files from the ISO image file and burn them to disc. Most CD-burning software packages are capable of doing this; however, many aren't. Check your package's documentation to see whether it supports burning from ISO images. Once the CD is burned, insert it in your Linux server's CD drive and mount it. At this point, you're ready to start the pre-installation process. You also have a second option for installing from the ISO image files. Using the mount command, Linux allows you to mount the image file itself to a mount point in the file system, just as if it were a CD. To do this, first download the ISO image file to your server; then enter the following command: mount -o loop /image_path_and_filename /mount_point In Figure 5.1, the NNLS image file is named nnls.iso and is saved in the /tmp directory. Using the mount command, it is mounted in the /media/iso directory. Figure 5.1. Mounting an ISO image. Once the image is mounted, the files within the ISO image are available for you to use to install NNLS. Note In Figure 5.1, I mounted the ISO image into the /media/iso directory. This directory doesn't exist by default. It was created earlier with the mkdir command . Novell offers an evaluation version that you can download for study purposes. This is available at http://www.novell.com/products/linuxservices/. The evaluation version doesn't include the Companion CD. This version is only licensed for a 90-day evaluation period, and Novell doesn't offer any support for it. For study purposes, this version will work very nicely . Once you have downloaded the appropriate files and created a license disk by copying the NICI file to a floppy disk, you're ready to start preparing your SUSE Linux system to install NNLS. Getting Ready to Install NNLSIf you're like me, your first inclination when you get a new piece of software is to straightway throw the CD in and start installing (who needs documentation, anyway). You can get away with this approach with many software packages. With NNLS, however, you should avoid this urge at all costs. Unlike other products, you must thoroughly plan and prepare your system before installing. To do this, you need to do the following:
Warning I can't emphasize enough the importance of completing these steps before you begin installing. If you don't, it's likely your installation will fail. Even if it actually completes, it's very likely your NNLS implementation will not function correctly. The information that will be presented here is the result of a lot of painful experience on the part of many early NNLS adopters. Be glad you didn't have to learn these things the hard way! Let's start by reviewing the system requirements you must meet in order to use NNLS effectively. Meeting System RequirementsAs we go through the next couple chapters, you'll discover that NNLS is composed of a whole suite of products. This makes NNLS a very powerful Linux solution, providing everything from identity management with eDirectory to collaboration services with Virtual Office. Providing all these services requires a lot of horsepower from your server. You really shouldn't skimp on CPU speed, memory, or hard disk space. Although you may be able to get NNLS installed on a minimal system, the performance of the product will be poor. Let's start with the server hardware requirements for running NNLS. Hardware RequirementsThe minimal NNLS hardware requirements include the following:
These hardware requirements are written with the assumption that you are going to run all the NNLS services on one piece of server hardware. Although this can be done, it may be more practical to consider dedicating separate servers to specific services. Depending on the number of users in your enterprise, you could consider implementing as few as one server per service. Some services, such as iFolder, could even be spread out across several servers. In addition to these hardware specifications, NNLS also has some stringent software requirements. Software RequirementsTo install NNLS, you must be running one of the following distributions:
That's not to say NNLS won't run on other Linux distributions or versions. I've tried it on a few and had good success. Novell, however, doesn't support NNLS on anything but SLES 8 and Red Hat AS/ES 2.1. Having vendor support is critical for servers in a production environment, so make sure you use a supported distribution. NNLS also requires that the gettext package be installed in order to run its installation script. Check your system and verify that it is there. Depending on the installation profile you chose when you installed Linux, it may or may not have been installed by default. If it isn't there, you can either download the latest version or install the version that's on your distribution CDs. If you followed the steps in Lab Exercise 2.1, your server has this package installed. Your server also needs to have a static IP address assigned. Many NNLS products require that the server continue to use the same IP address it was using when they were installed. Using DHCP to assign an address to your server will cause these products to stop functioning when a new address is dynamically assigned. Again, if you followed the steps in Lab Exercise 2.1, your server should have a static IP address installed. In addition to these software requirements, NNLS has several product dependencies. We'll discuss these next. Product DependenciesIf you've used Linux for a while, you're aware of the concept of dependencies . Many Linux applications and services are written with the assumption that certain other applications or services are already installed and running on the system. NNLS has several product dependencies. The NNLS installation script checks your system to verify that the required packages are installed. If a missing dependency is identified, the installation routine will automatically install the missing package. For the CLE certification, however, Novell wants you to know what these dependencies are:
With these prerequisites met, the next thing you need to do is to verify that the NTP daemon on your server is synchronizing time properly. Verifying That Time Is SynchronizedBefore installing NNLS, you need to verify that time is synchronized on your network. Many who are new to eDirectory underestimate the importance of this operation. It is essential that the NNLS installation program will not let you install into an existing eDirectory tree if time is not synchronized with the other servers in the tree. Even if you are installing a new tree with your NNLS implementation and your server will be the only server in the tree, it is still good form to configure time synchronization. Your server's time should match up to that supplied by the public NTP time sources mentioned in Chapter 3, "Linux Administration and Configuration," or with a time server on your organization's network. Imagine what would happen if you didn't and your server's clock is 23 hours behind the correct time. As long as it is the only server in the tree, there would be no problems. If you later tried to install a new server into the tree, however, you would have to set its clock back to match the first server's time before the installation could take place. This may not sound like a big deal, but be aware that many Linux processes and applications don't like having the system time set to a date in the past. It's likely that you will experience problems with non-NNLS services on the second server. In short, you're much better off synchronizing your server with a reliable time provider, even if it is the only server in the tree. In Chapter 3, we discussed NTP configuration in detail. You should make sure your ntp.conf file has been configured correctly and that the xntpd daemon is running on your server. You can check your time synchronization status by opening a terminal session on your server and entering ntpq -p at the shell prompt. Remember that NTP uses the concept of insane time . If the time on your local server drifts more than 1000 seconds (about 17 minutes) apart from the time source, the NTP daemon considers the time provider to be unreliable and will not synchronize with it. Because of this, it's a good idea to periodically check your synchronization status and make sure it is still taking place. If you've lost synchronization, complete the following:
With this done, your next task is to implement and configure the Service Location Protocol (SLP). Implementing SLPBefore installing NNLS, you need to have SLP configured and running on your Linux servers. Warning If you've ever worked with eDirectory on the NetWare platform, you know that the default SLP configuration created during installation works very well. You don't have to do any manual configuration before installation . However, when running eDirectory on Linux, it is critical that you have your SLP configuration installed and running prior to installing NNLS . The key goal behind NNLS is to provide a wide variety of network services designed to enhance end-user productivity while reducing help-desk calls. The other hosts on your network, both workstations and servers, need to be able to identify and locate these services. Novell has always been famous for making this an easy-to-administer process. Advertising Services with SAPEarly on, eDirectory didn't run on Windows or Linux servers. The only platform it ran on was Novell NetWare. Tip The first versions of eDirectory were named Novell Directory Services (NDS) . Back then, NetWare didn't natively support the TCP/IP protocol. You had to use the Internetwork Packet Exchange (IPX) protocol instead. IPX was a very easy-to-use protocol; essentially , all you had to do was plug your server or workstation into the network jack, and the protocol would automatically configure itself. You didn't need DHCP to dynamically assign addresses. You also didn't need a DNS server to resolve hostnames into network addresses. That's because IPX used (and still does) the Service Advertisement Protocol (SAP). When an IPX server was booted , all the services it provided, such as file, print, and directory services, used the SAP protocol to advertise their availability. Regardless of whether anyone wanted to use them, they would periodically send out broadcasts to the entire network describing the service they had to offer as well as their network address. If a service were to be shut down, it would stop advertising itself. By way of analogy, imagine that you are sitting in a classroom taking a class. At 60-second intervals, each student in the class stands up and announces his or her name and the desk he or she is currently sitting in and then sits back down. Essentially, this is how SAP works. This strategy works very well, and if you've ever used Novell's Client software on a Windows workstation to log in to an IPX server, you know that you can browse the network to select the eDirectory tree and server you want to log in to. The Novell Client generates the list of trees and servers by simply listening on the network wire for SAP broadcasts, as shown in Figure 5.2. Figure 5.2. SAP broadcasts with IPX. For the most part, SAP was a joy for network administrators because little or no manual configuration was involved. Everything just worked. There are, however, two problems associated with this implementation. First, SAP can become a bandwidth hog. Referring to Figure 5.2, imagine what would happen if there were hundreds of servers and thousands of clients on the network. Every service advertises its availability regardless of whether anyone wants to use it. A large portion of your network bandwidth can be used up by traffic that isn't necessary. The second problem is that SAP is dependent on IPX. When Novell rewrote eDirectory to run on TCP/IP hosts, it had to come up with a new way for services to be located. Novell could have used static methods such as the hosts file or an option delivered via DHCP. Novell system administrators had become quite used to the automated nature of SAP. Using the hosts file would require a tremendous amount of manual configuration. Using a DHCP option is a little better; however, it doesn't carry any state information. In other words, it delivers the service address regardless of whether the service is up or down. To keep directory services working the way they had under IPX, Novell worked with several other industry vendors to author RFC 2165 and RFC 2608, which define the Service Location Protocol (SLP). SLP provides a level of automation on a TCP/IP network similar to that provided by SAP on an IPX network. It also eliminates some of the problems associated with SAP. Because of the way SAP broadcasts service availability, it is usually categorized as a push protocol, whereas SLP is categorized as a pull protocol. Let's take a closer look at how SLP provides network service discovery without using large amounts of bandwidth the way SAP does. How SLP WorksSLP uses software agents that run on both the network servers and on the workstations. When an SLP-aware service is brought up, it registers itself with an agent on a server. When a host needs to locate a service, its agent sends out a request with a description of the service. Agents that have the requested information respond to the request with the necessary information. This process is shown in Figure 5.3. Figure 5.3. Finding services with SLP. SLP responses are sent in the form of a URL, though. The format of the URL is slightly different from the URLs you use in a web browser. The general format of the URLs is as follows : service: service_name :/// service_address_or_hostname Here are sample URLs associated with the eDirectory service:
SLP doesn't use the networkwide service-announcement broadcasts that SAP uses. Service information is only sent when it is requested. In addition, the requested information is sent only to the host that requested it. By implementing SLP in this way, Novell effectively reduced the high bandwidth usage associated with SAP. Let's talk about the different types of agents used by SLP. SLP AgentsThe three types of SLP agents are detailed in the following list:
SLP can also be configured to use scopes . An SLP scope is a grouping of network services associated with one or more Directory Agents. In essence, scopes are a means for you to organize resources on your network. Scopes are useful when you are deploying SLP in a very large or geographically dispersed organization. For example, suppose your organization is composed of several divisions that each function as separate business units. You have a paper products division, a light bulb division, and a DVD player division. You can configure a scope for each business unit, such that users in the paper products division only see, through SLP, network resources in that division. Likewise, users in the light bulb and DVD player divisions have their own scopes that only contain network resources specific to their divisions. If there are network resources used across divisions, you can create a scope that includes those resources as well. Scopes are also useful if your organization is geographically dispersed. Suppose your organization has three different offices located in different areas of the country. Instead of requiring SLP requests to cross WAN links to access a remote DA, you can set up a DA in each location and configure each of those DAs with a scope that is limited to local network resources. With this information in mind, you're ready to learn about the different ways SLP can operate on your network. SA-Only ModeThe default mode for SLP is SA-Only mode. In this mode, there are no DAs configured in the network. Each server runs an SA and a UA. Each client workstation runs a UA. This configuration is shown in Figure 5.4. Figure 5.4. Using SLP in SA-Only mode. In this configuration, SLP-aware services on the local server register themselves with the local SA. The SA maintains a list of all services it knows about on the local server. For example, if the eDirectory daemon were to be started on the server, the eDirectory tree and the all the eDirectory partitions on the local server are all registered with the SA. Tip When a service is stopped , it deregisters itself from the SA . The SA doesn't broadcast this service information. Instead, it waits passively for requests from UAs. When an application on a client workstation needs to use a network service, the application sends the request to the local UA. The UA then sends out a multicast to the entire network asking for the location of the specified service. Before proceeding, we need to discuss the concept of a multicast . Although a multicast sounds similar to a broadcast, it is quite different. A network broadcast is a network transmission that is addressed to all hosts. Every host on the network accepts the broadcast packets and processes them. A multicast, on the other hand, is a message from a single source host that is sent to multiple recipient hosts. Unlike a broadcast, the transmission isn't sent to all network hosts. Instead, it is sent only to hosts who are configured to listen for multicasts. Hosts configured to listen for multicasts are members of a multicast group . By using multicasting instead of broadcasts, SLP uses considerably less network bandwidth than SAP. In our SLP configuration, all SAs are members of the multicast group. When the UA sends its multicast requesting information about the specified service, all the SAs receive it and process the query. If an SA recognizes the service and has the information being requested, it responds with a unicast response to the requesting UA. Tip A unicast is a network transmission that is sent from a single host to a single recipient host; in this case, the host running the UA making the request . If the SA doesn't have any information about the requested service, it ignores the request and doesn't respond to the UA. This process is depicted in Figure 5.5. Figure 5.5. Requesting service locations from Service Agents. In Figure 5.5, the workstation UA makes a request for the location of the CLE-TREE eDirectory tree. All server SAs in the multicast group receive and process the request. The first two SAs don't know anything about the requested service, so they ignore the request. The third SA, however, has information about CLE-TREE, so it sends the appropriate URL back to the UA using a unicast transmission. This is how your NNLS system is configured by default. It works acceptably well for small networks that have less than 25 or so servers. For networks larger than this, however, it may not be the best option. Even though SLP uses multicasts instead of broadcasts, the traffic from the multicast requests can still use excessive amounts of your network bandwidth. If your network is large, you may need to configure one or more DAs. DA ModeBy implementing one or more DAs on your network, you can significantly reduce SLP traffic on your network. As discussed earlier, a DA acts as a central repository for SLP information. As in SA-Only mode, each server in the network runs a UA and an SA. Each client workstation runs a UA. In DA mode, however, you select one or more servers to run a DA as well as an SA and a UA. When you do this, the SAs on the network change their behavior. They still register SLP-aware applications and services on their individual servers, but they no longer respond to requests from UAs. In DA mode, SAs send out a DA discovery multicast packet when the SA is first started. If a DA responds, the SA will register all the services it knows about with the DA using unicast transmissions. After that, the SA will no longer respond to UA requests. If the SA does not discover a DA, they will default to SA-Only mode and will respond to UA requests. In DA mode, you configure your client workstation UAs with the IP address of the DA (or DAs) you want them to send their requests to. When a UA needs to locate a service, it will send a unicast request directly to the configured DA. The DA will process the query and respond with the requested information ”again using unicast transmissions. This configuration is shown in Figure 5.6. Figure 5.6. Requesting services from a Directory Agent. When a service is shut down, the local SA deregisters the service with the DA. As you can see from Figure 5.6, using a DA requires more work on the part of the network administrator to configure. The bandwidth savings in larger organizations, however, is usually worth the effort. DA mode also prevents other problems. Recall that SA-Only mode is heavily dependent on multicast transmissions. Most hardware and software routers, however, are configured by default to not allow multicast traffic to cross between network segments. If the servers in your organization lie on different network segments separated by routers, you must enable multicast routing to use SLP in SA-Only mode. As a better alternative, Novell recommends that you implement DAs on each side of the router. I mentioned earlier that SAs still rely on multicast transmissions to discover DAs by default. You can, however, manually configure each SA with the IP address of the DAs you want them to register their services with. By doing this, multicast traffic is all but eliminated. We'll discuss how to do this a little later in this chapter when we explore the SLP daemon-configuration files. Now that you understand the conceptual architecture of SLP, you need to learn how to implement and configure SLP daemons. SLP DaemonsIf you're running eDirectory on NetWare or Windows, your SLP configuration choices and tasks are pretty much straightforward. On Linux, however, you need to take into consideration a couple issues. The first one is the choice of an SLP daemon. You have two packages to choose from:
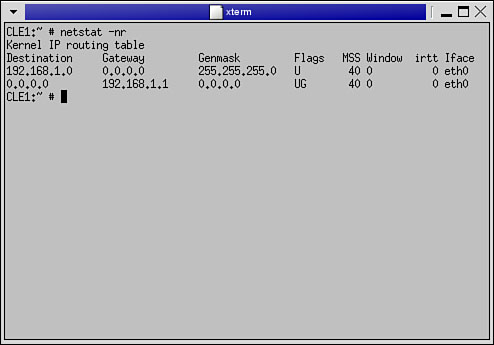
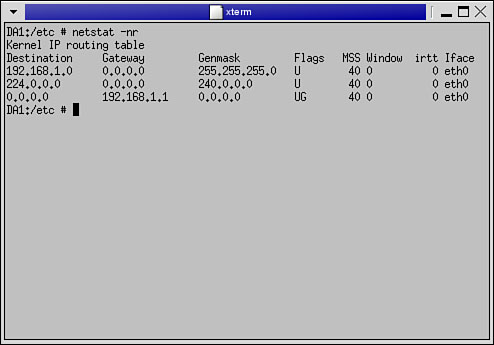
Warning If you have OpenSLP installed on your system prior to installing NNLS, the installation script will detect it and will not install the slpuasa daemon. I highly recommend that you use OpenSLP instead of the slpuasa daemon. In fact, even Novell recommends that you use OpenSLP instead of its own package . The CLE certification only requires that you know how to implement the slpuasa daemon. However, I've heard many ill reports as to its reliability. Therefore, we're going to cover both slpuasa and OpenSLP in this chapter. Before doing so, we need to discuss how to enable multicasting on your Linux server. Configuring Multicast RoutingDepending on the mode you select, you will need some level of SLP support on your servers. By default, most Linux distributions have multicasting support disabled. To check, open a terminal session and enter netstat -nr at the shell prompt. If you see a route listed with a destination of 224.0.0.0, multicast routing has been enabled. If not, you need to enable it. Output from the netstat -nr command on a system where the multicast route has not been added is shown in Figure 5.7. Figure 5.7. Output from netstat -nr with no multicast route. Output from netstat -nr on a system where the route has already been added is shown in Figure 5.8. Figure 5.8. Output from netstat -nr with a multicast route already added. If you need to add the multicast route, complete the following steps:
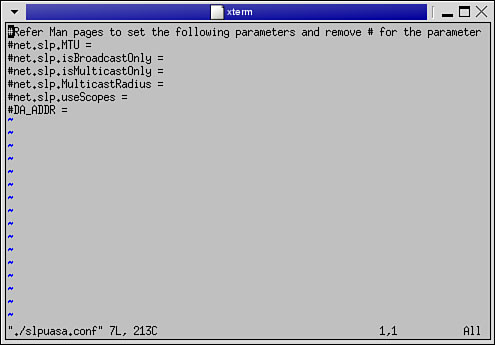
Be aware that this route is not persistent. If you restart your server, the route information will be lost. To make this persistent, add an entry to the /etc/sysconfig/network/routes file that reads as follows ( assuming you are using eth0 as your network device): 224.0.0.0 0.0.0.0 240.0.0.0 eth0 Once you have added the multicast route, you're ready to start configuring an SLP daemon on your server. As mentioned earlier, you need to choose whether you want to use the slpuasa daemon that comes with NNLS or the OpenSLP daemon. Configuration tasks for both will be covered next. Configuring the slpuasa DaemonIf you don't have OpenSLP installed, the NNLS installation script will automatically install the slpuasa daemon on your server. By default, it is configured to load an SA and a UA on your server. Once the slpuasa daemon is installed during the NNLS installation, you can configure it by editing the slpuasa.conf file located in the /etc directory on your server. The default slpuasa.conf file is shown in Figure 5.9. Figure 5.9. The slpuasa.conf file. You can configure the following parameters in the slpuasa.conf file:
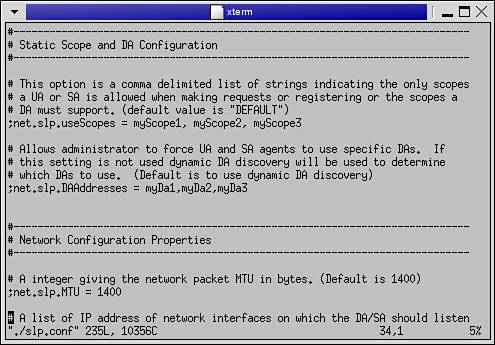
Tip Recall earlier that I said SAs, by default, send out a DA discover multicast message when they are started. If they find a DA, they register their services with it. If not, they default to SA-Only mode. If you list an IP address for the DA_ADDR parameter, however, the SA will not do this. Instead, it will contact the specified DAs and register its services with them only . This is a very useful parameter if your network routers aren't configured to forward multicast traffic. By you specifying a DA in this parameter, your SA will contact it using unicast transmissions . The syntax is as follows: DA_ADDR = DA_IP_address, scope_name Once you have configured your slpuasa.conf file, you next need to restart the slpuasa daemon. This is done using the slpuasa script located in /etc/init.d . Tip On other distributions, such as Red Hat, the script is located in /etc/rc.d/init.d . To stop the daemon, open a terminal session and enter /etc/init.d/slpuasa stop . To start the daemon, open a terminal session and enter /etc/init.d/slpuasa start . Because SLP is so critical to the operation of eDirectory and other NNLS components , you should use the chkconfig command to make the service start automatically each time the system starts. To do this, enter chkconfig slpuasa 345 at the shell prompt. Configuring OpenSLPAs discussed earlier, Novell actually recommends that you don't use the slpuasa daemon on any implementation where there are more than a handful of servers or where the eDirectory tree has many partitions and replicas. If you want to implement a DA on a Linux server, this is even more applicable because the slpuasa daemon doesn't include DA functionality. Warning Novell's SLP implementations on NetWare and Windows do include DA functionality. Many administrators are tempted to implement a DA on one of these platforms in their network and configure the slpuasa daemon on their Linux servers to register its SA with those DAs. I've done this before and had reasonably good success. However, I've also talked with administrators who have done this and had terrible problems. I side with Novell and say don't even bother with the slpuasa daemon. Use OpenSLP instead . In these cases, it is recommended that you install and configure the OpenSLP Open Source SLP package prior to installing NNLS. The NNLS installation program will automatically detect the presence of the OpenSLP package on your system and will not install the slpuasa daemon. OpenSLP is freely available from http://www.openslp.org as both a tarball and an RPM package. In this book, we're going to work only with the RPM version. Once downloaded, the package is very easy to install. Open a terminal session and switch to the directory where the OpenSLP RPM package is located. Then enter rpm -i ./ OpenSLP_package_filename When the installation is complete, the OpenSLP daemon, slpd, is copied to /usr/sbin and its configuration file, slp.conf , is copied to /etc . After the initial installation, the slpd daemon is configured to run in SA-Only mode, much like the slpuasa daemon discussed earlier. To create a DA, you must edit the slp.conf file, shown in Figure 5.10. Figure 5.10. A portion of the slp.conf file. The following is a list of parameters you can configure in the slp.conf file:
To configure your slpd daemon, simply edit the /etc/slp.conf file, making the changes you need for your network. Once done, you're ready to start the service. Tip In the lab for this chapter, you will create a DA and configure it with a scope . Like the slpuasa daemon, the slpd daemon places an init script file in the /etc/init.d directory named slpd . On other distributions, such as Red Hat, this will be located in the /etc/rc.d/init.d directory. To run the slpd daemon, open terminal session and enter /etc/init.d/slpd start . As we discussed earlier with the slpuasa daemon, it is absolutely critical that SLP be running on your Linux server for the proper functioning of NNLS components. You should use the chkconfig command to configure the slpd daemon to automatically start on runlevels 3, 4 (optional), and 5. To do this, enter chkconfig slpd 345 at your shell prompt. Once the daemon is running, you can use the slptool utility, which is installed as a part of the OpenSLP package, to verify that your configuration is working properly. The syntax for using slptool is as follows: slptool options commands You can use the following options with slptool:
You can use the following commands with slptool:
It's important that you remember that your system's SLP configuration is absolutely critical to the proper functioning of your NNLS installation. I highly recommend that you install and configure OpenSLP on your system before you start the NNLS installation process. To do this, we're going to perform Lab Exercise 5.1. |
| < Day Day Up > |
EAN: 2147483647
Pages: 128