| One of the latest trends of corporate web sites is the addition of a favicon that gets dropped in before the URL on the location line in most modern web browsers. For example, Figure 7-48 shows O'Reilly's favicon in Safari. Figure 7-48. O'Reilly's favicon. 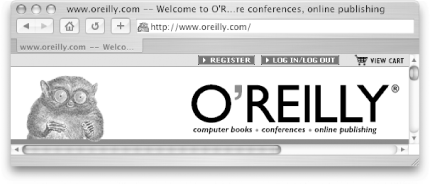
As you can see, O'Reilly's favicon is a smaller image of our company mascot, the tarsier ( otherwise known as "The vi Guy"). While favicons aren't necessary, they are something cool that you can add to your web site to help people identify the site with you.  | Unfortunately, there's no easy way to add the favicon to all of the pages in your .Mac web site if you are using the HomePage building tools. It would have been great if Apple let you automatically use the image you associate with your .Mac email account (in the Account preference settings, described in Chapter 4) as your favicon, but you can't. Instead, if you want to use a personalized favicon for your HomePage, you will need to roll up your sleeves a bit to get the job done. | |
7.12.1 Favicon Gotchas Before you run off and start creating your favicon, there are a couple things that you need to know: -
The size of the favicon is limited to 16 16 pixels square (and not a pixel larger). -
The favicon must either be saved as an ICO or PNG file. ICO files are generally Windows icon files, while PNG files (portable network graphics) are also acceptable by most browsers. -
Favicons should be reduced to 4-bit color to not only help keep their file size small, but to also make them viewable on a wider variety of web browsers and platforms (primarily Windows, though). | | My preference is to use PNG as the format for favicons and other web graphics because it's a web standard and PNG files offer things like alpha channel transparency that you can't get with a GIF or JPEG. For more information about the PNG image format, see the World Wide Web Consortium's (W3C) page at http://www.w3.org/Graphics/PNG/. | |
7.12.2 Choosing and Resizing Your Image So what makes a good favicon? Something that doesn't have a lot of color and is pretty clear in its original size is always a good choice. Because the image will be reduced to a mere 16 16 pixels, the image shouldn't have a lot going on in it, otherwise, it will just look muddy once you've reduced it in size. For example, I decided to use a picture of my friend's dog, Rowan, as my favicon image. The original image (a grayscale version of which is shown in Figure 7-49), was originally 475 pixels square. When reduced to 16 pixels square, you could still tell that it was a dog's head with a yellow background. Figure 7-49. The original image for your favicon shouldn't be busy; something simple works best. 
How you resize the image depends on the tools you have at your disposal. You can use anything from high-end applications such as Adobe Photoshop (http://www.adobe.com), to web-graphics apps such as Macromedia's Fireworks (http://www.macromedia.com) or GraphicConverter from Lemke Software (http://www.lemkesoft.com). But you can also use iPhoto to resize and save an image in PNG format; you just have to get a little creative with how you use it. To take the image shown in Figure 7-49 and convert it into a favicon, follow these steps: -
Launch iPhoto by either clicking on its icon in the Dock or double-clicking its icon in the Finder ( /Applications ). -
Locate the image you want to use as your favicon in the Organize section, select the image, and then click on the Edit button. -
In the lower-left corner of iPhoto's window, click on the Constrain pop-up menu and select the very last option in this pop-up menu: Square. -
Move the mouse pointer over the image; you'll see that the arrow changes to a set of crosshairs. Click-and-drag a selection of the image; you'll notice that the selected area is constrained to the dimensions of a perfect square, as shown in Figure 7-50. Figure 7-50. Constrain your selection to a square, as shown here. 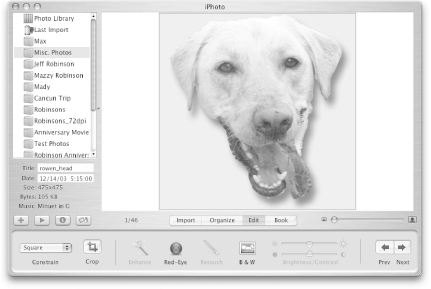
-
Select the area of the image you want to use. If you need to move the selection square around to adjust the selection, you'll notice that the mouse pointer changes to a hand with its index finger extended. Just click and drag the square around to how you want it to be. -
To make the image a perfect square, click on the Crop icon (located to the right of the Constrain pop-up menu). -
Select File  Export (Shift- Export (Shift-  -E) from the menu bar; this opens the Export Photo window, shown in Figure 7-51. -E) from the menu bar; this opens the Export Photo window, shown in Figure 7-51. Figure 7-51. Use iPhoto's Export window to resize the image for your favicon. 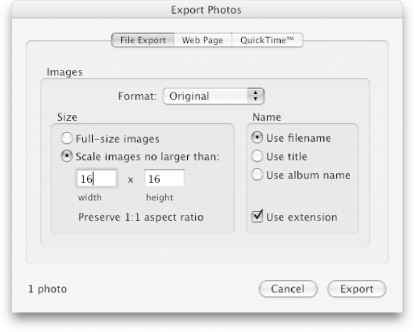
On the left side of the window (in the Size section), select the radio button next to "Scale images no larger than" and then tab down to the width field below. Type in 16; since the image is a perfect square, the height will be constrained to 16 pixels as well. Leave the Format menu set to Original, and in the Name section, leave "Use filename" as the selection. -
Click on the Export button; when you do, a sheet slides out of the window's titlebar, giving you the option of changing the image's filename and selecting a place to save it. As shown in Figure 7-52, we've opted to save the file in the Pictures folder, since that's the logical place to save an image. Figure 7-52. Save the resized image in your Pictures folder. 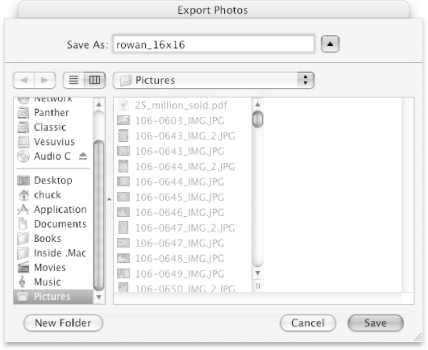
If you look closely, you'll notice that the file was named rowan_16x16 . I named the file this way to remind me that it is only 16 pixels square. As for the file extension, iPhoto will save the image in its original format, since that's the option we selected in the Format menu. In this case, the file will be saved as a JPEG image. -
Select File Import (Shift- -I) from iPhoto's menu bar, navigate to the Pictures folder, and select the image you've just exported, as shown in Figure 7-53, and then click on the Import button. Figure 7-53. Select the image and import it into iPhoto. 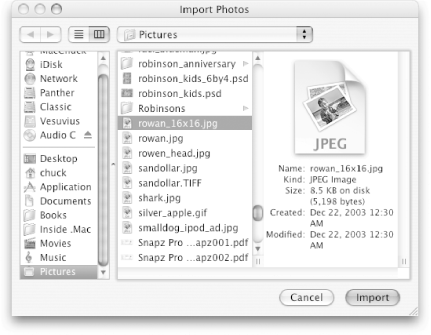
-
In iPhoto, click on the Last Import icon to the left, and then select the image. Because its size is so small, you'll notice that the image is fairly distorted ; don't worry about that right now. -
Go back to the menu bar and select File Export (Shift- -E). -
In the Format pop-up menu, select PNG as the format. Now you may be wondering why we just didn't do this earlier and save all these steps. Well, the answer is because you can't; iPhoto won't let you export a PNG image and resize it at the same time. -
Click on the Export button to bring up a dialog similar to that shown earlier in Figure 7-51. Instead of leaving the file named as rowan_16x16 , I've renamed it as favicon . After clicking on the Export button, iPhoto converts the image to a PNG graphic and saves it as favicon.png in my Pictures folder. -
Quit iPhoto (  -Q). -Q). That's it; you've created and saved your favicon using nothing more than some random image and iPhoto. Best of all, you didn't have to run out and spend $500 on Photoshop just to resize and convert an image. Now let's put that little graphic to work as a favicon for your web pages. 7.12.3 Uploading the Favicon to Your iDisk Now that you've created a PNG graphic to use for your favicon, you need to upload the image file to your iDisk. Just follow along: -
If your iDisk isn't already mounted, open a Finder window and click on the iDisk icon in the Sidebar. -
After the iDisk mounts, switch the Finder window to Column View (View as Columns, or -3), and then click on the Sites folder. -
Open another Finder window by selecting File New Finder Window ( -N), and select the Pictures folder in the Sidebar -
Place the two Finder windows side by side, as shown in Figure 7-54. Figure 7-54. Use two Finder windows to upload the favicon to your iDisk's Sites folder. 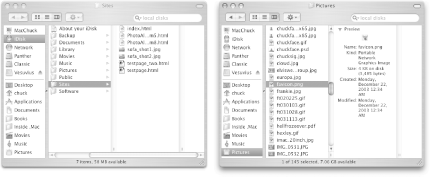
-
Locate and select the favicon.png file in the Pictures folder, and then drag it into the iDisk's Sites folder in the other Finder window. When you let go of the mouse button, the favicon.png file will be copied to your iDisk. -
Close the two Finder windows. Now you're ready to start deploying the favicon throughout your .Mac HomePage. 7.12.4 Creating the HTML Tags for a Favicon Example 7-1 shows the basic HTML code used for creating a test page to see whether favicons can actually be used on .Mac HomePages. The two lines that you'll want to pay attention to are the <link/> tags, which are highlighted in bold . Example 7-1. Basic HTML source code for a page that uses favicons <html> <head> <title>Chuck's .Mac HomePage</title> <link rel="shortcut icon" href="favicon.png"></link> <link rel="icon" href="favicon.png" type="image/png"></link> </title> </head> <body bgcolor="#FFFFFF"> <h2>Just Testing my Favicon</h2> <p> This page is simply here to test whether or not <i>favicons</i> work on .Mac HomePages. </p> </body> </html>
As you can see, there are two <link/> tags that get added to the header section (the area between the <head> and </head> tags) of the HTML file. The first line: <link rel="shortcut icon" href="favicon.png"></link>
tells the web browser that the icon, which is linked in with href="favicon.png " is to be used as a shortcut icon for the web page. If somebody bookmarks your .Mac page, the favicon will show up along with the bookmark in their list of favorite sites. Meanwhile, the second line: <link rel="icon" href="favicon.png" type="image/png"></link>
is the link to the image ( href="favicon.png ") that gets pulled into the location line of the web browser. To see whether this works, I saved the HTML code shown in Example 7-1 and named it as testpage_two.html in my Sites folder. When you load the URL http://homepage.mac.com/chuckdude/testpage_two.html, you will see the page shown in Figure 7-55. Figure 7-55. The favicon worked! 
It worked! As you can see, the very tiny image the dog shows up as the favicon for this page. As mentioned earlier, there's no way to automatically add the tags for the favicon with the HomePage building tools. Unfortunately, you'll have to copy and paste the two <link/> tag lines into the headers of every HTML page of your .Mac HomePage. |