| Once you've finished creating your movie, you can store it on your hard drive, but that uses a lot of disk space and the only place you can then show it is on your computer. Since iMovies are usually large, from several gigabytes on up, you can't pass them around on a Zip disk or even on a CD. To share your movie with others, you need to export the movie in a format that can be shared. iMovie is able to export a movie in a variety of formats, depending on its final intended use. To share your movie 1. | From the File menu, choose "Share…."
| 2. | A sheet drops down from iMovie's title bar and offers six ways to share a movie: Email, HomePage, Videocamera, iDVD, QuickTime, and Bluetooth.
Click one of the icons at the top of the sheet to show the options available for that category. A separate sheet for each category provides its options and settings, including a description of the file that will be exported.
|
The Share settings change according to which icon you select at the top of this drop-down sheet. 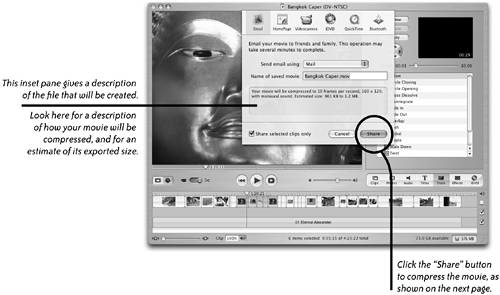 Email option Send a small movie to someone through email. iMovie will compress the movie to 10 frames per second (digital video is usually 30 frames per second) and 160 x 120 pixels with monaural sound (not stereo). Even a short and highly compressed movie makes a large file, so don't send long movies through email unless absolutely necessary. 1. | Open an iMovie project.
| 2. | From the File menu, choose "Share…." Click the "Email" icon.
| 3. | From the "Send email using" pop-up menu, choose the name of the email program you use.
| 4. | Type a name for the exported movie in the "Name of saved movie" text field.
| 5. | Click the "Share" button. The chosen email application opens with the exported movie attached to a new message form (below-right).
| 6. | Type a message, put an address in the "To" field, then send the email.
|
Instead of emailing an entire movie to someone, send a movie made of just a few clips: Before Step 2, above, select several clips in the Timeline. Carry on, and in the Email sharing sheet (below), make sure there is a checkmark in "Share selected clips only." iMovie opens your email application and adds your movie as an attachment, with the movie name in the "Subject" field. 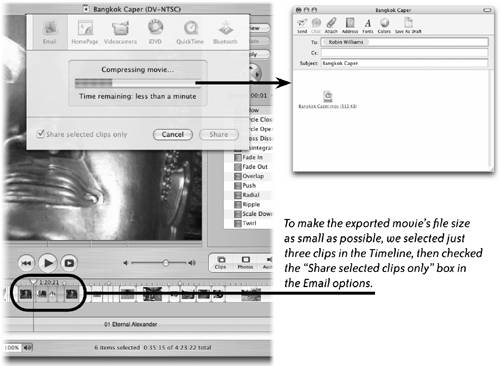
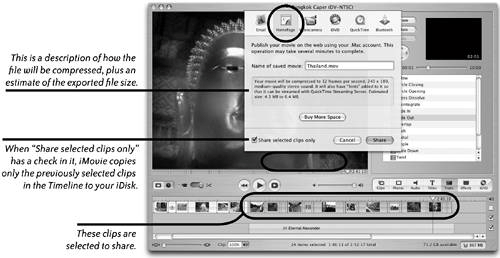
HomePage option If you have a .Mac account, you can share your movie by uploading it to your iDisk (storage space that comes with a .Mac account) and publishing it on the Internet through HomePage. See Chapter 8 to learn all the details. iMovie automatically compresses the movie into a format necessary to play on a QuickTime Streaming Server, the type of server that's used with your .Mac account and HomePage. After compression, iMovie moves the exported movie file to the "Movie" folder on your iDisk. 1. | To conserve storage space on your iDisk, you might want to export only selected clips instead of the whole movie. If so, first select several clips in the Timeline.
| 2. | From the File menu, choose "Share…." Click "Homepage."
| 3. | Type the name you want to use for your exported movie. Don't change the extension (.mov).
| 4. | If your iDisk is almost full, click "Buy More Space" to log in to your .Mac account and purchase more iDisk storage space.
| 5. | If you selected clips earlier, now click "Share selected clips only."
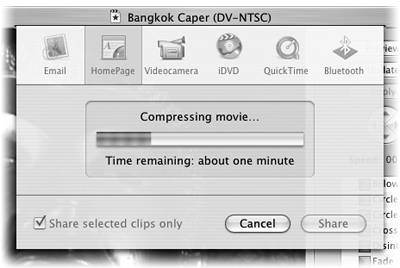
| 6. | Click the "Share" button. A sheet drops down from the title bar that contains a "Compressing movie…" progress bar (left). IMovie compresses the movie, formats it to play on the web, and copies it to your iDisk on Apple's servers.
| 7. | A .Mac login page opens in your web browser. Enter your member name and password, then click the "Enter" button.
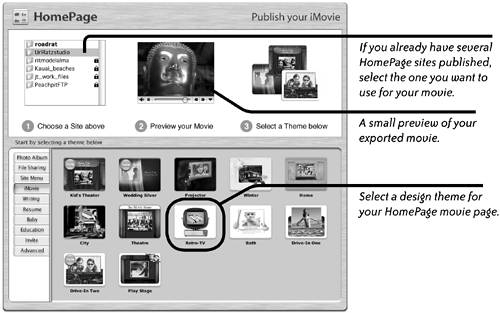
| 8. | A .Mac HomePage window opens as shown below. Choose one of the movie page themes from the templates provided to open an editable HomePage movie page (below-right).
 | 9. | Edit your movie page (shown on the right) by customizing the text in the text fields.
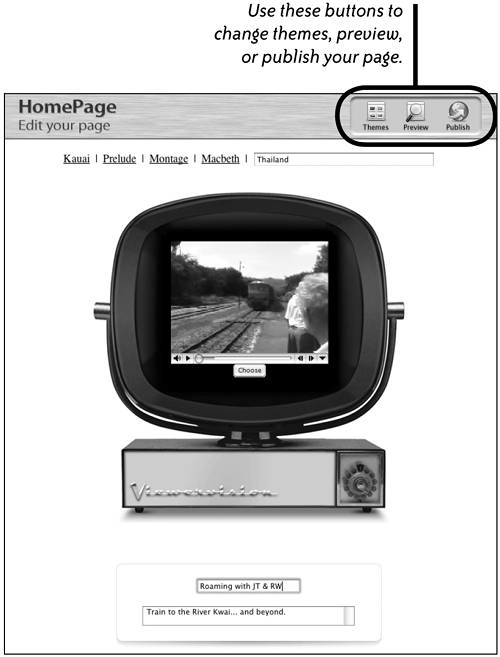 Click the "Preview" button to preview the page. Click the "Preview" button to preview the page.
To change design themes, click the "Themes" button.
When you're satisfied with the page, click the "Publish" button.
|
Videocamera option An easy way to share a movie with others is to copy the edited movie onto a tape in your video camera. You can then connect the camera to a TV and show it, or connect the camera to any computer with video editing software to show it in the preview window (it's the same as previewing raw footage). You can also connect your video camera to a VHS tape recorder and record to a VHS tape. Or you can send the tape from the camera to someone so they can play it on their own TV or computer. They can even show it on their video camera's LCD screen. 1. | Put a blank video tape in your camera, or make sure the tape is positioned at a point where you will not record over other footage.
| 2. | Connect the camera to your computer with a FireWire cable.
| 3. | Put the camera in VTR mode (sometimes called VCR mode) or "Play" mode. Do not use "Record" or "Camera" mode.
| 4. | In the iMovie File menu, choose "Share…."
| 5. | In the "Videocamera" sheet (shown below), set how many seconds of black to record before the movie, and how many seconds of black to record after the movie.
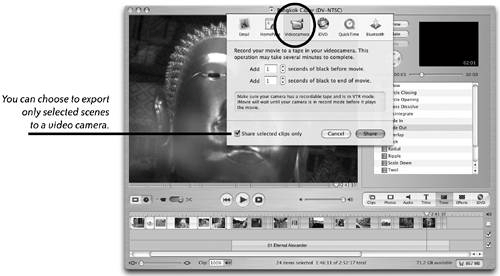 | 6. | Click the "Share" button. If your movie contains scenes that have slow motion, fast motion, or reversed effects, iMovie will tell you that it needs to render those scenes before it can export the movie.
|
Your edited movie is copied to the digital video tape in your camera. iDVD option This sharing option opens your movie in iDVD, ready for any customization you may want to add. iDVD is Apple's amazing software for putting a collection of movies and slideshows onto a DVD that will play on your computer (if you have a supported DVD drive) and will also play on most commercial DVD players. Sharing through iDVD opens the iDVD application and automatically creates a main DVD menu and submenus based on chapter markers that you placed in the movie. If some scenes in your movie need to be rendered because they contain an effect such as slow motion, iMovie alerts you that it needs to render those scenes before you can open the movie in iDVD. Tip This export option immediately starts a DVD project by opening your movie in iDVD. If you want to import your movie into a DVD project later, export the movie as "Full Quality," as explained on pages 172173, then import the full-quality DV file into an iDVD project at some other time. |
1. | Open an iMovie project.
| 2. | From the File menu, choose "Share…."
| 3. | Click the "iDVD" icon.
| 4. | Click the "Share" button.
| 5. | This opens your edited movie in iDVD. Your movie is now part of an iDVD project and is saved in your Documents folder as "your--project-name.dvdproj."
|
See page 165 for more information about creating a DVD project. Chapter 4 provides all the details about iDVD and how to customize your iDVD project. 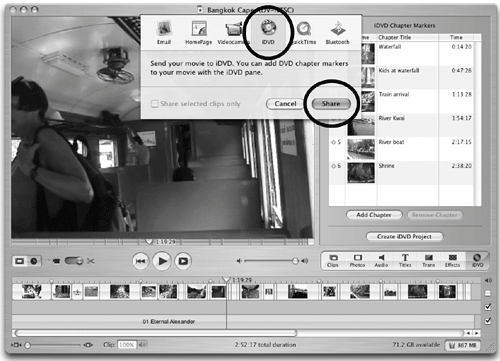 QuickTime option QuickTime is a popular format for multimedia files. QuickTime compresses movies to make their files sizes are manageable for transport and delivery, either on the Internet or other media (such as CDs). QuickTime provides several compression options, depending on how the movie is to be shared. These are the QuickTime compression options in the pop-up menu shown below. 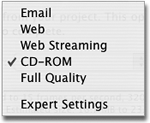
1. | Open an iMovie project.
| 2. | From the File menu, choose "Share…." Click the "iDVD" icon.
| 3. | From the "Compress movie for" pop-up menu (circled below), select one of these compression options:
- Email: This compression option is suitable for sending a small movie to someone through email. It compresses your movie to 10 frames per second, sized to 160 x 120 pixels, with monaural sound.
If your movie is very long, even this highly compressed format will produce a file that's too large for email. A 10-second QuickTime movie with the above setting is around 200 kilobytes. To keep the movie size as small as possible, select several clips from the Timeline before you choose "Share…" from the File menu. Then make sure to click the "Share selected clips only" box in the drop-down sheet. - Web: This option creates a QuickTime movie file that is 12 frames per second, 240 x 180 pixels, with medium-quality stereo sound.
- Web Streaming: Choose this compression setting to create a QuickTime file that uses the same settings as the "Web" option, but also includes "hints" to the file that enable web streaming.
| Web streaming movies do not have to wait for the entire movie to download to your computer before they can play. In fact, streaming movies don't download to your computer at all. Instead, the movie starts playing after a buffer of data is received by your computer, and continues to play until the stream of data ends. |
| Streaming movies work on QuickTime Streaming Servers, such as the HomePage server that's included with a .Mac membership. |
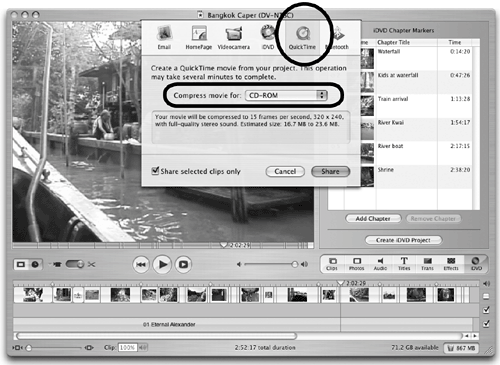 - CD-ROM: This option compresses your movie to half of full quality15 frames per second, 320 x 240 pixels, and full-quality stereo soundideal for copying to another computer or to a CD. The final file size is approximately twice that created by "Web" or "Web Streaming" compression.
When you use the Share options of "Email," "-Home-Page," or "iDVD," the exported file is put in a "Shared Movies" folder that iMovie creates inside the project "package." To open the iMovie package, Control-click on the iMovie project icon, then choose "Show Package Contents." A Finder window opens to display the files and folders of the package. 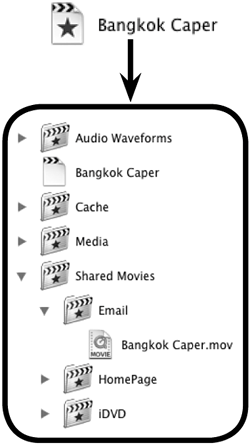
- Full Quality: Choose this compression option to save a QuickTime movie that is full quality30 frames per second, 640 x 480 pixels, and full-quality stereo. The final file size is MANY times larger than the files created with the other compression schemes listed here. A 10-second test movie file compressed as "Web" weighed in at 500 kilobytesand 32.4 MEGAbytes when compressed as "Full Quality."
- Expert Settings: If you've upgraded your QuickTime software to QuickTime Pro, you can use custom export settings that you've set in QuickTime. QuickTime Pro enables you to edit, save, import, and export multimedia files using a large selection of file formats. You can upgrade your copy of QuickTime for $29.99 at www.apple.com/quicktime/upgrade.
|
Bluetooth option If you want to send a QuickTime movie to a Bluetooth-enabled device, such as a PDA or cell phone, choose this option to create a file that is low-quality but very small in file size, making it suitable to copy across the very limited bandwidth provided by Bluetooth devices. Make sure the Bluetooth device contains an application that can display movies. 1. | Use Bluetooth Setup Assistant to set up your Bluetooth device.
| 2. | Open iMovie. If you want to export only selected clips, then select those clips now.
| 3. | From the File menu, choose "Share…." Click "Bluetooth"; see below.
| 4. | Click the "Share" button to compress the movie. If you selected clips, check the box to "Share selected clips only."
| 5. | In the Bluetooth Device window that opens, select a device.
 |
|


 Click the "Preview" button to preview the page.


