Installing Check Point VPN-1FireWall-1 NG AI on Nokia
Installing Check Point VPN-1/FireWall-1 NG AI on Nokia
Check Point s Next Generation with Application Intelligence Enterprise Suite on the Nokia IPSO appliance is a popular combination. Providing a combination of rack-mount appliance hardware, pre- hardened multi-purpose operating system, and the simple web and command-line interface, the IPSO platform currently claims nearly half of all Check Point installations. Nokia provides a web front-end called Voyager (see Figure 2.67) for easy package management and system configuration. Nokia also provides a fast failover mechanism utilizing VRRP and Check Point s state synchronization with an average failover time of just four seconds.
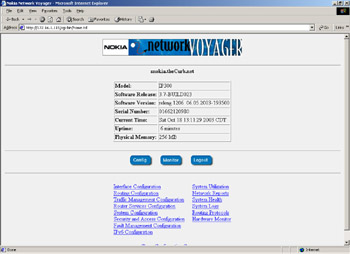
Figure 2.67: Nokia s Voyager GUI
Check Point VPN-1/FireWall-1 NG with Application Intelligence requires Nokia IPSO 3.7 or later for installation (refer to Nokia s Support website for the latest compatible version of the operating system which runs Check Point NG AI). You can either order a Nokia box with Check Point preinstalled , or you can download the installation package from Check Point (with appropriate login ID) and install it yourself. If you need to upgrade your IPSO, you will need to obtain the IPSO image from Nokia s website. It may be necessary to upgrade your boot manager prior to upgrading your IPSO image. Please read all release notes prior to installing new packages or operating system (IPSO) images. It is not recommended to upgrade from 4.1 to NG AI if you have less than 128MB of memory; because this is the minimum memory required to run Check Point NG AI.
Installing the VPN-1/FireWall-1 NG AI Package
Since the Nokia appliance is already hardened, there is very little you need to do to prepare it for firewall installation. You must configure and test networking and DNS, set up the host address assignment through the Voyager GUI, and you may need to upgrade your IPSO and boot manager.
Upgrading IPSO Images
Nokia is actively developing the IPSO operating system and is continually adding new features. Before upgrading your system, you should always check Nokia s website for compatibility matrix of platforms, operating systems, and Check Point software (see Nokia Resolution 11253). The release notes for each IPSO version contain a list of versions of IPSO that are supported upgrade paths. The newimage command will automatically upgrade the boot manager on IP300, IP600, IP500, IP100, and IP700 series appliances. You can download the 3.7 image from https ://support.nokia.com (login required). Once you have the image in /var/admin, you can run newimage to install it. The options for newimage are illustrated in Table 2.2.
| Switch for newimage | Description |
|---|---|
| -k | Enables you to upgrade the IPSO image and keep all currently active packages so they will be started upon reboot. |
| -R | Sets the new image to be used upon the next reboot. |
| -l < path to image> | Tells the newimage command where to find the ipso.tgz file, which contains the new image. |
| -T | Enables you to perform a test boot with the new image. (not supported on the IP440). |
| -I | Sets the newimage command in interactive mode. Use this if you need to ftp the file or use the CD-ROM drive (Platforms with CD-ROM only) to upgrade the IPSO image. |
| -b | Forces upgrade of bootmgr. |
Assuming that you have the ipso.tgz file downloaded to /var/admin, and your system is on, the recommended command to upgrade your IPSO image is as follows :
newimage k R l /var/admin
| Note | The “k option should only be used if the software version you have installed and the one you are running are compatible with the current and new operating system versions. |
After updating the image, reboot your system:
sync; sync; reboot
| Warning | If your IPSO hardware platform is an IP350 or IP380, you can run IPSO 3.5.1 or IPSO 3.7 (or later). Other IPSO versions previous to 3.7 were not compatible with the IP350 and IP380 hardware and when installed, required sending the system to Nokia for a newly formatted hard drive. |
Installing VPN-1/FireWall-1 NG AI
To install the VPN-1/FireWall-1 NG AI package, you must first install the SVN foundation and then the VPN-1/FireWall-1 package. You will need to get the software from Check Point or from a Check Point reseller since Nokia does not provide VPN-1/FireWall-1 packages on their support Web site any longer. The simplest way to install the Check Point software on a Nokia appliance is to download the wrapper (also known as the NG with Application Intelligence bundle). Follow this step-by-step procedure to install the new packages. Of course, you should always read the release notes for the most recent information on installing the Check Point software and any applicable limitations. See Table 2.3 for available arguments to the newpkg command.
| Switch for newpkg | Description |
|---|---|
| -I | Installs the package, but does not activate it. Prompts you for media type, new packages and old packages that you wish to install or upgrade. |
| -s <server> | Specifies the FTP server IP address. |
| -l <username> | Enter the FTP username (you don t need to enter a username if you will be using anonymous FTP). |
| -p <password> | Enter the FTP user s password. |
| -m <CDROM AFTP FTP LOCAL> | Choose your media type; the options are CD-ROM, AFTP,FTP or LOCAL. |
| -d | Prints debug messages. |
| -v | Verbose mode for FTP. |
| -n <new package> package you are installing. | Enter the full pathname to the new |
| -o <old package> | Enter the full pathname of the package you are upgrading from. |
| -S | This sets the newpkg to install the package silently. If you enable silent mode, then you must specify the following arguments: -o, -m, -n and possibly “s and -l, “p if the media type is not LOCAL. |
| -h | Prints the usage for newpkg (help). |
-
Put the installation wrapper package file in /var/admin. The NG with Application Intelligence wrapper file name at the time of release is IPSO_wrapper_R54.tgz.
Note Do not unzip or untar the Nokia packages. When you run the newpkg command, it will do that for you.
-
From the /var/admin directory, type newpkg “i and press Enter . The newpkg installation program will begin, and will ask you where to install the new package as illustrated in Illustration 2.15.
| |
ExternalFW[admin]# newpkg -i Load new package from the following: 1. Install from CD-ROM. 2. Install from anonymous FTP server. 3. Install from FTP server with user and password. 4. Install from local filesystem. 5. Exit new package installation. Choose an installation method (1-5): 4 Enter pathname to the packages [ or 'exit' to exit ]: . Loading Package List Processing package IPSO_wrapper_R54.tgz... Package Description: Check Point SVN Foundation NG with Application Intelligence Would you like to : 1. Install this as a new package 2. Upgrade from an old package 3. Skip this package 4. Exit new package installation Choose (1-4): 1
| |
-
Choose the option for local filesystem number 4 and press Return .
-
When you are asked for the pathname to the package, type a period ( . ) for your current directory (which is /var/admin) and press Enter .
-
The newpkg program will locate any packages in this directory and begin processing them one by one. The Check Point SVN Foundation NG package will be presented to you. Choose 1 to install this as a new package and press Enter .
Once the newpkg program has begun, it will process each package in the current directory until it has run through them all. If a package comes up that is already installed, or if you don t want to install it, then choose option 3 to skip the package and continue on with the others. You should reboot your Nokia appliance after each new Check Point package that you install; do not install them all simultaneously .
-
When the installation of SVN is finished, exit the newpkg installation and reboot with the command sync; sync; reboot .
-
When the system boots up, log in to Voyager and enable the SVN package.
-
Click Manage Installed Packages.
-
Turn on the new NG SVN package.
-
Click Apply Save .
-
-
When done in Voyager, type newpkg “i once again and press Enter from the /var/admin directory.
-
Choose the option for localfile system number 4 and press Enter .
-
Type a period ( . ) for your current directory (/var/admin) and press Enter .
-
If you have an earlier version of VPN-1/FireWall-1 installed, then choose to number 1 to install this as a new package. If an earlier version of Check Point is currently enabled, select number 2 to upgrade this package from the existing, enabled version. If upgrading then:
-
Choose the package you are upgrading from the available choices.
-
Verify that you want to continue and that the correct packages are being processed by pressing Enter .
-
-
When the installation is complete, exit the newpkg installation and reboot by typing: sync; sync; reboot .
Configuring VPN-1/FireWall-1 NG AI on Nokia
If VPN-1/FireWall-1 NG is installed on your Nokia appliance, but it hasn t been configured, then you must run cpconfig before attempting to start the new package. If you just received your Nokia fresh from the factory NG AI is probably pre-installed installed, but you will still need to run cpconfig before the package will run properly. This is because you must accept the license agreement, choose which components you want to run (management and/or enforcement module), and configure licenses, administrators, GUI clients , etc. Your configuration options are the same as your options on the Solaris platform. See Figure 2.68 for the output of cpconfig on an NG FP1 Nokia appliance.
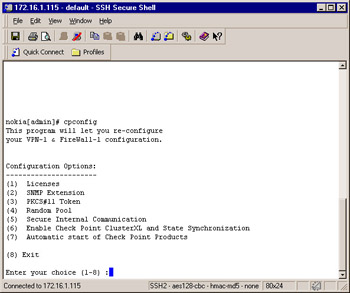
Figure 2.68: cpconfig on Nokia
After the NG package is installed on your system, you must run cpconfig to configure the package. Follow these steps to configure and activate your VPN-1/FireWall-1 NG package.
-
Run cpconfig and go through each screen. It is highly recommended that you do not enter CTRL-C at any time during the initial cpconfig configuration screens.
-
When finished with cpconfig, log in to Voyager and enable your NG package (see Figure 2.69).
-
Click Manage Installed Packages .
-
Turn off the old FireWall-1 package if enabled.
-
Turn on the new NG AI package.
-
Click Apply Save .
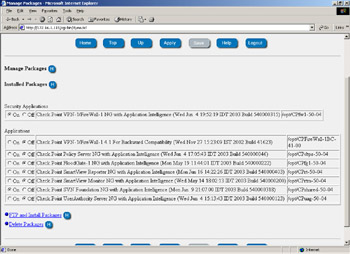
Figure 2.69: Managing Installed Packages
The Nokia package management makes it simple to back out of an upgrade. As you can see, it is easy to toggle back and forth between installed packages. You can also switch back and forth between IPSO images from Voyager s Manage IPSO Images page. After enabling or disabling a package or IPSO image, you must reboot your firewall. It is also very important to ensure that you do not leave two packages which would conflict (i.e. CPShared NG FP3 and CPShared NG AI) enabled at the same time.
Note Remember to always click Apply and then Save when making changes in the Voyager GUI. If you don t save your changes, then they will not be retained following a reboot.
-
-
After making changes to the FW-1 packages, then you must reboot the system again. You can either choose to restart the system from the Voyager GUI, or exit Voyager and type sync; sync; reboot from the command line to restart the box.