Lesson 4:Archiving and Recovering Certificates
|
| < Day Day Up > |
|
If your PKI deployment is successful, users and applications will use certificates to protect their private data. Accessing that data, of course, requires the users’ private keys. If a user loses access to the private key, or if the user leaves the organization, you will develop a new appreciation for the power of encryption—the data will be inaccessible.
Fortunately, Windows Server 2003 Certificate Services includes the ability to back up private keys and recover lost keys. By using key archival and recovery, you can archive and recover the private key portion of a key pair in the event that a user loses a private key or in the event that an administrator must assume the role of a user to access or recover data.
After this lesson, you will be able to
-
Determine the need for key recovery.
-
Select appropriate methods to recover keys.
-
Export and import keys.
-
Perform key archival and recovery.
-
Describe how risks associated with key archival are mitigated.
Estimated lesson time: 45 minutes
Overview of Key Recovery
Windows clients store certificates locally on the computer or hardware device that requested the certificate, or, in the case of a user, on the computer or device that the user used to request the certificate. The certificates are stored in a location known as a certificate store. There are separate stores known as the machine store, used by the computer, and the user store (also known as My store), used by the currently logged on user. A certificate store will often contain numerous certificates, possibly issued from a number of different certification authorities.
Users will lose their keys occasionally. Often, users lose their keys because of one of the following reasons:
-
The user profile is deleted. When a CSP encrypts and stores a private key, the encrypted private key is stored in the local file system and registry in the user profile folder. Deleting the profile results in the loss of the private key.
-
The operating system is reinstalled. When you reinstall the operating system, the previous installation’s user profiles are lost, including the private key.
-
The disk is corrupted. If the hard disk becomes corrupted and the user profile is unavailable, the private key can be lost.
-
The computer is stolen. If a user’s computer is stolen, the user profile containing the private key is also lost.
There are certain PKI tasks that rely on the user having access to a specific certificate. For example, if you encrypt a file by using EFS and then your certificates become unavailable, you must recover the lost certificate to gain access to your file. Creating a new certificate will not allow you to unencrypt the file.
To prevent the potential loss of data that can result from a lost key, Windows Server 2003 provides two methods for backing up and recovering private keys: exporting and importing, and key archival and recovery. Keys can be exported and imported by individual users, without the use of Active Directory. However, exporting and importing keys does not scale well to the volume of keys an enterprise must maintain.
Key archival and recovery allows key recovery agents (KRAs) to retrieve an original certificate, a private key, and a public key from a database stored on the CA. This process is implemented in two phases—key archival and key recovery—and is also referred to as key escrow. By using key archival and recovery, you can archive and recover the private key portion of a key pair in the event that a user loses a private key.
Exporting Keys
The simplest method for backing up a key pair is to manually export the key, protect it with a password, and store the export media in a secure location. A PKI uses several formats for importing and exporting certificates, certificate chains, and private keys.
When a user exports a certificate by using the Certificates console, the Certification Authority console, Certutil.exe, or Internet Explorer, the PKCS #7 and PKCS #12 export formats are available. The PKCS #7 format, also known as the Cryptographic Message Syntax Standard, should only be used to export certificates without the private key and for certificate chains for a CA. PKCS #7 is not useful for backing up a private key. Instead, use the PKCS #12 format, also known as the Personal Information Exchange Syntax Standard. Because the private key is included in the export, the PKCS #12 file requires that a password be used to protect the private key. An exceptionally strong password should be chosen to protect the private key.
| Note | You can also export keys in the Exchange Protection File (EPF) file format from the Outlook 2000 or Outlook 2002 client. |
You can export a certificate by using the Certificates snap-in, the Certification Authority snap-in, or Certutil.exe. You can also use other applications, such as Outlook or Internet Explorer, to export keys for Windows NT 4.0 and earlier operating systems that do not have a snap-in. When you export a certificate by using any of the above utilities, you must enable the certificate template to allow the private key to be exported by selecting the Allow Private Key To Be Exported check box on the certificate template.
The method you should use to export a certificate is dictated by the certificate template upon which the certificate is based. For example, if the certificate contains an application policy for secure e-mail or an extended key usage Object Identifier (OID), you can use either Outlook or the Certificates snap-in. If the certificate does not contain the extended key usage OID, you must use the Certificates snap-in.
Many security experts debate the issue of exporting private keys. For some, the very fact that you can export a private key is considered a breach of security that weakens trust in the entire PKI system. Others, including myself, argue that you must balance manageability with security. We argue that being able to export a private key can save time and money by enabling the user to move to a new computer or recover files if a private key is lost or corrupt.
Ultimately the choice between security and manageability is yours. However, always remember that encryption is only as secure as the user’s private key.
When you export a certificate and the associated keys, you can choose from the following additional options:
-
Include all certificates in the certification path if possible. This option includes the entire certificate chain of the exported certificate. It allows the import to include all certificates in the certificate chain up to the root certificate. This selection will allow the entire certificate chain to be present on the computer where the certificate is imported, thereby eliminating the possible need to add each individual certificate in the chain. Use this option when exporting a certificate that will be imported on a computer that cannot communicate with the issuing CA, intermediate CAs, or the root CA.
-
Enable strong protection. This option will store the exported PKCS #12 file with 128-bit encryption. You should still provide a strong password to protect the data. This option requires Internet Explorer 5.0 and Windows NT 4.0 Service Pack 4 or later. You should enable this option as an added security measure to protect the certificate.
-
Delete the private key if the export is successful. This option deletes the private key that is associated with the certificate from the certificate store. Delete the private key only if you are moving the key to another computer.
After you have successfully exported the private key with a strong password, store the exported file in a physically secure location that cannot be accessed across the network. For example, export the file to a CD-ROM and then store the CD-ROM in a safe location.
Key Archival
Key archival must be performed when the certificate is issued to the user. The version 2 certificate template’s configuration, as shown in Figure 7.17, determines whether the CA will archive the key. Version 1 certificate templates cannot be automatically archived by this process.
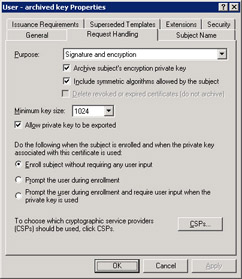
Figure 7.17: Specifying key archival
When an administrator enables key archival by using a version 2 certificate template, the CA encrypts and stores that private key in its database. The key pair is actually generated by the client, and therefore the private key must be transferred back to the CA for archival. The client encrypts the private key with the CA’s public key to ensure that the private key is not compromised during transmission. The CA then decrypts and validates the private key, re-encrypts the key by using a random Triple-Data Encryption Standard (3DES) symmetric key, and archives the encrypted private key. The random symmetric key is then encrypted with the public key or keys of the KRAs and stored along with the encrypted private key.
An important aspect of the CA’s archival and recovery attributes is that the CA does not hold any information that can be used to decrypt the archived private keys. Decrypting archived private keys requires one of the KRAs’ private keys, which is stored in each KRA user’s profile. Only public key certificates are used to encrypt the keys needed to gain access to the archived private keys. This ensures that an attacker who compromises the CA cannot compromise the security of the archived keys.
To successfully implement a key archival and recovery strategy in your organization, you must first ensure that the CA meets the following requirements:
-
All certificates that require archival are based on version 2 certificate templates.
-
The issuing CAs are running Windows Server 2003.
-
All clients are using Windows XP or Windows Server 2003.
-
You are using enterprise CAs and the Windows Server 2003 schema extensions have been applied to the forest.
Off the Record You can run an enterprise CA running Windows Server 2003 in a Windows 2000 forest without modifying the schema; however, you will not be able to use version 2 certificate templates. When you run adprep.exe /forestprep in a Windows 2000 forest, the version 2 templates will be installed the next time you open the certificate templates administration tool.
Additionally, the certificate templates for the certificates you want to archive must be configured for key archival. To configure the template, go to the Request Handling tab on the template’s properties and select the Archive Subject’s Encryption Private Key check box. Exercise 3 in this lesson prepares the Certificate Services infrastructure for archiving certificates based on a new template.
Key Recovery
After a key is archived, a key recovery agent can use key recovery to recover a corrupted or lost key. At a high level, the certificate manager retrieves the encrypted file that contains the certificate and private key from the CA database. A KRA then decrypts the private key from the encrypted file and returns the certificate and private key to the user.
At a more detailed level, key recovery performs the following process:
-
A certificate manager for the CA that issued the certificate determines the serial number of the certificate. You probably will not have the serial number memorized, so you will need to use the Certificates snap-in to find the certificate relating to the user’s private key and retrieve the serial number.
-
A certificate manager extracts the encrypted private key and certificate from the CA database by using the Certutil.exe command-line tool. The export format of the private key and certificate is a PKCS #7 file. The file is encrypted by means of the KRA’s public key. For example, if the certificate manager identified the certificate’s serial number as 11593dbc000000000006 in step 1, the following command would recover the key to a file named Recovered.pfx:
certutil –getkey 11593dbc000000000006 recovered.pfx
Note The encrypted PKCS #7 files in the database, referred to as blobs, contain the issuer name and serial number of each Key Recovery Agent certificate for KRA identification purposes during recovery.
-
The certificate manager transfers the PKCS #7 file to the KRA. Because the PKCS #7 file is encrypted so that only the defined KRA can recover the encrypted certificate and private key, no additional security is required for the transfer.
-
The KRA uses the Certutil –RecoverKey command to recover the private key and certificate from the encrypted PKCS #7 file. This step should be performed at a secure workstation, also known as a recovery workstation. During the recovery process, the KRA will assign a password that the user must provide when importing the certificate. The private key and certificate are stored in an encrypted PKCS #12 file.
-
The KRA then supplies the PKCS #12 file to the user, who provides the KRA- assigned password and imports the certificate and private key into the certificate store by using the Certificates snap-in.
Note If your organization is willing to trust a single person with a great deal of power, you can perform the roles of both the certificate manager and the KRA.
An easier way to perform key recovery is to use the Key Recovery Tool (krt.exe) from the Windows Server 2003 Resource Kit Tools. This graphical tool allows an administrator to:
-
Search the CA database for archived keys.
-
Display the KRA for a specific archived key.
-
Retrieve the encrypted blob.
-
Decrypt the blob and set a password on the outputted .pfx file.
You can download the Windows Server 2003 Resource Kit Tools from http://www.microsoft.com/.
The private keys of a KRA can be misused to steal other users’ private keys from an archive. Guard them carefully by using a dedicated offline computer to store the KRA user profile, and use that computer for all key recovery tasks. You should also remove KRA certificates and private keys from the KRA’s user profile. By exporting the keys from the KRA’s user profile and importing them only when needed for recovery, you reduce the likelihood of someone misusing the recovery capabilities. Finally, develop a secure method for transporting the recovered private keys to the original owner, and delete the PKCS #12 file to prevent the certificate and private key from being imported in the future.
You must be conscious of the potential for key recovery to be misused. Many companies do not entrust this role to even network administrators, because it would give them the ability to decrypt files created by individuals with higher security clearance, such as managers. Many companies use a dedicated user account as the data recovery agent. This account might require a smart card for logon, or it might even be disabled with the password kept in a secure location, such as a safe. Some companies even break the password in half or into thirds, and entrust two or three different individuals with knowledge of only part of the password. This strategy ensures that no one individual can activate the data recovery agent.
Beyond requiring collusion, you can reduce the likelihood for abuse of the recovery process by revoking the certificate that is associated with the lost private key immediately after you recover the data. For example, if a laptop computer is stolen and the user has encrypted files on a network share, you should recover the private key, decrypt the files, and then revoke the certificate. Then issue the user a new certificate so that the user can re-encrypt the files. After you revoke the certificate, the key pair cannot be used for encryption or digital signing purposes. The private key can still be used to decrypt previously encrypted files, but further attempts to encrypt files by using the public key will fail during the certificate validation process.
Practice: Exporting and Recovering Keys
In this practice, you will create several certificates by using various methods. You will then revoke a certificate and publish a CRL.
Exercise 1: Exporting Keys
In this exercise, you will export a certificate so that you can recover it later.
-
Log on to the cohowinery.com domain on Computer1 using the Administrator account.
-
Click Start, and then click Run.
-
Type mmc.exe and then click OK.
-
In the empty MMC console, on the File menu, click Add/Remove Snap-In.
-
In the Add/Remove Snap-In dialog box, click Add.
-
In the Add Standalone Snap-In dialog box, under Available Standalone Snap-Ins, click Certificates, and then click Add.
-
In the Certificates dialog box, click My User Account, click Finish, and then click Close to close the Add Standalone Snap-In dialog box.
-
Expand Certificates, and then expand Personal. Click Certificates. Right-click the last certificate, click All Tasks, and then click Export.
-
On the Welcome To The Certificate Export Wizard page, click Next.
-
On the Export Private Key page, click Yes, Export The Private Key. Click Next.
-
On the Export File Format page, select the Include All Certificates In The Certification Path If Possible check box, ensure that Enable Strong Protection is selected, and then click Next.
-
On the Password page, type a complex password in the Password and Confirm Password boxes. Click Next.
-
On the File To Export page, type c:\mycert.pfx and then click Next.
Tip Personal Information Exchange (PFX) is the file format used for exported certificates. It is also known as PKCS #12.
-
The Completing The Certificate Export Wizard page appears, as shown in Figure 7.18. Click Finish, and then, in the Certificate Export Wizard dialog box, click OK to acknowledge that the export was successful.
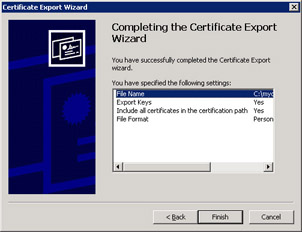
Figure 7.18: Exporting a certificate -
Remain logged on to Computer1, and leave the Certificates snap-in open. You will use the console in Exercise 2.
Exercise 2: Recovering Exported Keys
In this exercise, you will delete a certificate and then recover it.
-
In the Certificates snap-in, expand Certificates, and then expand Personal. Click Certificates. Right-click the last certificate and then click Delete.
-
When prompted, click Yes.
-
Right-click Certificates, click All Tasks, and then click Import.
-
On the Welcome To The Certificate Import Wizard page, click Next.
-
In the File Name box, type c:\mycert.pfx. Click Next.
-
In the Password box, type the complex password you specified in Exercise 1. Click Next.
-
On the Certificate Store page, click Automatically Select The Certificate Store Based On The Type Of Certificate, as shown in Figure 7.19. Click Next.
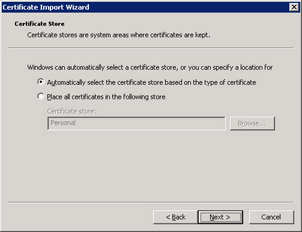
Figure 7.19: Importing a certificate -
Click Finish. When prompted, click OK.
-
Press F5 to refresh the display of personal certificates. The certificate has been restored.
Exercise 3: Configuring Key Archival
In this exercise, you will create a user account for key recovery, enable key archival on Computer1, and then create a certificate template that automatically archives the private key. In the first procedure, you will create a user account to act as the KRA, and then grant the user the permissions necessary to access the certificate templates.
-
On Computer1, log on to the cohowinery.com domain using the Administrator account.
-
Open Active Directory Users And Computers. Create a new user with the name KeyRecoveryUser. Accept the defaults for the other settings for the user account, and close Active Directory Users And Computers.
-
Open Active Directory Sites And Services. Click Active Directory Sites And Services, and, on the View menu, click Show Services Node.
-
Expand Services, expand Public Key Services, and then click Certificate Templates. Right-click KeyRecoveryAgent, and then click Properties.
Note This exercise uses Active Directory Sites And Services to access certificate templates simply to familiarize you with the tool. It provides the same functionality that you could get by loading the Certificate Templates snap-in directly.
-
Click the Security tab. Allow the KeyRecoveryUser the Read and Enroll permissions, and then click OK.
Just like any user, the KRA must have Read and Enroll permissions to the Key Recovery Agent certificate template in order to be issued a certificate.
Caution Do not automatically enroll users for KRA certificates because this should be a highly restricted certificate. Using autoenrollment for this certificate might cause confusion for CA Administrators when automatic enrollment is unintentionally initiated, and this could result in additional KRA certificates.
-
Close Active Directory Sites And Services.
At this point, you have created a user to act as the KRA and granted that user the necessary rights to the certificate templates. In the next procedure, you will configure the Key Recovery Agent certificate template so that it can be issued, and then you will request a certificate based on that template.
-
Open the Certification Authority console. Expand Computer1, and then right-click the Certificate Templates node. Click New, and then click Certificate Template To Issue.
-
In the Enable Certificate Templates dialog box, click Key Recovery Agent, and then click OK.
-
Leave the Certification Authority console open, and open Internet Explorer. In the address bar, type http://computer1/certsrv. Click Go.
-
In the Connect To Computer1.Cohowinery.Com Authentication dialog box, type the user name KeyRecoveryUser and the password you created for the account earlier in this exercise. If Internet Explorer notifies you that content is being blocked, click the Add button and add http://computer1 to the trusted sites list.
-
On the Welcome page of Certificate Services, click Request A Certificate.
-
On the Request A Certificate Web page, click Advanced Certificate Request.
-
On the Advanced Certificate Request page, click Create And Submit A Request To This CA.
-
In the Certificate Template box, click Key Recovery Agent, and then click Submit.
-
In the Potential Scripting Violation warning box, click Yes. Leave Internet Explorer open.
Because of the high sensitivity of this certificate, the KRA certificate requires CA manager approval. In the following procedure, you will approve the pending KRA certificate and then install it.
-
Return to the Certification Authority console.
-
Expand Computer1, and then click the Pending Requests node. Right-click the pending KRA certificate, click All Tasks, and then click Issue.
-
Leave the Certification Authority console, and return to Internet Explorer. In the address bar, type http://computer1/certsrv. Click Go.
Note To perform the above steps, you must use the same computer that was used to generate the request. This is because certificate pending information is stored as a browser cookie.
-
On the Welcome page, select View The Status Of A Pending Certificate Request.
-
On the View The Status Of A Pending Certificate Request page, click Key Recovery Agent Certificate.
-
On the Certificate Issued page, click Install This Certificate.
-
In the Potential Scripting Violation warning box, click Yes.
-
Close Internet Explorer.
The KRA is almost ready. In the final steps of this process, you will configure Certificate Services to use the newly configured KRA certificate, and then create a new certificate template that is configured for key archival.
-
Return to the Certification Authority console.
-
Right-click Computer1, and then click Properties.
-
On the Recovery Agents tab, click Archive The Key, and then click Add.
-
In the Key Recovery Agent Selection dialog box, select the KRA certificate as shown in Figure 7.20, and then click OK.
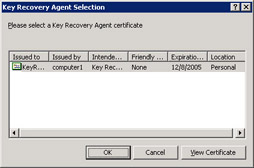
Figure 7.20: Key Recovery Agent Selection dialog box -
On the Recovery Agents page, click Apply, and then click Yes to restart Certificate Services.
Notice that the status of the certificate is now Valid.
-
Click OK.
-
In the Certification Authority snap-in, right-click the Certificate Template node, and then click Manage.
-
In the Certificate Templates console, right-click the User certificate template, and then click Duplicate Template.
-
Click the General tab and then type User–Archived Key in the Template Display Name box.
-
Click the Request Handling tab, select the Archive Subject’s Encryption Private Key check box, and then click OK.
-
Close the Certificate Template console, and open the Certification Authority console.
-
Right-click the Certificate Templates node, click New, and then click Certificate Template To Issue.
-
Click the User–Archived Key template, and then click OK.
All keys associated with certificates issued by using the User–Archived Key certificate template will now be encrypted with the KRA’s digital certificate and stored in the CA database. If users lose the private key associated with this certificate, the KRA now has the ability to retrieve their keys from the CA database.
Lesson Review
The following questions are intended to reinforce key information presented in this lesson. If you are unable to answer a question, review the lesson materials and try the question again. You can find answers to the questions in the “Questions and Answers” section at the end of this chapter.
-
The security policy of your organization requires that you implement role separation to ensure the separation of duties in your PKI management strategy. Your organization decides to implement EFS file encryption to protect high-value documents that are stored on network shares. To protect the EFS-encrypted documents, you plan to archive the EFS encryption private keys on the issuing CA. How does role separation secure the key recovery process in the event of a lost EFS encryption key?
-
Role separation enables the certificate manager to access the PKCS #7 blob in the CA database and enables the KRA to recover the private key.
-
Role separation enables the KRA to access the PKCS #7 blob in the CA database and enables the certificate manager to recover the private key.
-
Role separation enables the local administrator to delegate the key recovery process to non-administrators.
-
Role separation does not add security to the key recovery process.
-
-
You are designated as a certificate manager for the CA that enables private key archival in your CA hierarchy. One of your roles is to determine the KRA for each certificate that has an archived private key. What can you use to determine the KRA for each private key that is archived in the CA database? (Choose all that apply.)
-
Use certutil –recoverkey to determine the KRA.
-
Use certutil –getkey to determine the KRA.
-
Use the Certification Authority MMC console to determine the KRA.
-
Use the Certificate MMC console to determine the KRA.
-
Use the Key Recovery Tool to determine the KRA.
-
Lesson Summary
-
If a user loses access to a private key, the user can lose important data. Specifically, EFS-encrypted files will be inaccessible.
-
There are two ways to back up and restore private keys: exporting and importing, and key archival and recovery.
-
Key archival and recovery can scale to meet enterprise requirements. However, it requires version 2 certificates, enterprise CAs, and Active Directory.
-
You can use either the Certutil.exe command-line utility, included with Windows Server 2003, or the Key Recovery Tool, included with the Windows Server 2003 Resource Kit Tools, to perform key recovery.
|
| < Day Day Up > |
|
EAN: 2147483647
Pages: 217