Lesson 3: Deploying and Revoking Certificates
|
| < Day Day Up > |
|
Before you can use the autoenrollment capability of version 2 certificate templates, you will need to enable automatic certificate enrollment for your environment. However, not all certificate management issues can be automated. To maintain a PKI, you will still need to be able to manually issue certificates. Additionally, you will need to revoke certificates when computers are retired, when employees leave, or when security compromises occur. Revoking certificates, and publishing the certificate revocation lists (CRLs), is an important but complicated process.
After this lesson, you will be able to
-
Select an appropriate certificate enrollment method.
-
Perform manual certificate enrollment.
-
Enable autoenrollment of certificates.
-
Revoke a certificate.
Estimated lesson time: 45 minutes
Certificate Enrollment Process
Certificate enrollment is the process of requesting and installing certificates for a user, computer, or service. You, as an administrator, define the policies and processes of your CA. Although your options might be restricted by network connectivity or by the use of a standalone CA, the certificate enrollment process involves the same steps at a high level, and occurs as follows:
-
When a user generates a request for a new certificate, the operating system passes the request information to a Cryptographic Service Provider (CSP) that is installed on the user’s computer.
-
The CSP generates the private key and the public key—referred to as a key pair— for the certificate request. If the CSP is software based, it generates the key pair on the computer on which the request was performed. If the CSP is hardware based, such as a smart card CSP, the CSP instructs the hardware device to generate the key pair.
-
The public key is sent to the CA, along with the certificate requester information. The CSP stores the private key in a secure location. A software CSP encrypts and secures the private key by using the Data Protection API (DPAPI) in the user’s profile. A smart card CSP stores the private key on a smart card, which controls access to the key.
-
The CA then either allows or denies the request. If the request is successful, the CA creates and signs the certificate.
-
Finally, the CA issues the completed certificate to the requester, who installs the certificate on the required store on the computer or hardware device.
Certificate Enrollment Methods
A Windows Server 2003 CA provides several methods for certificate enrollment. Your choice of enrollment method for issuing certificates will be dictated by the type of CA that you are requesting the certificate from and whether the client and CA can communicate across a network. For example, a standalone CA does not have the ability to automatically issue a certificate; therefore, autoenrollment is not an option. Additionally, a computer that is not connected to the network cannot automatically enroll for a certificate because autoenrollment requires the client to communicate directly to the enterprise CA. In these circumstances, all certificates will have to be manually submitted by the end user.
When requesting certificates from a standalone CA, you can request certificates by using the Web enrollment pages, the Certificates snap-in, or the Certreq.exe command- line utility. Web-based enrollment is by far the easiest and most intuitive method for end users to enroll for certificates. If users have the ability to use the Certificates snap- in, they have the option of using the console to submit certificate requests directly to the CA. This method will require end users to load and configure a Microsoft Management Console (MMC) snap-in—hardly a user-friendly process. The final method for certificate enrollment is to use the Certreq.exe command directly from the command line. Certreq.exe is primarily used for scripting certificate tasks that cannot be accomplished by using Group Policy settings. Although it can be used to request certificates, it is not intended to be used by end users.
When you use an enterprise CA for certificate enrollment, you can configure enrollment by using the Web enrollment pages, the Certificates snap-in, autoenrollment of certificates by means of Group Policy, or the Certreq.exe command-line utility. The most important advantage of using an enterprise CA with Web enrollment, MMC snap-in, or the command-line utility is the ability of the CA to automatically issue the certificate without a CA administrator approving the certificate. You control whether certificates are autoenrolled or must be manually approved by granting the Autoenroll permission on the certificate template for users and groups that should receive a certificate.
For the ultimate in automation, use Group Policy to cause clients to automatically enroll without prompting the user. There is an important restriction, however. Although computers running Windows 2000 can participate in autoenrollment for computer certificates deployed by means of the Automatic Certificate Request Settings Group Policy setting, autoenrollment of user certificates is not possible for clients running Windows 2000.
| Planning | When Windows XP and Windows Server 2003 perform autoenrollment, there is a short delay between the time when a user logs on and the time when autoenrollment starts. This delay allows services to start and the user to finish logging on. |
In contrast, Windows XP and Windows Server 2003 support autoenrollment for both user and computer certificates by means of Autoenrollment Settings policies and version 2 certificate templates. This solution reduces the number of certificates issued by combining certificate purposes into fewer certificates. It also reduces administration and end user interaction by using autoenrollment. Remember that autoenrollment settings in Group Policy require the use of version 2 certificate templates.
Manual enrollment
If you have client computers running operating systems that are earlier than Windows 2000, you must manually enroll these clients for certificates because the client operating systems do not support Group Policy, and therefore cannot take advantage of autoenrollment. As discussed in the previous section, you can manually enroll for certificates by using a Web-based interface, the Certificates snap-in, or the Certreq.exe utility.
To manually enroll for certificates by using a Web-based interface, ensure that the CA is hosted on a server running Windows Server 2003 Certificate Services that has IIS 6.0 installed. The Web Enrollment application is installed when Certificate Services is installed. It allows users to perform various tasks that are related to requesting certificates from both standalone and enterprise CAs. The Web Enrollment Web site is located at http://ServerName/certsrv.
| Security Alert | By default, SSL is not enabled on the Web-based interface. For increased security, enable SSL on the certsrv virtual directory using a certificate that is trusted by all clients, such as a certificate issued by a public CA. |
You can also enroll for certificates by using the Certificate Request Wizard in the Certificates snap-in to request certificates from a computer running Windows Server 2003 that is configured as an enterprise CA. The Certificates snap-in displays the active certificates and other PKI client properties, such as trusted root CAs and existing certificate trust lists. As the administrator of a computer, you can manage certificates that are issued to users, computers, and services. As a user without administrative privileges, you can manage certificates only for your user account.
| See Also | For more information on how to obtain and install an SSL certificate see http://msdn.microsoft.com/msdnmag/issues/01/04/ssl/. |
You can use the command-line program Certreq.exe to submit, retrieve, and accept certificate requests. Because it is a command-line program, you have the ability to script the certificate enrollment process. Using Certreq.exe with its primary switches will allow you to perform some common certificate-related tasks. Use the certreq –submit command to submit a precreated request file to a CA. Use the certreq –retrieve command to retrieve a certificate from a CA. Use the certreq –accept command to accept and install certificates from a new request to a CA.
Automatic enrollment
Autoenrollment enables organizations to automatically deploy certificates to both users and computers. The autoenrollment feature allows you to centrally manage all aspects of the certificate lifecycle, including certificate enrollment, certificate renewal, and the modification and superseding of certificates.
Autoenrollment of user certificates provides a quick and simple way to issue certificates to users. It also enables faster deployment of PKI applications, such as smart card logon, EFS, SSL, and Signed Multipurpose Internet Mail Extensions (S/MIME), within an Active Directory environment by eliminating the need for interaction with the end user.
| Exam Tip | For the exam, know that using autoenrollment minimizes the high cost of PKI deployments and reduces the total cost of ownership for a PKI implementation. |
In a Windows Server 2003 PKI, there are two methods of enabling autoenrollment of certificates: Automatic Certificate Request Settings and Autoenrollment Settings. Automatic Certificate Request Settings is a Group Policy setting that enables the deployment of version 1 certificates to computers running Windows 2000, Windows XP, and Windows Server 2003. This type of autoenrollment can be used only to deploy computer certificates, and it occurs each time the computer starts or Group Policy is refreshed. It is most commonly used to deploy certificates to be used for encrypted IPSec connections. This Group Policy setting is located under the Computer Configuration/Windows Settings/Security Settings/Public Key Policies/Automatic Certificate Request Settings node in the Group Policy Object Editor snap-in.
Autoenrollment Settings are based on a combination of Group Policy settings and version 2 certificate templates. This combination allows the client computer running Windows XP Professional or Windows Server 2003 to enroll user or computer certificates automatically when the user logs on. For computer certificates, this Group Policy setting is located under the Computer Configuration/Windows Settings/Security Settings/ Public Key Policies node in the Group Policy console. For user certificates, the Group Policy setting is in User Configuration/Windows Settings/Security Settings/Public Key Policies. By default, both user and computer autoenrollment is enabled.
| Exam Tip | Remember that the Automatic Certificate Request Settings Group Policy setting does not apply to users. It applies only to computers. Because Windows 2000 cannot use Autoenrollment Settings, Windows 2000 can only autoenroll in computer certificates. |
Some types of certificates require user interaction to be enrolled. For example, smart card certificates require the user to insert the smart card before the certificate can be generated. In these cases, you can still use autoenrollment by configuring the version 2 certificate template to prompt the user during enrollment. From the certificate’s properties dialog box, click the Request Handling tab and then select either Prompt The User During Enrollment or Prompt The User During Enrollment And Require User Input When The Private Key Is Used. When users are autoenrolled, a pop-up window (like those used in update notifications) will prompt the user that interaction is required.
| Caution | Do not configure computer certificates to prompt the user—it will cause autoenrollment to fail. |
Revoking Certificates
You might occasionally need to revoke a certificate because a user has left your organization, because you have decommissioned a computer, or because a private key has been compromised. There are two ways you can revoke certificates: by using the Certification Authority snap-in, and by using the Certutil.exe command-line program.
To revoke a certificate by using the Certification Authority snap-in, select the Issued Certificates node. Then, in the right pane, right-click the certificate you want to revoke, click All Tasks, and then click Revoke Certificate. You will then be prompted to choose the reason for revoking the certificate, which will be included in the CRL. You can choose from the following self-explanatory reason codes:
-
Unspecified
-
Key Compromise
-
CA Compromise
-
Change Of Affiliation
-
Superseded
-
Cease Of Operation
-
Certificate Hold
Off the Record The CRL contains the reason code you select for revoking the certificate. Before you select the reason code, think about whether you really want everyone who can access the CRL to know why you revoked it. If you did have a key compromise or a CA compromise, are you ready for that to be public information? If not, just select Unspecified.
Clients discover that a certificate has been revoked by retrieving the certificate revocation list (CRL). There are two kinds of CRLs: full CRLs, which contain a complete list of all of a CA’s revoked certificates, and delta CRLs. Delta CRLs are shorter lists of certificates that have been revoked since the last full CRL was published. After a client retrieves a full CRL, the client can download the shorter delta CRL to discover newly revoked certificates.
| See Also | For detailed information about CRLs, read the white paper “Troubleshooting Certificate Status and Revocation” which is located at http://www.microsoft.com/technet/prodtechnol/WinXPPro/support/tshtcrl.asp. |
Publishing CRLs
If you need to download a file from a server, you might access the file in several different ways. If you’re logged onto the computer locally, you would use Windows Explorer to navigate to the folder containing the file. If you were on a different computer on the same network, you might map a drive to the server and download the file from a shared folder. If the server was behind a firewall and running IIS, you could open a Web browser to retrieve the file.
Having multiple ways to retrieve a file from a server is important, especially when the server will be accessed by a variety of different clients. Certificate Services enables clients to retrieve CRLs by using a wide variety of different protocols: shared folders, Hypertext Transfer Protocol (HTTP), File Transfer Protocol (FTP), and Lightweight Directory Access Protocol (LDAP).
By default, CRLs are published in three different locations. For clients accessing the CRL from a shared folder, they are located in the \\Server\CertEnroll\ share, which is created automatically when Certificate Services is installed. Clients who need to retrieve the CRL by using LDAP can access it from CN=CAName,CN=CAComputerName,CN=CDP,CN=Public Key Services,CN=Services,CN=Configuration,DC=ForestRootNameDN. Web clients can retrieve the CRLs from http://Server/certenroll/.
Though the default locations are sufficient for most organizations, you can add locations if you need to. In particular, you must add a location if you are using an offline root CA, since the CA will not be accessible by clients under normal circumstances. Additionally, if certificates are used outside your private network but your CA is behind a firewall, you should publish your CRL to a publicly accessible location. To add a CRL publishing location, go to the Extensions tab of the CA’s properties, as shown in Figure 7.10, and then click the Add button.
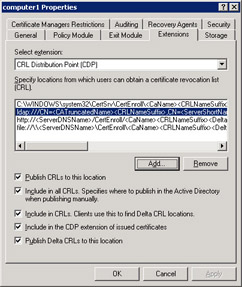
Figure 7.10: CRL publishing list
| Note | By default, the http:// and file:// CRL publishing locations do not have the Publish CRLs To This Location check box selected. However, CRLs are most definitely available from these locations, because they both map to the C:\WINDOWS\System32\CertSrv\CertEnroll folder by default. |
To simplify administration, you can use variable names when entering CRL locations. After you click the Add button, the Add Location dialog box appears and provides a list of variables that you can use, as shown in Figure 7.11. Descriptions for each variable are provided in the Description Of Selected Variable box.
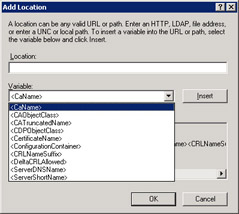
Figure 7.11: Adding a CRL publishing location
After you revoke a certificate, the CRL must be published before clients will discover that the certificate has been revoked. By default, delta CRLs are published daily, and full CRLs are published weekly. You can change these settings by using the Certification Authority snap-in. To do so, right-click the Revoked Certificates node, and then click the CRL Publishing parameters tab. This tab also shows you when the next scheduled updates will occur.
| Planning | The delta CRL publishing schedule requires careful planning. Increasing the publishing frequency enables clients to identify revoked certificates faster. However, it causes clients to retrieve the CRL more often, which increases network traffic. |
Troubleshooting CRL Publishing
You might occasionally discover a client that does not have a published CRL that the client should have retrieved. While publishing and retrieving CRLs is designed to be as automated as possible, you do have the ability to manually publish and retrieve CRLs for troubleshooting purposes. Certutil.exe is a command-line program that is installed along with Certificate Services. It provides a useful interface to a wide variety of Certificate Services functionality.
To manually retrieve the latest CRL from a CA, log on to the CA as an administrator, open a command prompt, and run the command certutil –GetCRL crl-filename.crl. For example, to retrieve the latest CRL and save the CRL with the name latestcrl.crl, you would execute the command certutil –GetCRL latestcrl.crl. To retrieve the latest delta CRL, execute the command certutil –GetCRL crl-delta-filename.crl delta.
You can also use Certutil.exe to retrieve older versions of CRLs. This is useful for pinpointing when a particular certificate was added to a CRL. To retrieve the second CRL, add the parameter 2 to the end of the certutil command line. For example, the command certutil –GetCRL crl-filename.crl 2 retrieves the second most recent CRL, and the command certutil –GetCRL crl-filename.crl 5 retrieves the fifth most recent CRL. If the older versions of the CRLs are not available, you will receive an error.
Certutil.exe can also be used to verify that a CA is up and running. To determine whether a particular CA is functioning, use the –ping parameter. For example, to determine if Certificate Services is running on the local computer, run the command certutil –ping. To check for Certificate Services on a computer with the computer name Computer2 and the CA name Computer2, run the command certutil –ping –config computer2\computer2. Use the –pingadmin parameter with the same syntax to verify that the CA administrative functionality is available.
| Tip | Use the certutil –dump command and look for the Config: line in the output to identify the computer and CA names of registered CAs. |
Practice: Creating and Revoking Certificates
In this practice, you will create two certificates by using two different methods. You will then revoke a certificate and publish a CRL.
Exercise 1: Creating a Certificate Using Web Enrollment
In this exercise, you will create a Basic EFS certificate by using the manual Web enrollment process. To request a certificate by using the Web Enrollment Web site:
-
Log on to the cohowinery.com domain on Computer1 using the Administrator account.
-
Start Internet Explorer.
-
In the address bar of Internet Explorer, type http://computer1/certsrv. Click Go.
-
If you are not automatically authenticated, provide your user name and password when prompted, and then click OK.
The Web interface for manually enrolling for certificates appears, as shown in Figure 7.12.
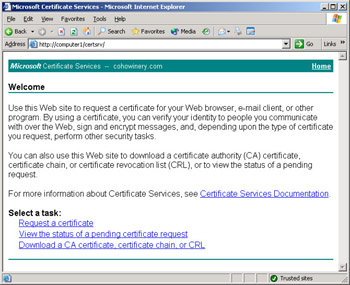
Figure 7.12: Web interface for manual enrollment -
Click Request A Certificate.
-
Click Advanced Certificate Request.
The Advanced Certificate Request page appears. Note that you have the option to submit a request based on a previously created certificate request that you have saved. If you click Request A Certificate For A Smart Card On Behalf Of Another User, you will be taken to the Smart Card Enrollment station where you can request a certificate for a smart card on behalf of another user.
-
Click Create And Submit A Request To This CA.
-
On the Advanced Certificate Request page, click the Certificate Template list and then select Basic EFS.
If you completed the exercise in Lesson 2, you will see Backup Operators available in the Certificate Template list.
-
Select the Enable Strong Private Key Protection check box, as shown in Figure 7.13. Click Submit.
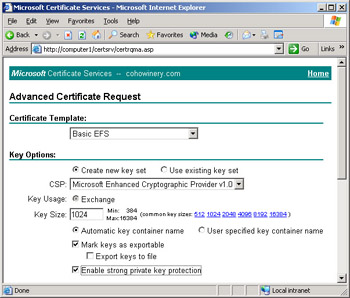
Figure 7.13: Advanced Certificate Request using Web enrollment -
Click Yes in the Potential Scripting Violation warning dialog box.
-
In the Creating A New RSA Exchange Key dialog box, click Set Security Level.
-
Read the descriptions of the two security level options, and then click High. Click Next.
-
In the Password and Confirm boxes, type a complex password. This does not have to be the same as your domain user password. Click Finish.
-
Click OK.
-
On the Certificate Issued page, click Install This Certificate.
-
Click Yes in the Potential Scripting Violation warning box.
-
Close Internet Explorer.
Exercise 2: Creating a Certificate Using the Certificates Snap-in
In this exercise, you will create a certificate by using the Certificates snap-in. To do so:
-
Log on to the cohowinery.com domain on Computer1 using the Administrator account.
-
Click Start, and then click Run. Type mmc, and then click OK.
-
Click File, and then click Add/Remove Snap-In.
-
Click Add. In the Add/Remove Snap-In dialog box, click Certificates, and then click Add.
-
Click My User Account, and then click Finish. Click Close, and then click OK.
-
Expand Certificates, and then expand Personal. Right-click Certificates, click All Tasks, and then click Request New Certificate to start the Certificate Request Wizard.
-
In the Certificate Request Wizard, click Next.
-
On the Certificate Types page, click User. Select the Advanced check box, and then click Next.
-
On the Cryptographic Service Provider page, notice that the Mark This Key As Exportable check box is selected by default, and that Enable Strong Key Protection is disabled by default. Click Next.
Strong key protection requires the user to provide a password each time the key is used. Lesson 4 discusses the purpose of exporting keys, in addition to the advantages and disadvantages.
-
On the Certificate Authority page, click Next.
-
In the Friendly Name box, type Personal Certificate. Click Next.
-
On the Completing The Certificate Request Wizard page, click Finish.
-
After the Certificate Request Wizard has successfully finished, click OK to install the issued certificate with medium security.
-
In the Certificates snap-in, double-click the new certificate. Note that it expires in one year, and that it can be used to encrypt data, protect e-mail, and authenticate you, as shown in Figure 7.14. Click OK.
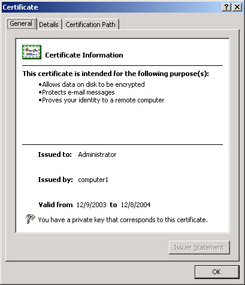
Figure 7.14: Properties for a new certificate
Exercise 3: Revoking a Certificate and Publishing a CRL
In this exercise, you will add a CRL publishing location and then revoke the certificate you just created. To revoke a certificate using the Certification Authority console, perform the following steps:
-
Log on to the cohowinery.com domain on Computer1 using the Administrator account.
-
Open the Certification Authority console from Administrative Tools.
-
Right-click Computer1, and then click Properties. Click the Extensions tab.
-
Click the Add button.
-
In the Location box, type C:\<CaName><CRLNameSuffix><DeltaCRLAllowed>.crl. Click OK.
Use the Variable list and the Insert button to add the variable names. Review the description of each variable as you add it.
-
In the Computer1 Properties dialog box, select the Publish CRLs To This Location and Publish Delta CRLs To This Location check boxes. Click OK.
-
When prompted to restart Certificate Services, click Yes.
-
Expand Computer1 and then click Issued Certificates. Right-click the COHOWINERY\Administrator certificate, click All Tasks, and then click Revoke Certificate, as shown in Figure 7.15.

Figure 7.15: Revoking a certificate -
In the Certificate Revocation dialog box, click the Reason Code list, and then click Key Compromise. Click Yes.
-
Click the Revoked Certificates node in the left pane, and note that the newly revoked certificate appears in the list.
-
Right-click the Revoked Certificates node, click All Tasks, and then click Publish.
-
In the Publish CRL dialog box, click New CRL as shown in Figure 7.16, and then click OK.
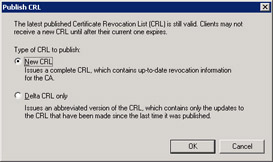
Figure 7.16: Publishing a CRL -
Start Windows Explorer and navigate to the root of drive C. Notice that two files have been created: Computer1.crl and Computer1+.crl. Double-click each of them, and examine the details of the two certificates. Click the Certificate Revocation List tab to verify that the revoked certificate appears. Click OK.
Computer1.crl is the full CRL. Computer1+.crl is the delta CRL. Because you have only revoked a single certificate, they both contain the same information.
Lesson Review
The following questions are intended to reinforce key information presented in this lesson. If you are unable to answer a question, review the lesson materials and try the question again. You can find answers to the questions in the “Questions and Answers” section at the end of this chapter.
-
You are a certificate manager for your company’s PKI. You are reviewing enrollment methods and have determined that you will implement three methods for certificate enrollment: Web-based enrollment, MMC enrollment by using the Certificate Request Wizard, and autoenrollment. Under what circumstances must you use Web-based enrollment to perform certificate enrollment? (Choose all that apply.)
-
When enrolling certificates that are issued by an enterprise CA
-
When performing enrollment from computers running Windows 95 or Windows 98
-
When enrolling certificates that are issued by a standalone CA
-
When performing enrollment from computers running Windows 2000
-
When enrolling for certificates that are issued by a CA on computers running Windows 2000
-
-
You are reviewing enrollment methods and have determined that you will implement three methods for certificate enrollment: Web-based enrollment, MMC enrollment by using the Certificate Request Wizard, and autoenrollment. What criteria must you meet if you want a client to use the Certificates console to enroll certificates? (Choose all that apply.)
-
The issuing CA must be an enterprise CA.
-
The computer must be a member of an Active Directory domain.
-
The issuing CA must be a standalone CA.
-
The client computer must be running Microsoft Windows NT 4.0 or later.
-
The client computer must be running Windows 2000 or later.
-
Lesson Summary
-
Certificate enrollment is the process by which a user, computer, or service obtains a certificate from a CA.
-
A Windows Server 2003 family CA provides several methods for certificate enrollment: Web-based, the Certificates console, the Certreq.exe command-line utility, and autoenrollment.
-
If you have a client using an operating system that is earlier than Windows 2000, you must use manual enrollment because it does not support Active Directory or Group Policy. Windows 2000 supports autoenrollment of computer certificates; Windows XP and Windows Server 2003 support autoenrollment of both user and computer certificates.
-
Autoenrollment enables organizations to automatically deploy public key–based certificates to users and computers. It also supports smart card–based certificates.
|
| < Day Day Up > |
|
EAN: 2147483647
Pages: 217