Customizing your System
|
You can customize nearly every aspect of the brand-new Red Hat Linux 8.0 interface. From adding new Panels and changing the look of your interface, to resizing icons and adding emblems to icons, Red Hat Linux 8.0 makes it easier than ever to customize the desktop interface.
Figure 6-11 shows just how different you can make your desktop look. Compare this figure with Figure 6-1; the two do not even resemble one another.
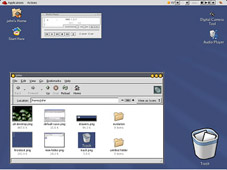
Figure 6-11. Customizing Your Desktop
The following sections show you how to customize your system to suit your needs and preferences.
Setting your Preferences
The central location for customizing your system is from the Preferences menu of the Main Menu. (You can also access Preferences by double-clicking the Start Here icon on your desktop and double-clicking the Preferences icon.) The Preferences menu offers a wide selection of configuration options. The following list discusses these options briefly.
-
About Myself — From here you can change your login shell, as well as add information about yourself such as your home and office phone numbers.
-
Accessibility — Here you can make changes to the way Red Hat Linux responds to key presses, mouse clicks, and so on.
-
Background — You can configure your background with new colors, patterns, or a new image.
-
CD Properties — From here you can change whether or not CDs are automatically mounted by default, which command is executed when a CD is inserted in the drive, and more.
-
Extras — A few advanced preferences are under Extras, including an HTML viewer icon that launches the preferences for viewing HTML files in graphical applications, the Desktop Switching tool, and some extra Panel preferences. Also included here is the Preferred Applications utility, which allows you to set your default Web browser, text editor, and terminal.
-
File types and programs — From here you can add new file types and change the programs that are associated with file types.
-
Font — Here you can configure which fonts are used for various system elements, such as title bars, terminal windows, the desktop, and applications.
-
Keyboard — Make decisions about your keyboard, such as the keyboard repeat rates, the cursor blink rate, and whether you want your keyboard to beep at you.
-
Keyboard Shortcuts — You can configure shortcuts (pressing a combination of keystrokes on the keyboard) to perform actions within an application or on your desktop. For example, you can configure a shortcut to move from your current Workspace to Workspace 2 by pressing Ctrl-F2.
-
Menus and Toolbars — Customize the way your toolbars and menus behave. For example, you can choose not to have icons displayed in menus.
-
Mouse — Here you can configure your mouse, with options such as allowing for a left-handed mouse, setting your double-click delay, and changing your cursor and the sensitivity of mouse motions.
-
Network Proxy — Here you can set your HTTP proxy (if you have one) as well as any username and password the proxy might require.
-
Password — This tool allows you to change your user password; you have to enter your existing password first.
-
Pilot/Handspring Tool — If you have a Palm Pilot or Handspring Visor, you can configure it to sync with Red Hat Linux using this tool.
-
Screensaver — This tool lets you change your default screensaver, configure the settings of a given screen saver, and set the number of minutes your system will wait to bring the screensaver up.
-
Sound — In this section you can configure the system sounds associated with various functions. For example, if you would like to have a sound play when you log in to your desktop, you can configure that here.
-
Theme — This utility allows you to change your theme or window border as well as install new ones.
-
Window Focus — This tool enables you to change the way you give a window focus (which means to bring it to front). The default setting is that you have to click somewhere on the window to give it focus, but you can also configure your settings so that you can merely point to a window to give it focus and bring it to the front.
Customizing the Desktop
The Start Here screen in Nautilus contains additional configuration tools that help you with your new Red Hat Linux system and the server applications included. The System Settings icon includes tools that help you set up your system for personal everyday use. Below you will find a list of some of the tools included in System Settings and what you can do with them.
-
Date & Time — This tool allows you to set the date and time of your machine. You will be able to set your time zone information as well. See Chapter 19 for more information on time and date configuration.
-
Soundcard Detection — The Soundcard Detection tool probes your machine for available sound devices. See Chapter 14 for more details on configuring your sound hardware.
-
Users & Groups — The Users & Groups tool allows you to add and remove users from your system. See Chapter 10 for details.
-
Printing — The Printer Configuration Tool allows you to add a new printer to your system. The printer may be connected to your machine or available on a network. See Chapter 16 for details.
As mentioned before, you will also find server configuration tools in the Start Here area. These tools help you configure services and applications you are using on the local machine to serve other machines. The server configuration tools are found by clicking on the Server Settings icon. A couple of examples of the tools found in this area are the tools for the Apache Web Server and a DNS/Bind tool. You must have those server applications installed before these tools appear in this section. Refer to the Official Red Hat Linux Administrator’s Guide (Red Hat Press/Wiley, 2003) for details.
Customizing the Panel
You can hide the Panel automatically or manually, place it on any edge of your desktop, change its size and color, and change the way it behaves. To alter the default Panel settings, right-click in an unused area of the panel and select Properties. You can set the size of the Panel, its position on the desktop, and whether you want the Panel to be automatically hidden (Autohide) when not in use. If you choose to Autohide the Panel, it will not appear on the desktop until you move your mouse pointer towards it.
Adding Icons and Applets to the Panel
To make the panel fit your needs, you may want to add more applets and launcher icons. To add an applet to the Panel, right-click in an unused area on the Panel, select Add to Panel, and choose from the menu of applets. When you select an applet, it will appear on your Panel, as that is the only place it will run.
To add a launcher icon to the panel, right-click in an unused area on the Panel and select Add to Panel > Launcher. This will launch a dialog box that allows you to enter the name of the application, the location and name of the command that starts the application (such as /usr/bin/foo), and even choose an icon for the application. Click OK and the new launcher icon will appear on the Panel.
| Tip | Another quick and easy way to add a launcher to the Panel is to right-click on an unused area of the Panel and choose Add to Panel > Launcher from menu. Then select an application that appears in the menu. This will automatically add a launcher icon based on the properties of the item in the Main Menu. |
Autohiding the Panel
Autohiding the Panel makes the Panel disappear altogether until you drag your mouse to the bottom of the screen (or whichever edge of the screen your Panel is located). To autohide the Panel, right-click an empty spot on the Panel and select Properties, check the Autohide checkbox, and click Close. The Panel in Figure 6-11 is not visible because we chose to autohide it.
Adding Drawers to the Panel
A drawer is really like a Panel within a Panel. A drawer can be collapsed to just an icon (a drawer) or extended into an entirely new Panel. Drawers are quite useful for organizing applications on a Panel. For example, you might want to have a drawer on your Panel that includes all of your Internet software and another drawer that contains all of your Office Productivity software to avoid having a cluttered Panel.
To add a drawer to the Panel, right-click an empty spot on the Panel and choose Add to Panel > Drawer from the menu that appears.
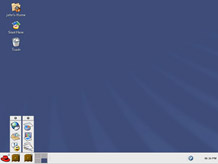
Figure 6-12. Adding a Drawer to the Panel
Moving the Panel
To move a Panel, right-click an empty spot on the Panel and choose Properties. Then click the desired Position for your Panel. The Position options will be different depending on the type of Panel you are dealing with.
Resizing the Panel
To resize a Panel, right-click an empty spot on the Panel and choose Properties. Then pull down the Size: drop-down list and choose a new size for your Panel. The size for the default Panel is Medium (48 pixels).
Adding Panels
To add a Panel, right-click any spot on an empty spot on the Panel and choose New Panel > Panel Type, and select from among the following types of Panels:
-
Corner Panel — A Panel that sits in the corner.
-
Edge Panel — A Panel that sits along one edge of the screen.
Note The original Panel is an edge Panel.
-
Floating Panel — A floating Panel can be moved anywhere on the screen.
-
Sliding Panel — A sliding Panel can be moved along any edge of the screen, but not out into the middle of the screen.
-
Menu Panel —The menu Panel sits at the top of the screen and is smaller than the original Panel by about one-half. There is an Applications menu button and an Actions menu that, between the two of them, pretty much replace the original Main Menu.
Figure 6-13 shows the desktop with one of each of the five types of Panels (the original Panel at the bottom represents the edge Panel type).
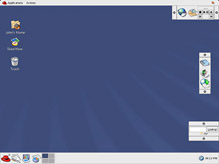
Figure 6-13. Adding New Panels
Deleting a Panel
To delete a Panel, right-click the Panel you want to delete and choose Delete this Panel from the menu that appears. All of the configuration settings of that Panel will be lost.
| Warning | You can delete the original Panel, but all of the settings will be lost. |
Customizing Workspaces
Workspaces are the equivalent of extra desktops on your system. By default, Red Hat Linux comes with four workspaces that you can work with, but you are by no means limited to four. The following sections show you how to add and remove workspaces, drag applications across workspaces, and make a single application appear on all of your workspaces.
Adding or Removing Workspaces
Depending on your needs, you may want more or fewer than the four default workspaces. To add or remove workspaces from your panel, right-click the Workspace Switcher Panel applet (refer to Figure 6-3) and choose Preferences. The Workspace Switcher Preferences window appears. From this window you can change the number of workspaces, choose to show only the first workspace (if you do not want any additional workspaces), or change the number of rows that your workspaces are displayed in.
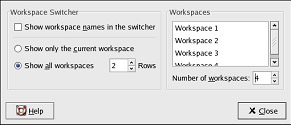
Figure 6-14. The Workspace Switcher Preferences Window
Dragging Applications Across Workspaces
Workspaces can be useful if you find you have a lot of applications open at the same time and do not want all of them cluttering up a single workspace. Using workspaces, you could group applications of a certain type on different workspaces. For example, if you are working with several Internet applications, several OpenOffice.org applications, and several graphics applications, you could have all of the Internet applications on one workspace, all of the OpenOffice.org applications on a second workspace, and all of the graphics applications on another workspace.
Moving an application across workspaces is easy; click the icon for an open window in one workspace on the Workspace Switcher Panel applet (refer to Figure 6-3) and then drag it to a different workspace on the applet.
| Tip | The current workspace is easily identified because it is the dark box among the rest of the workspaces, which are of a lighter color. |
After dragging the application to a different workspace, you can access the application by clicking on that workspace on the Workspace Switcher Panel applet and then clicking on the application.
Making One Window Appear on All Workspaces
You may find that when working with workspaces you have applications that you want to be accessible on all workspaces. For example, if you are waiting on an important email but do not want to have to keep switching workspaces to check your email, making one window appear on all workspaces would allow you to keep your eye on your email client no matter what workspace you are using. To make one window appear on all desktops, click the down arrow in the upper left corner of the window. In the menu displayed, select Put on All Workspaces.
Changing Your System’s Appearance
Some customization features do not really change the way you work with your system, but just change the look of your system. For example, your desktop background does not affect the way you work with your system, but it does change the appearance of your desktop.
The following sections show you how to change your system’s appearance.
Changing Themes
Themes are becoming more and more popular in modern software; a theme is basically a different interface for your windows and graphical user interface.
| Tip | Even Mozilla 1.0 supports its own themes (choose View > Apply Theme from the Mozilla browser window). |
To change your theme, click the Main Menu button and choose Preferences > Theme, choose a new theme from the Installed themes list, and click Close.
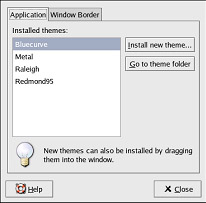
Figure 6-15. The Theme Preferences Window
Red Hat Linux comes with the following choice of themes:
-
Bluecurve — This is the default theme for Red Hat Linux 8.0.
-
Raleigh — This theme is named after the city in North Carolina that Red Hat is based in looks a great deal like Red Hat Linux 7.x and earlier.
-
Redmond 95 — This theme is named after the city in Washington that Microsoft is based in, and looks quite reminiscent of Windows 95.
-
Metal — This theme looks similar to the default theme (called Bluecurve), but is colored differently and includes some more metallic textures.
New themes can be installed by dragging them from their location in a folder (or desktop) onto the Theme Preferences window.
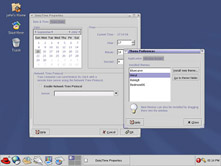
Figure 6-16. The Metal Theme
You can change your interface even more drastically by clicking the Window Borders tab and trying out some of the various window borders.
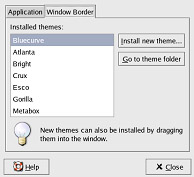
6-17. Theme Preferences: 8212; Window Border Tab
There are several window border styles listed here, some of which are very different from the original, such as the Gorilla window border style.
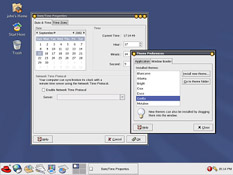
Figure 6-18. The Gorilla Window Border Style
Changing Desktop Backgrounds
To change your desktop background, click the Main Menu button and choose Preferences > Background. The Background Preferences window appears, from which you can change the background pattern or even drag a picture onto the window to make that picture your background.
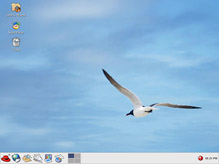
Figure 6-19. Changing Your Desktop Background
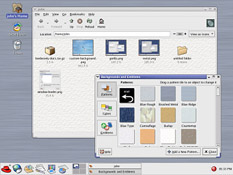
Changing Window or Desktop Patterns
This feature allows you to change the pattern for a window background or the desktop. To do so, from the Nautilus window choose Edit > Backgrounds and Emblems and then click the Patterns button on the left. By default, the Patterns customization features are in front. On the Patterns window are different patterns that you can use to change the look of the Nautilus window or even your desktop. Find a pattern that you like, click it, and then drag it to either the Nautilus window or to the desktop and watch Nautilus (or the desktop) change to that pattern. Drag the Reset box onto the item to reset it to its original state.
| Note | As you are dragging a pattern across the screen, you can tell whether or not the item underneath it can be changed by looking at the shape of the cursor. If the cursor shows a plus symbol, you can change the item underneath the pattern; if the cursor shows no plus symbol, dropping the pattern there will do nothing. |
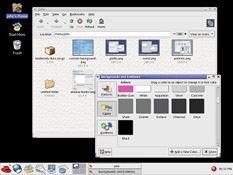
Changing Window or Desktop Colors
Just like changing a pattern, changing a color is easy. To do so, from the Nautilus window choose Edit > Backgrounds and Emblems and then click the Colors button at left. Then you can click the desired color and, while holding the mouse button down, drag the color onto the desired item and drop it there. Drag the Reset box onto the item to reset it to its original state.
| Note | As you are dragging a color across the screen, you can tell whether or not the item underneath it can be changed by whatever you are dragging by the shape of the cursor. If the cursor shows a plus, you can change the item underneath the color; if the cursor shows no plus symbol, dropping the color there will do nothing. |
Adding Emblems to Icons
This feature allows you to add little emblems to icons to help you better distinguish similar icons from one another. For example, one of the emblems says “Draft”; if you have several documents in a folder and want to be able to visually tell the drafts from the final versions, you can add the “Draft” emblem to all the draft versions in the folder so that you can tell them apart.
To add an emblem to an icon, follow these steps:
-
From the Nautilus window choose Edit > Backgrounds and Emblems. The Backgrounds and Emblems window appears.
-
Click the Emblems button at the left of the window.
-
Find the emblem you want and drag it onto the icon.
Note You can also right-click an icon, choose Properties from the context menu, and then add or remove icons from the Emblems tab of the icon’s Properties window.
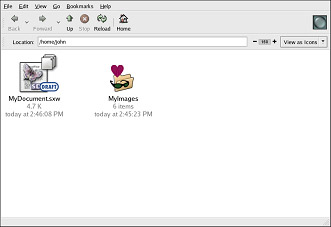
Figure 6-22. Adding Emblems to Icons
Resizing Icons
Red Hat Linux now includes the ability to resize icons to suit your tastes or needs.
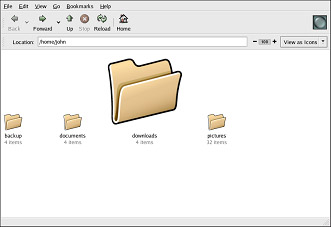
Figure 6-23. Resizing Icons
If you are working with many files and folders in a given folder and want one folder to be very easy to spot compared to the others, right-click the icon and choose Stretch Icon from the menu. Little handles will appear at the icon’s corners; you can then stretch the icon by clicking on one of the handles and dragging it away from the center of the icon to make it larger or towards the center of the icon to make it smaller.
To reset the icon to its original size, right-click the icon and choose Restore Icon’s Original Size.
Changing Your Screensaver
Red Hat Linux 8.0 comes with some impressive screensavers.
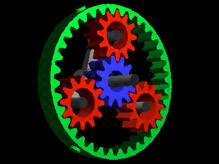
Figure 6-24. Screensavers in Red Hat Linux
To change your screensaver, click the Main Menu button and choose Preferences > Screensaver. The Screensaver Preferences window appears, from which you can change your screensaver, modify the settings of a screensaver, and preview a screensaver.
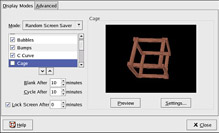
Figure 6-25. The Screensaver Preferences Window
|
EAN: N/A
Pages: 223