Section 3.1. Visual Basic Controls
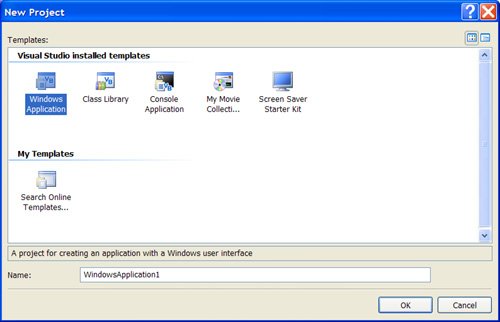
3.1. Visual Basic ControlsVisual Basic programs display a Windows-style screen (called a form) with boxes into which users type (and in which users edit) information and buttons that they click to initiate actions. The boxes and buttons are referred to as controls. In this section, we examine forms and four of the most useful Visual Basic controls. Starting a New Visual Basic ProgramFor our purposes, Visual Basic programs are also known as applications, solutions, or projects. Each program is saved (as several files and subfolders) in its own folder. Before starting a new program, you should use Windows Explorer to create a folder to hold the folders for your programs. The process for invoking Visual Basic varies slightly with the edition of Visual Basic installed on the computer. To invoke Visual Basic from a computer that has Visual Basic Express installed, click the Windows Start button, hover over All Programs, and then click on Microsoft Visual Basic 2005 Express Edition. With the other editions of Visual Basic, hover over All Programs, hover over Microsoft Visual Studio 2005, and then click on Microsoft Visual Studio 2005 in the short list that is revealed. The window that appears after Visual Basic is invoked has a menu bar whose first item is "File". Click on File, and then click on New Project to produce a New Project input dialog box. Figure 3.1 shows the New Project input dialog box produced by Visual Basic Express. The "Windows Application" icon should be selected as the installed template. If this is not the case, click on "Windows Application" to select it. (The other editions of Visual Basic contain a pane identifying a Project type. You should select "Visual Basic" as the Project type.) Figure 3.1. The Visual Basic Express New Project input dialog box. |
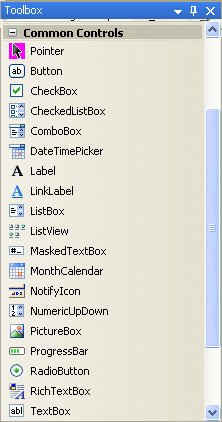
1. | Double-click on the text box icon in the Common Controls portion of the Toolbox. A rectangle with two small squares, called sizing handles, appears at the upper left corner of the form. (You can alter the width of the text box by dragging one of the sizing handles.) Move the mouse arrow to any point of the text box other than a sizing handle, hold down the left mouse button, and drag the text box to the center of the form. See Figure 3.4. Note: The Tasks button will be discussed later in this chapter. Figure 3.4. A text box with sizing handles. | |
2. | Click anywhere on the form outside the rectangle to deselect the text box. | |
3. | Click on the rectangle to restore the handles. An object showing its handles is said to be selected. A selected text box can have its width altered, location changed, and other properties modified. | |
4. | Move the mouse arrow to the handle in the center of the right side of the text box. The cursor should change to a double arrow ( 5. | Press the delete key, Del, to remove the text box from the form. Step 6 gives an alternative way to place a text box of any width at any location on the form. |
6. | Click on the text box icon in the Toolbox. Then move the mouse pointer to any place on the form. (When over the form, the mouse pointer becomes a pair of crossed thin lines.) Hold down the left mouse button, and drag the mouse on a diagonal to generate a rectangle. Release the mouse button to obtain a selected text box. You can now alter the width and location as before. Note: The text box should now be selected. If not, click anywhere inside the text box to select it. | |
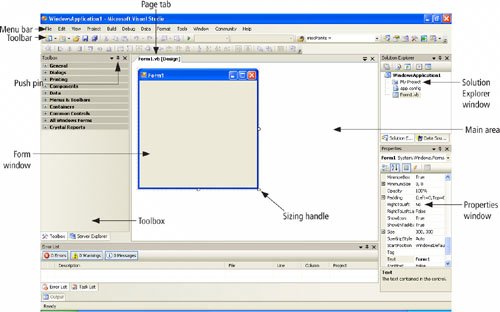
7. | Press F4 to activate the Properties window. (You also can activate the Properties window by clicking on it, clicking on the Properties window icon in the right part of the Toolbar, selecting Properties Window from the View menu, or clicking on the text box with the right mouse button and selecting Properties.) See Figure 3.5. The first line of the Properties window (called the Object box) reads "TextBox1 etc." TextBox1 is the current name of the text box. The first two buttons below the Object box permit you to view the list of properties either grouped into categories or alphabetically. Use the up- and down-arrow keys (or the up- and down-scroll arrows) to move through the list. The left column gives the property names, and the right column gives the current settings of the properties. We discuss four properties in this walkthrough. Figure 3.5. Text box Properties window. Note: If the Description pane is not visible, right-click on the Properties window, and then click on "Description." The Description pane describes the currently highlighted property. | |
8. | Move to the Text property with the up- and down-arrow keys. (Alternatively, scroll until the property is visible, and click on the property.) The Text property, which determines the words displayed in the text box, is now highlighted. Currently, there is no text displayed in the Settings box on the right. | |
9. | Type your first name. Then press the Enter key, or click on another property. Your name now appears in both the Settings box and the text box. See Figure 3.6. Figure 3.6. Setting the Text property to David.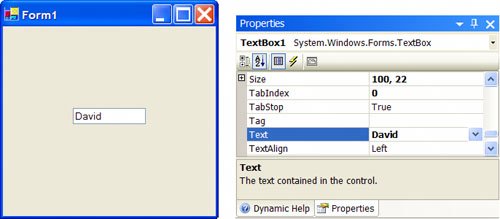 | |
10. | Click at the beginning of your name in the Text Settings box, and add your title, such as Mr., Ms., or The Honorable. (If you mistyped your name, you can easily correct it now.) Then, press Enter. | |
11. | Use the up-arrow key or the mouse to move to the ForeColor property. This property determines the color of the information displayed in the text box. | |
12. | Click on the down arrow in the right part of the Settings box, and then click on the Custom tab to display a selection of colors. See Figure 3.7. Click on one of the colors, such as blue or red. Notice the change in the color of your name. Figure 3.7. Setting the ForeColor property. | |
13. | Highlight the Font property with a single click of the mouse. The current font is named Microsoft Sans Serif. | |
14. | Click on the ellipsis (...) box in the right part of the Settings box to display a dialog box. See Figure 3.8. The three lists give the current name (Microsoft Sans Serif), current style (Regular), and current size (8) of the font. You can change any of these attributes by clicking on an item in its list or by typing into the box at the top of the list. Click on Bold in the style list, and click on 12 in the size list. Now click on the OK button to see your name displayed in a larger bold font. The text box will be longer so that it can accommodate the larger font. Figure 3.8. The Font dialog box. | |
15. | Click on the text box and resize it to be about 3 inches wide. | |
16. | Press F5 to run the program. (Alternatively, a program can be run from the menu by pressing Alt/D/S or by clicking on the Start Debugging icon, the fourteenth or fifteenth icon on the Toolbar.) After a brief delay, a copy of the form appears that has neither the form or the text box selected. | |
17. | Your name is highlighted. Press the End key to move the cursor to the end of your name. Now type in your last name, and then keep typing. Eventually, the words will scroll to the left. | |
18. | Press Home to return to the beginning of the text. You have a miniature word processor at your disposal. You can place the cursor anywhere you like to add or delete text. You can drag the cursor across text to select a block, place a copy of the block in the Clipboard with Ctrl+C, and then duplicate it elsewhere with Ctrl+V. | |
19. | To end the program, press Alt + F4, Alternatively, you can end a program by clicking on the form's Close button at the right corner of the title bar. | |
20. | Select the text box, activate the Properties window, select the ReadOnly property, click on the down-arrow button, and finally click on True. Notice that the background color is now gray. | |
21. | Run the program, and try typing into the text box. You can't. Such a text box is used for output. Only code can display information in the text box. | |
22. | End the program. | |
23. | Let's now save the program on a disk. Click on the Save All icon to save the work done so far. (The Save All icon is the fifth or sixth icon on the Toolbar. It shows three fanned diskettes. Alternately, you can press Alt/F/L.) You will be prompted for the name of the program and the path to the folder where you want the program to be saved. Type a name, such as "VBdemo". You can either type a path or use Browse to locate a folder. (This folder will automatically be used the next time you click on the Save All icon while working on this program.) The files for the program will be held in a subfolder of the selected folder. | |
24. | Create a new program as before by clicking on "New Project" on the File menu. (Or, you can click on the New Project icon, the first icon on the Toolbar.) A New Project dialog box will appear. | |
25. | Give a name to the project, such as My Program, and then click on the OK button. | |
26. | Place three text boxes on the form. (If you use the double-click technique, move the text boxes so that they do not overlap.) Notice that they have the names TextBox1, TextBox2, and TextBox3. | |
27. | Run the program. Notice that the cursor is in TextBox1. We say that TextBox1 has the focus. (This means that TextBox1 is the currently selected object and any keyboard actions will be sent directly to this object.) Any text typed will display in that text box. | |
28. | Press Tab once. Now, TextBox2 has the focus. When you type, the characters appear in TextBox2. | |
29. | Press Tab several times, and then press Shift+Tab a few times. With Tab, the focus cycles through the objects on the form in the order the objects were created. With Shift+Tab, the focus cycles in the reverse order. | |
30. | End the program you created. | |
31. | We would now like to reload the first program. Click on "Open Project" from the File menu. An Open Project dialog box will appear stating that "You must choose to either save or discard changes in the current project before opening a project." There is no need to save his program, so click on the Discard button. Then a second Open Project dialog box will appear. | |
32. | Find the folder corresponding to the program you saved earlier, double-click on the folder, and double-click on the file with extension sln. You have now recovered the first program. | |
33. | If you do not see the Form Designer for the program, double-click on Form1.vb in the Solution Explorer. |

 ). Hold down the left mouse button, and move the mouse to the right. The text box is stretched to the right. Similarly, grabbing the text box on the left side and moving the mouse to the left stretches the text box to the left. You also can use the handles to make the text box smaller. Steps 1 and 4 allow you to place a text box of any width anywhere on the form.
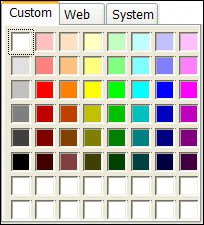
A Button Walkthrough
1. | Click on the New Project icon to start a new program. (Give a name, such as ButtonProg, to the program, and click on OK.) |
2. | Double-click on the Button icon in the Toolbox to place a button on the form. (The Button icon is the second icon in the Common Controls portion of the Toolbox.) |
3. | Move the button to the center of the form. |
4. | Activate the Properties window, highlight the Text property, type "Please Push Me," and press Enter. See Figure 3.9. The button is too small. Figure 3.9. Setting the Text property. |
5. | Click on the button to select it, and then enlarge it to accommodate the phrase "Please Push Me" on one line. |
6. | Run the program, and click on the button. The button appears to move in and then out. In Section 3.2, we write code that is executed when a button is pushed. |
7. | End the program and select the button. |
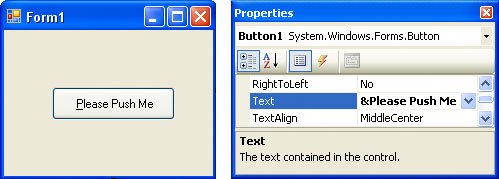
8. | From the Properties window, edit the Text setting by inserting an ampersand (&) before the first letter, P. Press the Enter key, and notice that the first letter P on the button is now underlined. See Figure 3.10. Pressing Alt+P while the program is running triggers the same event as clicking the button. However, the button will not appear to move in and out. Here, P is referred to as the access key for the button. (The access key is always specified as the character following the ampersand.) |
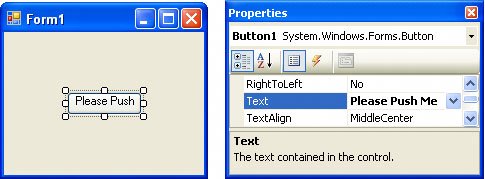
Figure 3.10. Designating P as an access key.
Label Walkthrough
1. | Click on the New Project icon to start a new program. Feel free to select the default name, such as WindowsApplication1. |
2. | Double-click on the label icon to place a label on the form. (The label icon is a large letter A.) Move the label to the center of the form. |
3. | Activate the Properties window, highlight the Text property, type "Enter Your Phone Number:", and press Enter. (Such a label would be placed next to a text box into which the user will type a phone number.) Notice that the label widened to accommodate the text. This happened because the AutoSize property of the label is set to True by default. |
4. | Change the AutoSize property to False. Press Enter. Notice that the label now has eight sizing handles when selected. |
5. | Make the label narrower and longer until the words occupy two lines. |
6. | Activate the Properties window, and click on the down arrow to the right of the setting for the TextAlign property. Experiment by clicking on the various rectangles and observing their effects. The combination of sizing and alignment permits you to design a label easily. |
7. | Run the program. Nothing happens, even if you click on the label. Labels just sit there. The user cannot change what a label displays unless you write code to make the change. |
8. | End the program. |
A List Box Walkthrough
1. | Click on the New Project icon to start a new program. Feel free to select the default name, such as WindowsApplication1. |
2. | Place a list box on the form. (The list box icon is the ninth icon in the Common Controls group of the Toolbox.) |
3. | Press F4 to activate the Properties window and notice that the list box does not have a Text property. The word ListBox1 is actually the setting for the Name property. |
4. | Also place a text box, a button and a label on the form. |
5. | Click on the Object box of the Properties window. The name of the form and the names of the four controls are displayed. If you click on one of the names, that object will become selected and its properties displayed in the Properties window. |
6. | Run the program. Notice that the word ListBox1 has disappeared, but the words Button1 and Label1 are still visible. The list box is completely blank. In subsequent sections, we will write code to place information into the list box. |
The Name Property
Every control has a Name property. It is used in code to refer to the control. By default, controls are given names like TextBox1 and TextBox2. You can use the Properties window to change the Name property of a control to a more meaningful name. (The Name property is always the third property in the alphabetized list of properties. A control's name must start with a letter and can be a maximum of 215 characters. It can include numbers and underline (_) characters, but cannot include punctuation or spaces.) Also, it is good coding practice to have each name begin with a three- or four-letter prefix that identifies the type of the control. See Table 3.1. The form itself also has a Name property. Beginning with Section 3.2, we will use suggestive names and these prefixes whenever possible.
Control | Prefix | Example |
|---|---|---|
form | frm | frmLottery |
button | btn | btnComputeTotal |
label | lbl | lblInstructions |
listbox | lst | lstOutput |
text box | txt | txtAddress |
The Name property of the form itself also can be changed. Suppose you want to change the name of the form from Form1 to frmPayroll. The most efficient way to set the name of the form is to change the name of the file Form1.vb appearing in the Solution Explorer window to frmPayroll.vb. To make the change, right-click on Form1.vb in the Solution Explorer window, click on Rename, type in the new name (frmPayroll.vb), and press Enter.
Important: Make sure that the new filename has the extension "vb".
To display the name of the form, and the names of all the controls on the form, click on the down-arrow icon at the right of the Property window's Object box. You can make one of these items the selected item by clicking on its name.
The Name and Text properties of a button are both initially set to something like Button1. However, changing one of these properties does not affect the setting of the other property, and similarly for the Name and Text properties of forms, text boxes, and labels. The Text property of a form specifies the words appearing in the form's title bar.
A Help Walkthrough
Visual Basic has an extensive help system. The following walkthrough demonstrates one of its featuresthe Help Index. The Help Index presents an alphabetized list of all the help topics available for Visual Basic.
1. | Press Alt/H/I to invoke the Index window from the Help menu. |
2. | If the "Filtered by:" box does not say "Visual Basic" or "Visual Basic Express Edition," click on the down arrow and select one of them from the drop-down list. |
3. | Type "TextBox class" into the "Look for" box. |
4. | Click on the last subheading, "Properties." The window that appears contains a list of all the properties of the textbox control, along with their descriptions. |
5. | Scroll down the list of properties and read the description of the MaxLength property. The MaxLength property is used to limit the number of characters that can be typed into a text box. Think about where this property could be useful. |
6. | Type "Windows Forms controls" into the "Look for" box, look down about 27 subheadings of "Windows Forms controls" and then click on "list of." |
7. | The window that appears contains a long list of underlined links. Click on the first underlined link, "Windows Form Controls by Function." |
8. | Read the description of the four controls we have discussed so far. As a preview of coming attractions, read about some of the controls we will discuss later in the book. They are MaskedTextBox, ComboBox, OpenFileDialog, GroupBox, CheckBox, RadioButton, PictureBox, and DataGridView. |
Fonts
The default font for controls is Microsoft Sans Serif. Two other useful fonts are Courier New and Wingdings.
Courier New is a fixed-width font; that is, each character has the same width. With such a font, the letter i occupies the same space as the letter m. Fixed-width fonts are used with tables when information is to be aligned in columns.
The Wingdings font consists of assorted small pictures and symbols, each corresponding to a character on the keyboard. For instance if one of the characters %, (, 1, or J is typed into the Text setting of a control whose Font is Wingdings, the control will display a bell, phone, open folder, or smiling face, respectively.
To view the character set for a Windows font, click on the Start button in the Windows task bar and successively select All Programs, Accessories, System Tools, and Character Map. Then click on Character Map, or press the Enter key. After selecting the font, click on any item to enlarge it. You can insert the keyboard character for the item into the Clipboard by pressing the Select button and then the Copy button. To place the character into the Text property of a control having that font, just move the cursor to the Settings box for the Text property and press Ctrl+V.
Auto Hide
The Auto Hide feature allows you to make more room for the Main area of the screen by minimizing tool windows (such as the Toolbox or Index window). Let's illustrate the feature with a walkthrough using the Toolbox window. We start by discussing the situation where the feature is disabled.
1. | If the Toolbox window is currently visible and the pushpin icon in the window title is vertical, then the Auto Hide feature is disabled. (If the Toolbox window is not visible, press Alt/V/X to select Toolbox from the View menu. If the pushpin icon is horizontal, then click on the icon to make it vertical.) When the Auto Hide feature is disabled, the Toolbox window stays stationary and is always ready for use. |
2. | Click the mouse cursor somewhere outside of the Toolbox window and note that the window stays fixed. |
3. | Click on the pushpin icon to make it horizontal. The Auto Hide feature is now enabled. |
4. | Move the mouse cursor somewhere outside of the Toolbox window and note that the window slides into a tab on the left side of the screen. The name and icon of the Toolbox window appear on the tab. |
5. | Hover the mouse cursor over the tab. The window slides into view and is ready for use. |
6. | Place a new control on the form, and then move the cursor away from the Toolbox window. The window automatically slides back to its tab on the edge of the screen. |
Positioning and Aligning Controls
Visual Basic provides several tools for positioning and aligning controls on a form. Proximity lines are short line segments that help you place controls a comfortable distance from each other and from the sides of the form. Snap lines are horizontal and vertical line segments that are help you align controls. The Format menu is used to align controls, center controls horizontally and vertically in a form, and make a group of selected controls the same size.
A Positioning and Aligning Walkthrough
1. | Start a new program. |
2. | Place a button near the center of the form. |
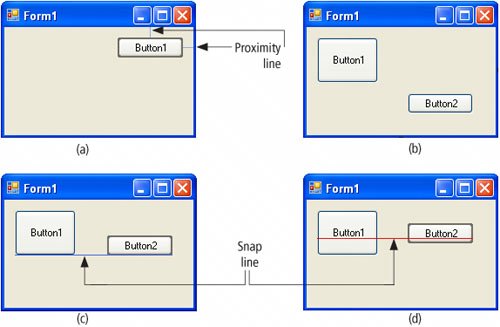
3. | Drag the button toward the upper-right corner of the form until two short line segments appear. See Figure 3.11(a). The button is now a comfortable distance from the two sides of the form. Figure 3.11. Positioning Controls. |
4. | Place a second button below the first button and drag it upwards until a proximity line appears between the two buttons. The buttons are now a comfortable distance apart. |
5. | Resize and position the two buttons as shown in Figure 3.11(b). |
6. | Drag Button2 upwards until a blue line appears along the bottoms of the two buttons. See Figure 3.11(c). This blue line is called a snap line. The bottoms of the two buttons are now aligned. |
7. | Continue dragging Button2 upwards until a purple snap line appears just underneath the words Button1 and Button2. See Figure 3.11(d). The middles of the two buttons are now aligned. If we were to continue dragging Button2 upwards, a blue snap line would tell us when the tops are aligned. Steps 8 and 9 show another way to align the tops. |
8. | Click on Button1 and then hold down the Ctrl key and click on Button2. After the mouse button is released, both buttons will be selected. |
9. | Open the Format menu in the Menu bar, hover over Align, and click on Tops. The tops of the two buttons are now aligned. Precisely, Button1 (the first button selected) will stay fixed, and Button2 will move up so that its top is aligned with the top of Button1. |
The most common uses of the submenus of the Format menu are as follows:
Align: Align middles or corresponding sides, of a group of selected controls.
Make Same Size: Make the width and/or height of a group of selected controls the same.
Horizontal Spacing: Equalize the horizontal spacing between a group of three or more selected controls arranged in a row.
Vertical Spacing: Equalize the vertical spacing between a group of three or more selected controls arranged in a column.
Center in Form: Center a selected control either horizontally or vertically in a form.
Comments
While you are working on a program, the program resides in memory. Removing a program from memory is referred to as closing the program. A program is automatically closed then you start a new program. Also, it can be closed directly with the Close Project command from the File menu.
Three useful properties that have not been discussed are the following:
BackColor: This property specifies the background color for the form or a control.
Visible: Setting the Visible property to False causes an object to disappear when the program is run. The object can be made to reappear with code.
Enabled: Setting the Enabled property of a control to False restricts its use. It appears grayed and cannot receive the focus. Controls sometimes are disabled temporarily if they do not apply to the current state of the program.
Most properties can be set or altered with code as the program is running instead of being preset from the Properties window. For instance, a button can be made to disappear with a line such as Button1.Visible = False. The details are presented in Section 3.2.
If you inadvertently double-click on a form, a window containing text will appear. (The first line begins Public Class Form1.) This is a Code window, which is discussed in the next section. Press Ctrl+Z to undo the addition of this new code. To return to the Form Designer, click on the page tab above the Main area labeled "Form1.vb [Design]."
We have seen two ways to place a control onto a form. A third method is to drag the control from the Toolbox to the form.
Practice Problems 3.1
| 1. | What is the difference between the Text and the Name properties of a button? |
| 2. | Give a situation where the MaxLength property of a text box is useful. |
Exercises 3.1
| 1. | Create a form with two buttons, run the program, and click on each button. Do you notice anything different about a button after it has been clicked? |
| 2. | While a program is running, a control is said to lose focus when the focus moves from that control to another control. In what three ways can the user cause a control to lose focus? |
In Exercises 3 through 24, carry out the task. Use a new program for each exercise.
| 3. | Place "CHECKING ACCOUNT" in the title bar of a form. |
| 4. | Create a text box containing the words "PLAY IT, SAM" in blue letters. |
| 5. | Create a text box with a yellow background. |
| 6. | Create a text box named txtGreeting and containing the word "HELLO" in large italic letters. |
| 7. | Create a label containing the sentence "After all is said and done, more is said than done." The sentence should occupy three lines, and each line should be centered horizontally in the label. |
| 8. | Create a read-only text box containing the words "Visual Basic" in bold white letters on a red background. |
| 9. | Create a text box named txtLanguage and containing the words "Visual Basic 2005" in Courier New font. |
| 10. | Create a yellow button named btnPush and containing the word "PUSH". |
| 11. | Create a white button containing the word "PUSH" in large italic letters. |
| 12. | Create a button containing the word "PUSH" in bold letters in which the letter P is underlined. |
| 13. | Create a button containing the word "PUSH" with the letter H as the access key. |
| 14. | Create a label containing the word "ALIAS" in white on a blue background. |
| 15. | Create a label named lblAKA and containing the centered italicized word "ALIAS". |
| 16. | Place BALANCE SHEET in the title bar of a form, where the form has a yellow background. |
| 17. | Create a label containing VISUAL on the first line and BASIC on the second line. Each word should be right justified. |
| 18. | Create a form named frmHello whose title bar reads "Hello World". |
| 19. | Create a label containing a picture of a diskette. (Hint: Use the Wingdings character <) Make the diskette as large as possible. |
| 20. | Create a label containing the bold word "ALIAS" in the Courier New font. |
| 21. | Create a list box with a yellow background. |
| 22. | Create a list box that will be invisible when the program is run. |
| 23. | Create a form named frmYellow having a yellow background. |
| 24. | Create a button containing a picture of a red bell. (Hint: Use the Wingdings character %.) Make the bell as large as possible. |
In Exercises 25 through 30, create the interface shown in that figure. (These exercises give you practice creating controls and assigning properties. The interfaces do not necessarily correspond to actual programs.)
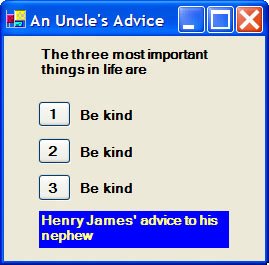
| 25. |
|
| 26. |
|
| 27. |
|
| 28. |
|
| 29. |
|
| 30. |
|
| 31. | Create a replica of your bank check on a form. Words common to all checks, such as "PAY TO THE ORDER OF," should be contained in labels. Items specific to your checks, such as your name at the top left, should be contained in text boxes. Make the check on the screen resemble your personal check as much as possible. |
| 32. | Create a replica of your campus ID on a form. Words that are on all student IDs, such as the name of the college, should be contained in labels. Information specific to your ID, such as your name and Social Security number, should be contained in text boxes. Simulate your picture with a text box containing a smiling facea size 24 Wingdings J. |

The following hands-on exercises develop additional techniques for manipulating and accessing controls placed on a form.
| 33. | Place a text box on a form and select the text box. What is the effect of pressing the various arrow keys? |
| 34. | Place a text box on a form and select the text box. What is the effect of pressing the various arrow keys while holding down the Shift key? |
| 35. | Experiment with the Align command on the Format menu to determine the difference between the center and the middle of a control. |
| 36. | Place four large buttons vertically on a form. Use the Format menu to make them the same size and to make the spacing between them uniform. |
| 37. | Place three buttons vertically on a form. Make them different sizes without their left sides aligned. Click on the first button. While holding down the Ctrl key, click on the second button and then the third button. (Notice that the first button has white sizing handles, and the other two buttons have black sizing handles.) This process is referred to as selecting multiple controls.
|
| 38. | Place a button, a list box, and a text box on a form. Then run the program, and successively press Tab. Notice that the controls receive the focus in the order in which they were created. Invoke the Index from the Help menu and type "Tab order" into the "Look for:" text box. Double-click on the subheading "controls on Windows forms" and read the discussion of how to set the tab order on Windows forms. Then change the tab order for the three controls you placed on the form. |
| 39. | Place a text box on a form, select the text box, and open its Properties window. Double-click on the name (not the Settings box) of the ReadOnly property. Double-click again. What is the effect of double-clicking on a property whose possible settings are True and False? |
| 40. | Place a button on a form, select the button, and open its Properties window. Double-click on the name (not the Settings box) of the ForeColor property. Double-click repeatedly. Describe what is happening. |
Solutions to Practice Problems 3.1
| 1. | The text is the words appearing on the button, whereas the name is the designation used to refer to the button. Initially, they have the same value, such as Button1. However, each can be changed independently of the other. |
| 2. | If a text box is intended to hold a telephone number, then you might want to set the MaxLength property to 12. Similarly, text boxes intended for Social Security numbers or state abbreviations might be given maximum lengths of 11 and 2, respectively. |
EAN: 2147483647
Pages: 164