Data Source Events
The InfoPath object model consists of objects that expose properties, methods, and events. InfoPath's programming model has two kinds of events: data source events, and form events. Because InfoPath's programming model emphasizes the role of events, let's take a look at the data source events first, and then some of the useful form events, properties, and methods of the various objects.
The number of data source events is small compared to the number of form events, but they are arguably the most powerful. Typically, most of the code behind a form involves sinking data source events.
Three data source events raise sequentially in the order listed here:
- OnBeforeChange
- OnValidate
- OnAfterChange
Each of these events can be raised on any data node (that is, element, attribute, or group of elements) in the data source.
|
Although the events are always raised in this order, InfoPath does not guarantee that the events will be raised one immediately after the other. For example, if you have a hierarchy and have event handlers for different levels in the hierarchy, you might not see the events handled immediately after each other for a given data source node. You might see OnBeforeChange raise for a group first, then OnBefore-Change handled next for a field, and then OnValidate for the group, and so on. |
While learning about these events and their functions, keep in mind that a data source change could occur because the text in a data node was deleted, cut, pasted, dragged, dropped, or modified in some other way. Furthermore, changes are not limited to textual changes in single elements. Inserting, deleting, or replacing a section, and repeating table row or list item also trigger data source events.
For example, suppose that we are sinking these three events for a text node called FirstName, which is bound to a text box containing the text Jogn. If the user fixes the typo by changing the text box to John, each event for the node bound to this text box will be raised twice: once as a delete operation (the text Jogn was deleted) and once as an insert operation (the text John was inserted). You will learn how to handle these cases by examining the Operation property on the DataDOMEvent object.
Furthermore, the events will not just raise on the node that changed, but also "bubble up" on the parent node of the changed node, and on its parent, and so on, until the root of the data source tree is reached.
The following sections first take a look at two ways to create event handlers using InfoPath, and then describe exactly the purpose of each of these three events.
Creating an Event Handler
How do you create an event handler for a particular data node? For example, suppose you have a mortgage application form and you want to handle the OnBeforeChange event for the telephone number HomePhone. Using the InfoPath designer, click the drop-down button on the data node called HomePhone and choose Properties, and then the Validation and Event Handlers tab, as shown in Figure 12-7.
Figure 12-7. Selecting a data source node and showing the Properties dialog.
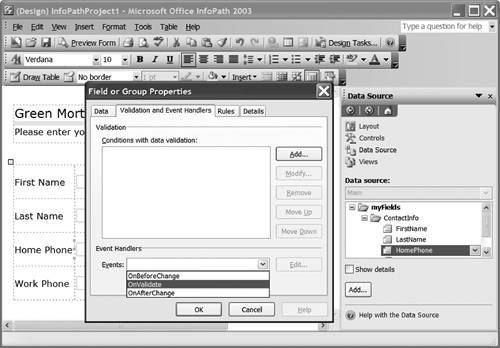
From the Events drop-down, select the OnBeforeChange event. Then click the Edit button. Visual Studio will automatically generate the appropriate event handler with the appropriate attributing. We sometimes omit the attributing in our example code in this chapter as we do herebut remember that the correct attributing must be in place for InfoPath to raise an event to a particular handler. These attributes are difficult to generate by handwhich is why you should use the dialogs of InfoPath to create these event handlers:
public void HomePhone_OnBeforeChange(DataDOMEvent e)
{
// Write your code here. Warning: Ensure that the constraint you
// are enforcing is compatible with the default value you set
// for this XML node.
}
You might want to start from a data-bound control to get to a data node for which you want to handle an event. If the data node is bound to a control, you can get to the same dialog shown in Figure 12-7 by first double-clicking the data-bound control in the view to get to its Properties dialog, as shown in Figure 12-8.
Figure 12-8. Selecting a control's properties to handle a data event.
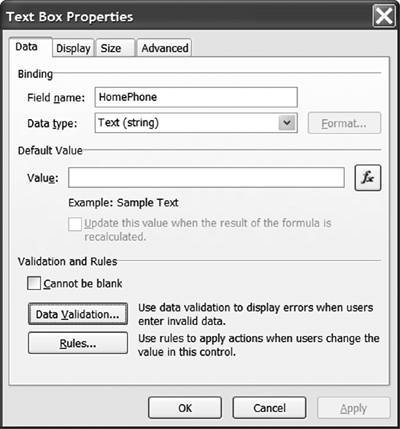
Click the Data Validation button to get to the dialog box shown in Figure 12-7.
The OnBeforeChange Event
The OnBeforeChange event fires before the change is made to the underlying XML data. If you want to abort the change, the OnBeforeChange event is your only chance; by the time the OnValidate event is raised, the change has already been made to the underlying data source.
To reject the change to the data, set the ReturnStatus property of the DataDOMEvent argument e to false. When ReturnStatus is set to false, InfoPath will show an error dialog informing the user that the change is not allowed.
Several additional useful properties are associated with the DataDOMEvent object. The Operation property returns a string set to "Delete", "Update", or "Insert". This tells you whether the user is deleting data, updating data, or inserting new data. The ReturnMessage property accepts a string that is shown in a dialog when the change is rejected. The NewValue property returns a string for the new value of the data node that was changed. The OldValue property returns a string for the value of the data node before it was changed.
Listing 12-4 shows an OnBeforeChange event handler that validates that an e-mail address is in a valid format. In Listing 12-4, we first check the DataDOMevent object's Operation property to make sure we are not in a delete operation. If we are in a delete operation, the NewValue property would be null. We then validate the e-mail address returned by the NewValue property by using a regular expression. If the change is not matched by our regular expression, we set ReturnStatus to false and set ReturnMessage to the message text we want InfoPath to use in the error dialog.
Listing 12-4. An OnBeforeChange Event Handler
public void Address_OnBeforeChange(DataDOMEvent e)
{
 if (e.Operation == "Delete") // only handle update and insert
 return;
 string newEmail = e.NewValue;
 if (newEmail.Length > 0)
 {
 Regex emailRegEx = new Regex(
 @"^[a-z][w.-]*[a-z0-9]@[a-z0-9][w.-]*" +
 @"[a-z0-9].[a-z][a-z.]*[a-z]$",
 RegexOptions.IgnoreCase);
 e.ReturnStatus = emailRegEx.IsMatch(newEmail);
 e.ReturnMessage = "Please use a valid email address.";
 }
}
You cannot change the data source itself from within the event handlerfor example, you cannot set the NewValue property to a different string. InfoPath "locks" the data source to make it read-only for the duration of the event, to prevent the scenario where one event handler attempts to change the data, triggering another change event handler, which might then trigger yet another change event handler, and so on. Making the data source read-only while the event sink runs prevents these "event storm" scenarios.
|
Data source change events are fired when the form loads and the data source is first created. If you set the DataDOMEvent object's ReturnStatus property to false during this data source creation phase, the form will fail to load. Use caution when writing an OnBeforeChange event handler. |
The OnValidate Event
By the time the OnValidate event raises, the new value has already been written into the data source. The most common reason to sink an OnValidate event is to implement error handling.
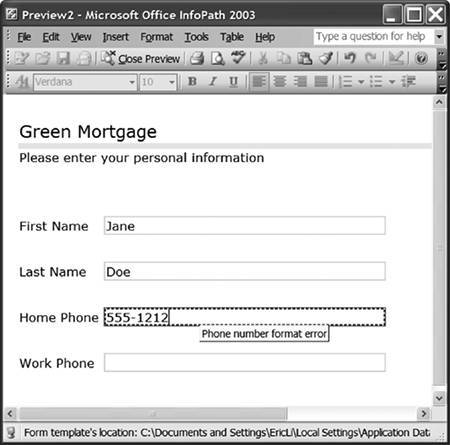
A form error is typically shown in an InfoPath form by a red dashed "error visual" rectangle surrounding the control. For instance, if you require that a telephone number include the area code, you might use an error visual rectangle to indicate an improper format, as shown in Figure 12-9.
Figure 12-9. A data validation error shown in InfoPath with a red dashed rectangle.
Let's add error handling for telephone number data using the OnValidate event. Listing 12-5 shows an OnValidate handler that uses some additional features of the InfoPath object model. The code uses the DataDOMEvent object's ReportError method to report data validation errors. The ReportError method takes the parameters listed in Table 12-1.
|
Parameter Name |
Type |
What It Does |
|---|---|---|
|
varNode |
object |
The data node to associate with the error. If this data node is bound to one or more controls, the controls might display error visuals. |
|
bstrShortError-Message |
string |
The short error message is the message shown in the tooltip when the user hovers over a control that is data-bound to the data node passed to varNode. |
|
fSiteIndependent |
optional bool |
Set to true to tell InfoPath that the error applies to all potentially matching nodes, which proves useful when you add an error to a node that is repeating and you want to add an error to the collection of nodes instead of a particular node. If set to false, the error is associated with the specific node passed to varNode and no other. |
|
bstrDetailed-ErrorMessage |
optional string |
The long error message typically has more information than the short error message and has additional troubleshooting options. |
|
lErrorCode |
optional int |
An error code value; it is sometimes convenient to be able to give each error condition a number. Setting an error code proves particularly useful if you have an existing error reporting system whose numeric codes you want reuse. |
|
bstrType |
optional string |
Tells InfoPath how to first reveal the error: If you pass the string "modeless", InfoPath will passively alert the user via an error visual on the control. If you pass the string "modal", InfoPath will show a dialog prompting the user with the long error message. |
Listing 12-5 also illustrates the use of the XDocument object's Errors collection as an alternative way to report errors. Recall from Listing 12-2 that the code generated for the InfoPath form has cached away the XDocument object in the thisXDocument variable. The code uses the thisXDocument variable to access the XDocument object for the form. It accesses the XDocument object's Errors collection and uses the Errors collection's Add method to associate errors with the form. The arguments to the Errors.Add are very similar to those of ReportError, with three differences. First, Errors.Add has no "site-independent" option. Second, Errors.Add allows you to tag an error condition with a string parameter called bstrConditionName as well as with an error code. This condition string is for your internal use only does not display to the end user. Third, you can call Errors.Add at any time in any handler, but ReportError may only be called from within an OnValidate event handler.
Listing 12-5. An OnValidate Event Handler That Uses the DataDOMEvent Object's ReportError Method and the XDocument Object's Errors Collection
public void HomePhone_OnValidate(DataDOMEvent e)
{
 // Ensure that the format is "xxx-xxx-xxxx"
 if (e.NewValue == null)
 return;
 bool siteIndependent = false;
 int errorCode = 0;
 string modal = "modal";
 string newPhone = e.NewValue;
 if (newPhone.Length != 12)
 {
 // Tell InfoPath what node caused the error, whether the error
 // is associated with this node, what the short and long error
 // messages should be, and whether to produce a modal or
 // modeless error dialog:

 e.ReportError(e.Site, "Phone number format error",
 siteIndependent, "Phone number expected format is xxx-xxx-xxxx.",
 errorCode, "modeless");
 }
 else
 {
 int indexOfHyphen = newPhone.IndexOf('-');
 if (indexOfHyphen != 3)
 {
 thisXDocument.Errors.Add(e.Site, "NoExpectedHyphen",
 "No hyphen found", "Expected a hyphen after 3 digits.",
 errorCode, modal);
 }
 else
 {
 indexOfHyphen = newPhone.IndexOf('-', indexOfHyphen + 1);
 if (indexOfHyphen != 7)
 {
 thisXDocument.Errors.Add(e.Site, "NoExpectedHyphen",
 "Second hyphen not found",
 "Expected a hyphen after 6 digits.",
 errorCode, modal);
 }
 }
 }
}
Site Versus Source
Another thing to note in Listing 12-5 is the code passes the Site property of the DataDOMEvent object to give ReportErrors and Errors.Add the data node where the error occurred. The Site property of the DataDOMEvent object refers to the data node currently processing the validation event (that is, the data node to which the event handler is listening). The DataDOMEvent object's Source property refers to the data node that changed and triggered validation. Remember that events can "bubble up" from child nodes to parent nodes; if you are sinking the OnValidate event of a parent node and the user changes a child node, the Site will refer to the parent node handling the event, and the Source will refer to the child node that triggered the event in the first place.
|
The Site and Source properties and the Errors.Add and ReportError methods all require the domain security level. |
The OnAfterChange Event
In OnBeforeChange and OnValidate events, the data source is read-only and cannot be modified by your event handler code. When can your code modify the data source? Code you write in an OnAfterChange event handler is allowed to edit the data source if InfoPath is not raising the OnAfterChange event for an undo or redo operation invoked by the user. Your OnAfterChange event handler can detect whether an undo or redo resulted in the event being raised by checking the DataDOMEvent's IsUndoRedo property.
If you directly update the data node that your event handler corresponds to, use cautionotherwise you could create infinite recursion. Listing 12-6 shows a simple OnAfterChange event handler that directly changes the data node it is handling the event for by setting e.Site.text to a new value. It prevents recursion by first checking to see whether e.Site.text is already set to the new value. It also checks the IsUndoRedo property to make sure OnAfterChange was not raised as a result of an undo or redo.
Listing 12-6. An OnAfterChange Event Handler That Updates the Data in the Node for Which It Is Handling the OnAfterChange Event
[InfoPathEventHandler(MatchPath="/my:myFields/my:someField",
 EventType=InfoPathEventType.OnAfterChange)]
public void someField_OnAfterChange(DataDOMEvent e)
{
 if (e.IsUndoRedo)
 return;

 if (e.Site.text == "newFieldValue")
 return; // prevents recursion

 e.Site.text = "newFieldValue";
}
Part One. An Introduction to VSTO
An Introduction to Office Programming
- Why Office Programming?
- Office Object Models
- Properties, Methods, and Events
- The Office Primary Interop Assemblies (PIAs)
- Conclusion
Introduction to Office Solutions
- The Three Basic Patterns of Office Solutions
- Office Automation Executables
- Office Add-Ins
- Code Behind a Document
- Conclusion
Part Two. Office Programming in .NET
Programming Excel
- Ways to Customize Excel
- Programming User-Defined Functions
- Introduction to the Excel Object Model
- Conclusion
Working with Excel Events
Working with Excel Objects
- Working with Excel Objects
- Working with the Application Object
- Working with the Workbooks Collection
- Working with the Workbook Object
- Working with the Worksheets, Charts, and Sheets Collections
- Working with Document Properties
- Working with the Windows Collections
- Working with the Window Object
- Working with the Names Collection and Name Object
- Working with the Worksheet Object
- Working with the Range Object
- Special Excel Issues
- Conclusion
Programming Word
Working with Word Events
Working with Word Objects
- Working with Word Objects
- Working with the Application Object
- Working with the Dialog Object
- Working with Windows
- Working with Templates
- Working with Documents
- Working with a Document
- Working with the Range Object
- Working with Bookmarks
- Working with Tables
- Conclusion
Programming Outlook
- Ways to Customize Outlook
- Introduction to the Outlook Object Model
- Introduction to the Collaboration Data Objects
- Conclusion
Working with Outlook Events
Working with Outlook Objects
- Working with Outlook Objects
- Working with the Application Object
- Working with the Explorers and Inspectors Collections
- Working with the Explorer Object
- Working with the Inspector Object
- Working with the NameSpace Object
- Working with the MAPIFolder Object
- Working with the Items Collection
- Properties and Methods Common to Outlook Items
- Outlook Issues
- Conclusion
Introduction to InfoPath
- What Is InfoPath?
- Getting Started
- Form Security
- Programming InfoPath
- Data Source Events
- Form Events, Properties, and Methods
- Conclusion
Part Three. Office Programming in VSTO
The VSTO Programming Model
- The VSTO Programming Model
- VSTO Extensions to Word and Excel Objects
- Dynamic Controls
- Advanced Topic: Dynamic Host Items
- Advanced Topic: Inspecting the Generated Code
- VSTO Extensions to the Word and Excel Object Models
- Conclusion
Using Windows Forms in VSTO
- Using Windows Forms in VSTO
- Introduction
- Adding Windows Forms Controls to Your Document
- Writing Code Behind a Control
- The Windows Forms Control Hosting Architecture
- Properties Merged from OLEObject or OLEControl
- Adding Controls at Runtime
- Conclusion
Working with Actions Pane
Working with Smart Tags in VSTO
- Introduction to Smart Tags
- Creating Document-Level Smart Tags with VSTO
- Creating Application-Level Smart Tags
- Conclusion
VSTO Data Programming
- VSTO Data Programming
- Creating a Data-Bound Customized Spreadsheet with VSTO
- Creating a Data-Bound Customized Word Document with VSTO
- Datasets, Adapters, and Sources
- Another Technique for Creating Data-Bound Spreadsheets
- Caching Data in the Data Island
- Advanced ADO.NET Data Binding: Looking Behind the Scenes
- Binding-Related Extensions to Host Items and Host Controls
- Conclusion
Server Data Scenarios
- Populating a Document with Data on the Server
- Using ServerDocument and ASP.NET
- A Handy Client-Side ServerDocument Utility
- The ServerDocument Object Model
- Conclusion
.NET Code Security
- .NET Code Security
- Code Access Security Versus Role-Based Security
- Code Access Security in .NET
- Location, Location, Location
- Strong Names
- Publisher Certificates
- Trusting the Document
- Deploying Policy to User Machines
- Conclusion
Deployment
- Deployment
- VSTO Prerequisites
- Deploying to an Intranet Shared Directory or Web Site
- Local Machine Deployment Without a Deployment Manifest
- Editing Manifests
- Creating Setup Packages
- Advanced Topic: Deploying Network Solutions to Be Cached Locally
- Conclusion
Part Four. Advanced Office Programming
Working with XML in Excel
- Introduction to Excels XML Features
- Introduction to XML Schema Creation in Visual Studio
- An End-to-End Scenario
- Advanced XML Features in Excel
- Excel-Friendly XML Schemas
- VSTO Support for Excel Schema Mapping
- Conclusion
Working with XML in Word
- Introduction to Words XML Features
- An End-to-End Scenario: Creating a Schema and Mapping It into a Word Document
- Exporting the Mapped XML in the Document to an XML Data File
- Importing an XML Data File into the Mapped Document
- The XML Options Dialog
- VSTO Support for Word Schema Mapping
- VSTO Support for the WordML File Format
- Conclusion
Developing COM Add-Ins for Word and Excel
- Introduction to Add-Ins
- Scenarios for Using Add-Ins
- How a COM Add-In Is Registered
- Implementing IDTExtensibility2
- Writing a COM Add-In Using Visual Studio
- The Pitfalls of MsCoree.dll
- COM Interop and Regasm.exe
- Shimming: A Solution to the Problems with MsCoree.dll
- Conclusion
Creating Outlook Add-Ins with VSTO
EAN: N/A
Pages: 214
