Configuring a Secure Site
|
We're going to go the simple route and store our credentials in the Web.config file. We can do this in our situation because the members of the band shouldn't change very often. Therefore, there won't be much administration of these accounts required. If you had a situation where you were changing users a lot, it would make more sense to have a database-driven security model.
We need to set up a configuration file for our secure section of the site.
Try It Out—The Web.config File
-
If you haven't already got one, create a file called Web.config using the built-in Web Matrix template.
-
Insert the following configuration XML as shown below. You can delete any existing authentication and authorization sections:
<configuration> <system.web> <authentication mode="Forms"> <forms name=".ASPXAUTH" loginUrl="Secure/Login.aspx"> <credentials passwordFormat="Clear"> <user name="john" password="passjohn" /> <user name="al" password="passal" /> <user name="dave" password="passdave" /> <user name="colt" password="passcolt" /> <user name="james" password="passjames" /> </credentials> </forms> </authentication> <authorization> <allow users="*" /> </authorization> </system.web> <location path="Secure"> <system.web> <authorization> <deny users ="?" /> </authorization> </system.web> </location> </configuration>
How It Works
As we've talked about, the way you authenticate a user with Forms-mode authentication is totally up to you. One method is to include the users' credentials in the Web.config file itself, as we did above. This is great for simple applications like ours that have few users, and whose users don't change very often. As you can imagine, if you had lots of users, and you needed to make changes to them often, constantly editing this configuration file would get very repetitive and dull! It could also be error-prone. If you break the XML schema of the Web.config file, your application will throw exceptions.
Here is an explanation of our Web.config file. We have to set up the authentication section, which specifies the attributes of your users and the method of logging in, and the authorization section, which specifies what the authenticated users can access and what their levels of permissions are.
The following line specifies we're using Forms-mode authentication:
<system.web> <authentication mode="Forms">
The name attribute specifies the name of the cookie that's used to track the user's authentication status. The default is .ASPXAUTH. You should change this if you have more than one secure directory using different credentials on the same website:
<forms name=".ASPXAUTH" loginUrl="Secure/Login.aspx">
The loginURL is the page the site redirects a user to when they try to access a page when they're not authenticated. In a minute we'll create the Login.aspx file itself.
The next line is the beginning of the section that has the users' credential information stored. The passwordFormat specifies how the passwords are encrypted. There are several possibilities that allow a password to be stored in a way that prevents viewing of the password itself in the configuration file. We're using Clear, which simply means we'll type the password in a standard textual format:
<credentials passwordFormat="Clear">
Next are the users themselves. We simply specify a name and password, and the user will use these combinations to gain access to the site:
<user name="john" password="passjohn" /> <user name="al" password="passal" /> <user name="dave" password="passdave" /> <user name="colt" password="passcolt" />
The authorization section is unique in that it's actually possible to have multiple sections for different locations. First, we specify the default permissions:
<authorization> <allow users="*" /> </authorization> </system.web>
This section specifies what kind of users can gain access to the site. There are two tags, allow and deny. You can specify usernames specifically within either tag by using a comma-delimited list, or you can use wildcards. There are two wildcards. The ? represents users that aren't authenticated. The * represents all users, authenticated or not. When you have multiple deny and allow tags, the system checks the user against each tag from top to bottom. As soon as the user matches one of the tags, they are either allowed or denied based on the tag type.
What we do next is override the settings for the location specified, in this case the Secure directory. You can also specify a specific file if you want. For this location, we are denying unauthenticated users. This will force them to log in using the Secure/Login.aspx page specified earlier in the Web.config file:
<location path="Secure"> <system.web> <authorization> <deny users ="?" /> </authorization> </system.web> </location> </configuration>
| Important | You should note that, in general, storing passwords in a text file is a bad idea, especially if they aren’t encoded. This is because if anyone gets access to the text file, they then get your passwords. For this Example, this is safe enough, but for commercial applications it’s best to use another form of storage, perhaps a database. In the online version of the samples running at http://alanddave.com/books/7992/cam/ the user details are stored in SQL Server. The login page on that site details and code of how this is done. |
Creating the Login Page
Now that we've got the security for the site configured, we need a way for the user to log on. Fortunately, Web Matrix provides a template for this, so it will be nice and easy to implement.
Try it Out—The Login Page Template
-
Create a new directory in your current working directory, and call it Secure.
-
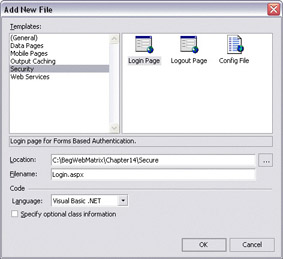
Add a new page to the Secure directory, choosing the Login Page template from under the list of Security templates, and name the file Login.aspx:
-
In the Code view, change the code that's generated to look like the following:
Sub LoginBtn_Click(Sender As Object, E As EventArgs) If Page.IsValid Then If FormsAuthentication.Authenticate(Username.Text, UserPass.Text) Then FormsAuthentication.RedirectFromLoginPage(UserName.Text, true) Else Msg.Text = "Invalid Credentials: Please try again" End If End If End Sub -
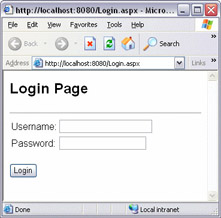
If the Web.config file doesn't already live in the Secure folder, along with Login.aspx, then move it now. You can now save and run the login page, and here is what you will see:
One of two things will happen now if you try to log in on this page.
If you submit incorrect credentials in the textboxes, then you will see this screen:

Note the helpful error message that is returned.
If you submit the correct credentials as dictated by the Web.Config file, then you will come across the following error screen:
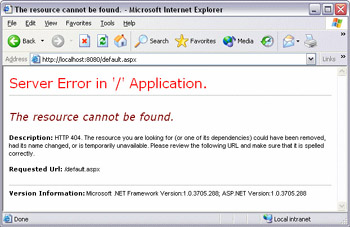
This is because we have not yet created the Default.aspx page that the web application looks for after a user logs in. We have already seen in Chapter 11 how to do this but you will see a quick recap on this, after we have seen how the code works.
How It Works
The page contains two textboxes, one for the user to enter their username and the other for them to enter their password. When they click on the Login button, the code above is executed. Let's take a look at it now:
If FormsAuthentication.Authenticate(Username.Text, UserPass.Text) Then
The Authenticate() function in the FormsAuthentication class takes a username and password as parameters. It then compares these to whatever credentials you've provided. In this case, we provided credentials in the Web.config file, so the function checks to see if the username and password are in it. If the username and password combination is in the credentials, it also checks the Authorization section of the Web.config to make sure the user is allowed to access the requested content. If the user is allowed to access it, the function returns True. If not, it returns False.
If the user was authenticated, we call the RedirectFromLoginPage() method:
FormsAuthentication.RedirectFromLoginPage(UserName.Text, True)
The first parameter above specifies the user's name. This can technically be anything you want, but it usually corresponds to the user's logon name. The second parameter specifies whether the cookie should remain valid across browser sessions. If set to True, the cookie will remain valid even if the browser is shut down and restarted. Therefore, the user won't have to log on again. This is great option for sites that need minimal security, but for others, I would set this to False. This is because when you set this value to True, you take the chance that someone might use your workstation after you and access the site under your name.
We have a message label on the page that we can use to provide feedback to the user as they attempt to log on. In this case, we let them know that their credentials are invalid:
Else Msg.Text = "Invalid Credentials: Please try again"
Creating the Options Page
As we mentioned at the end of the previous How It Works section, we need to have a page that a band member sees when they first log on. This will show them all of the things they can do within the secure site. This concept is similar to the linking to a default page functionality we saw in Chapter 11, but this time we are tying it in with security concerns.
Try It Out—Where to go after Logging in?
-
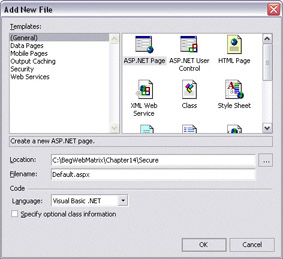
Create a new page called Default.aspx, within the Secure directory:
-
In the Design view for the page, add the following controls and set their properties:
| Control Type | Property | Value |
|---|---|---|
| Label | ID | lblWelcome |
| Text | Welcome | |
| Hyperlink | NavigateURL | TourDiary.aspx |
| Text | Tour Diary | |
| Hyperlink | NavigateURL | Logout.aspx |
| Text | Log Off |
You should have something similar to the following. It's not pretty, but it serves our purposes:

Now you should be able to login through your Login.aspx page and once authenticated, you should see Default.aspx we just created.
Creating the Logout Page
Before we create the tour diary functionality, let's complete the security of the site by allowing the user to log off. Fortunately, there's a template for this too.
Try It Out—Logging Out of the Site
-
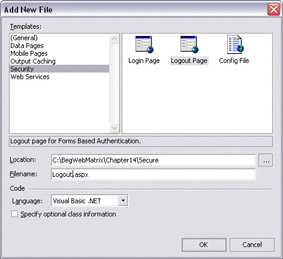
Create a page called Logout.aspx using the Logout Page template under the Security option in the Add New File dialog:
-
Try to log in to the website, view the Default.aspx page, and then choose Log off from the list of options on Default.aspx. After you click the Log Off button, you will see the following page:

It's interesting to note that when you first click the Log Off button on the Logout.aspx page, you'll see the message stating that you're not authenticated. If you click the button a second time, however, you'll be redirected to the Login.aspx page. This is because you can't even access the Logout.aspx page after the FormsAuthentication.SignOut() method has been called.
That's it. Let's look at the simple code that's generated and see how it's working.
How It Works
The intrinsic Request object has an IsAuthenticated property that specifies whether or not the user has been validated against a set of credentials:
Sub Page_Load(Sender As Object, E As EventArgs) If (Request.IsAuthenticated = true) Then
If the user is authenticated, we display their username and the fact that they are logged in. The User object contains several properties and methods. The one we're utilizing here is Name, which returns the same value we passed to the FormsAuthentication.Authenticate() method above:
Status.Text = "User " & User.Identity.Name & " is currently logged in."
To log the user out, call FormsAuthentication.SignOut():
Sub LogOffBtn_Click(Sender As Object, E As EventArgs) FormsAuthentication.SignOut() Status.Text = "Not authenticated." End Sub
The user's authentication cookie will be removed and they will have to log on again.
|
EAN: 2147483647
Pages: 141