Lights - Improving the Look of the Page
|
Lights – Improving the Look of the Page
So far in this chapter we've looked at how HTML works, and how controls and text can be laid out on a page to make it look neat and tidy. However, what we haven't looked at are some of the properties that can enhance the page and controls. For example, take the window title bar:
![]()
This looks rather messy, and unfriendly – wouldn't it better if we could change this to something more user-friendly?
Another point is that a textbox control will only allow one line of text by default, and the text for the labels is in a set font. This latter point may seem petty, but when you start thinking about readability, certain fonts are much more suitable than others. Let's take a look at how we can make pages look a little nicer.
Try It Out—Formatting Page Elements
-
Create a new ASP.NET Page called Properties.aspx.
-
Type some text onto the page – enough to make up a paragraph.
-
Drag a Label and TextBox onto the page:
-
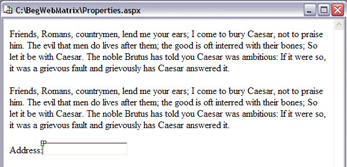
Copy the text from the first paragraph and paste it underneath the first copy, but above the label and the texbox. Then, change the Text property of the label to Address:. Your form should look like this now:
-
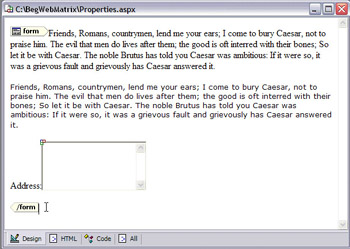
Select the text for the second paragraph, and from the formatting toolbar, change the font. Use the Verdana font (or Tahoma if Verdana isn't shown), and change the size to 2.
-
Select the TextBox, and in the Properties window change the TextMode property to MultiLine, and Rows to 5.
-
From the View menu select Glyphs.
-
Click to the right of the form glyph at the end of the page:
-
From the Properties window, change the bgColor property. Select a color of your choice – I used a pale yellow, which has a property value of #FFFFC0.
-
Switch to HTML view. At the top of the page you'll see:

-
Between the <head> and </head> elements, add the following:
<title>Setting Properties and Formatting</title> -
Save the page and run it:
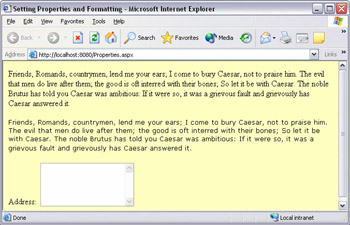
Notice how the page is no longer white, the top title bar contains some descriptive text, and that the second paragraph is easier to read than the first on the screen. You may have noticed the background color changing automatically if you switched to Design view after changing the bgColor property. Let's look at this in detail to see what we've done.
How It Works
Let's first look at the font. The formatting is simple – just pick the font from the list, much as you would in a word processor. What's important is the font we chose, instead of the default Times New Roman. We used Verdana, which just happens to be much easier to read on screen than many other fonts – and that's an important point, as some fonts are much easier to read when printed, and some are easier to read on the screen. Since this is a web page, it is going to be viewed on screen, so it's best to pick a suitable font. Other fonts that are easy to read on screen are Geneva, Arial, and Helvetica.
One thing to note is what happens if the font you pick isn't on the user's machine. Remember that it is the browser that renders the text. If the user machine doesn't have the font you've requested, then it defaults to Times Roman. To get around this, you can specify multiple fonts; you just need to separate them by commas. For example, you can have something like this:
Verdana, Tahoma, Helvetica It's also worth adding the default fonts that should be available to all browsers, on all platforms (remember, the user may not be using Windows). These fonts are:
serif, sans-serif, monospace, cursive The second item to look at is the TextBox. In an earlier example we changed the look of this, but didn't explain what the effect was when we changed the properties. We changed the TextMode and Rows properties. TextMode can take one of three values: SingleLine, MultiLine, or Password, which have the following characteristics:
| TextMode | Characteristic |
|---|---|
| SingleLine | Textbox appears as a single line. Carriage returns are not accepted in the text. |
| MultiLine | Textbox has multiple lines. Carriage returns are accepted in the text. |
| Password | Textbox appears as a single line. Carriage returns are not accepted in the text, and entered text is shown as the * character so it can't be read. You'll find out more about this later in the book. |
The Rows property defines how many rows are shown when the textbox is in MultiLine mode. There is a corresponding Columns property, to set how wide (how many characters) the textbox will be. This is useful for not only address fields, but also for general text fields, such as when a lot of text is required.
Changing the background color of the page is probably the most confusing thing in this example. It's not the changing of the property, since you can just pick a color, but it's how you get to it. The problem is that everything we put on a page is within the form glyphs, which aren't normally shown. These identify the area of the page that ASP.NET has control over, but to change the color we need to access the properties of the page itself – or more accurately, the BODY element. This is the HTML element that contains the body of the page (as opposed to specific HTML parts such as the heading area). So, showing the glyphs allows us to select the BODY element, and thus to change the color.
To change the title shown on the title bar of the browser window, we have to use HTML view, since it's not possible to set this from design view in Web Matrix:
<head> <title>Setting Properties and formatting</title> </head>
Here, we added a title element, and entered our heading text that should be displayed in the title bar of the browser.
Using Images
We've now seen how to lay out pages and add some formatting to make them look better. Let's take this one step further by looking at the use of images within pages. The use of images generally falls into one of two categories – those used for products, such as a CD cover image on Amazon, and those used for styling, such as logos. While both kinds can bring a web page alive, it's easy to mistakenly abuse their use.
The most important thing to remember about images is that they can be big, and big means slower downloading time. It's easy to forget this when you are testing pages on your local machine, but once the page is on a public website, many people will access it through slow connections. Now, big doesn't necessarily mean big in terms of how much space it takes on a page, it can also mean its physical size on disk. Resizing an image in Web Matrix doesn't make the image physically smaller when it's sent to the browser. You can resize images by using a specialist graphics tool – I use Paint Shop Pro (see http://www.jasc.com/ for more details). This allows manipulation of the colors and file formats, has some great features, and is pretty cheap.
Let's look at modifying the dice game to add some images.
Try It Out—Snake Eyes with Real Dice
-
Open up Dice.aspx (the one you created in the previous chapter) and create a sub-directory called Images (either from Windows Explorer or from the Workspace in Web Matrix – just right-click on a directory in the Workspace and select Add New Folder…).
-
Copy Dice.gif, and the files 1.jpg to 6.jpg from the samples directory into the new Images directory.
-
Drag an Image control onto the page, placing it at the top left corner, next to the title.
-
In the Properties window enter the file name and path of an image in the ImageUrl property, Images/Dice.gif. You might need to resize it once it's on the page. To make sure we don't squash the image and make it either too narrow or too short, try setting the Height property to 100px. The image will scale the width as appropriate, maintaining its aspect ratio.
-
Drag two more Image controls onto the page, this time placing them underneath the Label controls that are currently used for the dice. You will need to press Enter to place a new line between the current labels and the Ooops, you did it again :( line. You don't need to set any properties for these. The page should now look like this:
-
Switch to Code view, and change the code. The lines you need to add are highlighted below:
Label3.Visible = False Label1.Text = Int(Rnd() * 6) + 1 Label2.Text = Int(Rnd() * 6) + 1 Image2.ImageUrl = "Images/" & Label1.Text & ".gif" Image3.ImageUrl = "Images/" & Label2.Text & ".gif" If Label1.Text = "1" And Label2.Text = "1" Then Label5.Text = Label4.Text ...
-
Save the file and press F5 to run it.
-
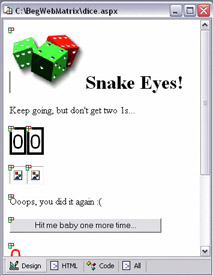
Click the button to roll the dice, and notice how you now get pictures of the dice too:
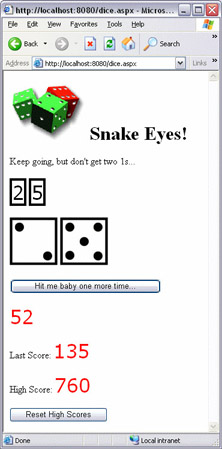
How It Works
The first part of this is simple – we just used an Image control at the top of the page. The ImageURL property identifies where the image comes from. In our case we used Images/Dice.gif as the file name. Placing your images in a sub-directory is a good idea, as it keeps them separate from the rest of the files that make up a website.
The second part of this example is more complex. We started with two Image controls, but don't set the ImageURL properties – that's because we set them in code:
Image2.ImageUrl = "Images/" & Label1.Text & ".gif" Image3.ImageUrl = "Images/" & Label2.Text & ".gif"
Although this looks complex, it's actually quite simple. You have to remember that Label1 and Label2 are the existing labels we use for the dice. Their Text properties contain the number that the dice 'rolled'. We want to show an image for that roll of the dice, so we need to convert the number of the roll into an image. We have six GIF images of dice, whose file name is just the number of the roll. So, 1.gif is an image of a die rolled 1, 2.gif shows a die rolled 2, and so on. To show the correct image we simply make up a string using the number rolled. In the screenshot, the first die rolled was a 4, as stored in the Text property of Label1. So the ImageUrl property of Image2 becomes Images/4.gif.
This shows that you don't have to set all of the details for an image when you are designing the page. In other words, it is possible (and sometimes essential) to make certain display decisions at run time, based upon some external factors that cannot be known until our program is actually running.
Who Turned out the Lights?
Another excellent use of setting properties at run time is when reacting to the user. In our dice game, we've reacted to the dice throws, and hidden or made visible label controls, and this is a really great technique. However, once you start doing it it's easy to get overwhelmed by trying to hide or unhide lots of controls. For example, if we consider adding high scores to the dice game, we might want to capture some user details, perhaps the name and e-mail address. Let's give this a go:
Try It Out—Hiding Multiple Controls
-
Open Dice.aspx, and drag a Panel control onto the page, placing it right at the bottom. With this Panel control selected, click it again, and the border will go shaded – this means you can edit the contents.
-
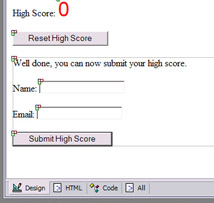
Delete the word Panel that's showing, and add some text, two TextBox controls, and a Button control. Set the Text property of the Button control to Submit High Score. You form should now look like this:
-
Select the Panel, by clicking outside on the main page, and then clicking on the Panel control again. This allows you to select the Panel itself, rather than the contents.
-
Change the Layout mode of the panel using Absolute Position from Layout on the menu bar, and drag the panel to the right of the Reset High Score Button. This just means the page is a bit easier to read since it's not so deep and won't scroll.
-
Set the Visible property for the Panel to False.
-
Double-click the Submit High Score button, and add the following line of code:
Sub Button3_Click(sender As Object, e As EventArgs) Panel1.Visible = False End Sub -
Change the Button1_Click code so it now looks like this – the new line is highlighted:
Sub Button1_Click(sender As Object, e As EventArgs) Label3.Visible = False Label1.Text = Int(Rnd() * 6) + 1 Label2.Text = Int(Rnd() * 6) + 1 Image2.ImageUrl = "images/" & Label1.Text & ".jpg" Image3.ImageUrl = "images/" & Label2.Text & ".jpg" If Label1.Text = "1" And Label2.Text = "1" Then Label5.Text = Label4.Text If CInt(Label5.Text) > CInt(Label6.Text) Then Label6.Text = label5.Text Panel1.Visible = True End If Label4.Text = 0 Label3.Visible = True Else Label4.Text = CInt(Label4.Text) + CInt(Label1.Text) + CInt(Label2.Text) End If End Sub -
Save the file, and run it.
-
Notice that none of the controls in the panel have shown up.
-
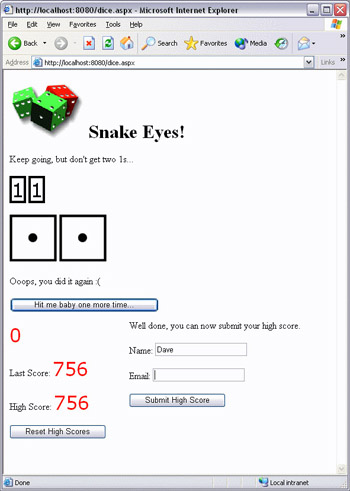
Click the roll button until you lose, and see how the controls in the panel appear:
-
Click the Submit High Scores button, and the Panel disappears again.
How It Works
This works on exactly the same principle as showing and hiding Label controls. The big difference is that the Panel is a container control – it doesn't have any display of its own, it is simply used to contain other controls. This means that we can place controls within a panel, and show or hide them all together by setting the Visible property on just the panel control. In the page design we set the Visible property of the panel to False, so none of the controls it contains show up initially. Then, when a game is lost, the Visible property is set to True, so all of the controls are shown. If we hadn't contained these controls within a Panel, we'd have had to set the Visible property on each one individually.
Not only is a Panel useful for hiding collections of controls, but it's also useful for grouping and moving them together when using absolute positioning.
Why does my Code Look Confusing?
One thing you may have noticed in the previous examples is that we haven't changed the name of any controls. We have Label1, Label2, Label3 and so on, but which is which? You can clearly see that as the number of controls increases, so does the confusion; it is difficult to keep track of which control is which.
To alleviate this we change the ID property of a control, giving it a meaningful name. For example, the labels used for the dice could be called Dice1 and Dice2, and the scores could be CurrentScore and HighScore. This makes our code much easier to read.
One thing we can also do is add something to the name to help us identify what type of control it is. For example, for the textboxes for the user name and e-mail address, we could change their ID values to Name and Email. The trouble is, how would we know what type of control this was is it a Label or a TextBox? Using txtName and txtEmail makes this clear; we've added txt to the beginning of the ID, using txt to stand for TextBox. Other common prefixes are:
-
•lbl for Label
-
•btn for Button
-
•lst for a list
-
•dg or grid for a DataGrid
You don't have to use prefixes, but they do make code easier to read, especially when you revisit that code after not looking at it for a while. If you decide to use these prefixes, it's worth being consistent, and using them throughout your code.
|
EAN: 2147483647
Pages: 141