Camera - Capturing User Information
|
Camera – Capturing User Information
In the previous section, we've looked at the "lights" – those things which make your web page nicer to look at and easier to use. Now it's time to move on to the section where we capture details. You've seen the TextBox control on a page, but it hasn't really been used to get details from the user. There are also other controls that we haven't looked at, such as those that supply lists of information, or allow selections from a small list.
A Mailing List Page
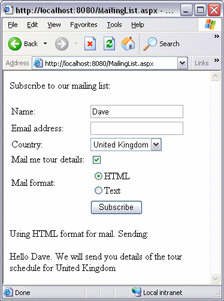
Let's build a simple page to allow people to subscribe to a mailing list – we'll assume it's for the site for a band (which is what the sample download application uses). What we're aiming for is something like this:
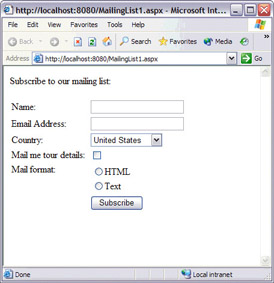
Here, we have fields for the name and e-mail address, a selection list for the country, a checkbox to see if the user wants tour details, and finally a selection of the format to use for e-mail messages. Let's give it a go.
Try It Out—Getting the User Details
-
Create a new ASP.NET Page called MailingList.aspx.
-
Add the text at the top of the page as shown above. Then add an HTML table (HTML ( Insert Table... from the main menu bar), and make it 6 rows deep and 2 columns wide.
-
Add the text into the first column as shown above.
-
Add two TextBox controls (from the Web Controls menu) into the cells to the right of the Name: and Email address: prompts, and change their ID properties to txtName and txtEmail.
-
Add a DropDownList control into the third row and change the ID property to cboCountry.
-
Add a CheckBox to the fourth row, and change the ID property to chkTour.
-
Add a RadioButtonList to the fifth row and change the ID property to radMail.
-
Add a Button to the last row and second column and change the Text property to Subscribe.
-
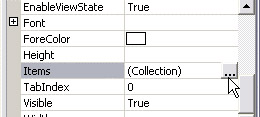
Select the DropDownList, and click into the Items property in the Properties window. You'll see a button appear on the right:
-
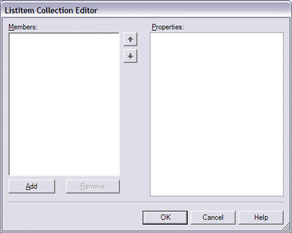
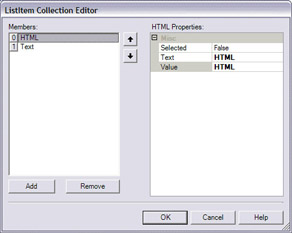
Click this button to launch the ListItem Collection Editor:
-
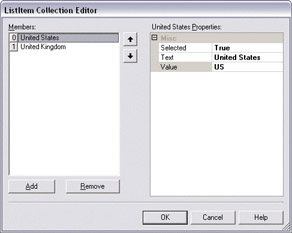
Click the Add button, and add details as follows for the United States, setting the Selected property to True:
-
Click Add again, and add another country – I used United Kingdom for the Text value and UK for the Value, leaving the Selected property at False. Later in the book you'll see how to fill these from a database. (There are many more country codes that you can use, the full list of which can be found by searching Google.com for Internet country codes.) Press OK to close this window.
-
Click the RadioButtonList and follow the same procedure, selecting the Items property and clicking the button. In the editor, add two members HTML and Text, using the same values for both the Text and Value properties. Leave the Selected property set to False for both of them:
-
Press OK to close the window.
-
Finally for the design, add a Label underneath the table containing all of the above controls and delete its default text.
-
Double-click the button at the bottom of the table, and add the following code in the code window:
Sub Button1_Click(sender As Object, e As EventArgs) Dim Message As String Message = "Hello " & txtName.Text & "." If chkTour.Checked Then Message &= " We will send you details of the tour " & _ "schedule for " & cboCountry.SelectedItem.Text End If If radMail.SelectedItem.Value = "HTML" Then Label1.Text = "Using HTML format for mail. Sending:<p />" & Message Else Label1.Text = "Using plain format for mail. Sending:<p />" & Message End If End Sub
-
Save the file and run it.
-
Add a name, select a country, a preferred mail format, and press the Submit button:

-
Now click the check box so a tick appears, select the HTML option, and press the Submit button again:
Notice how the message for the tour details e-mail now appears, and in that we have the country. Let's see how it works.
How It Works
You've already seen textboxes in action, so let's concentrate on the other controls, starting with the country list. A DropDownList contains a collection of ListItems, for which there is a special editor. Each ListItem has two properties, Text and Value. The Text property is what's displayed on the page, with the Value property hidden from view but usable in code. This allows you to show easy-to-read strings of text, rather than odd codes. This may not seem much with only two values of US and UK, but consider a page that just shows the full list of codes – the official ISO country list has 239 countries in it, and you don't want to show all of these as 2 letter codes. So, the DropDownList allows us to show a nice country name, while still using the abstract country code underneath that refers to the country name.
To get access to the country that has been chosen we use the SelectedItem property, which returns the ListItem selected. We can then pick the Text from this, which gives us the country name:
cboCountry.SelectedItem.Text
If we wanted the code, we could have used the Value property:
cboCountry.SelectedItem.Value
This would give us either UK or US, depending upon which country the user has selected.
The RadioButtonList has the same feature, so we can just extract the Value property:
radMail.SelectedItem.Value
|
EAN: 2147483647
Pages: 141