Securing Administrative Access to a Cisco Router
| Configuring administrative access on the Cisco router is an important step toward network security. You can access all Cisco routers in various ways:
Connection Through the Console PortTo protect administrative access to the routers, you must protect the console port via a password policy. You can store passwords locally on the router or use some kind of remote administration using a CiscoSecure Access Control Server authentication, authorization, and accounting (AAA) server. You can store passwords locally on the router or use Remote Authentication Dial-In User Service (RADIUS) or Terminal Access Controller Access Control System + (TACACS+) for remote AAA using CSACS. Password PolicyYou should keep the following rules in mind when formulating a password policy:
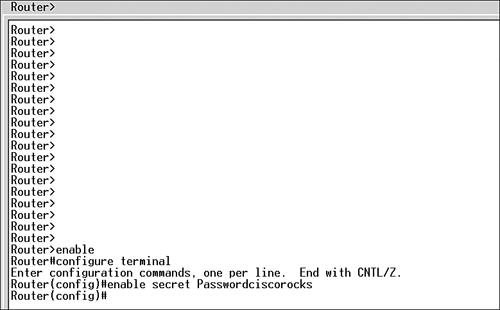
Securing Privilege EXEC Mode Using the enable secret CommandWhen you first power on the router, assuming that there is no prior configuration stored in the nonvolatile RAM (NVRAM), the router enters the Initial Configuration dialog box. The Initial Configuration dialog box is a menu system that assists you in applying basic configuration on the router. You can use Ctrl+Z to break out of the Initial Configuration dialog box. To make changes to the router configuration, you have to first enter privilege EXEC mode. By default, you do not need a password to access privilege EXEC mode. You can use the enable command to access the privilege EXEC mode of a router: Router> enable Router# Once you are in privilege EXEC mode, you can then secure privilege EXEC mode on the routers using the enable secret command in global configuration mode. The enable secret command encrypts the password to the privilege EXEC mode using the Message Digest 5 (MD5) hashing algorithm. It is a one-way hash. In other words, once you have a password using MD5, you cannot unhash it: Router> enable Router# configure terminal Router(config)# enable secret Passwordciscorocks Router(config)# Figure 3.1 shows how to configure an MD5 password on a router. Figure 3.1. Configuring the enable secret password on a router. In the example, Passwordciscorocks is the password that will be used to access the privilege EXEC mode of this router. Let us look at another example: Router> enable Router# configure terminal Router(config)# enable secret Password cisco rocks Router(config)# In this example, what is the password assigned to the privilege EXEC mode?
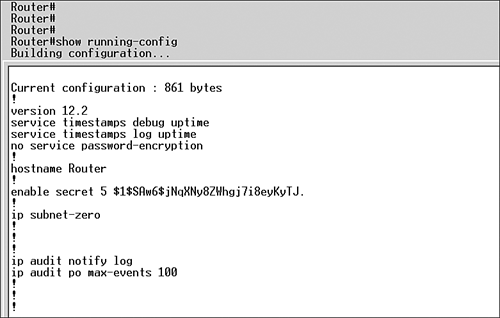
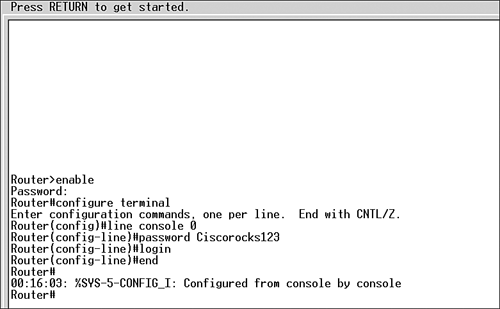
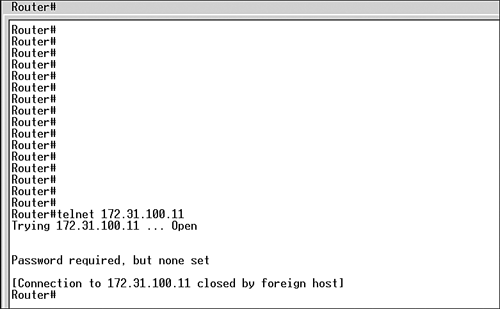
The password assigned to the privilege EXEC mode will be Password cisco rocks because all spaces after the first character are part of the password. If you do a show running-config on the router, you will note that the enable secret is encrypted and the 5 after enable secret identifies that it is an MD5 hash. Here is an example to illustrate this concept: Router# show running-config ! Last configuration change at 14:34:43 MST Wed Jul 16 2003 ! NVRAM config last updated at 14:34:44 MST Wed Jul 16 2003 ! ! version 12.3 service timestamps debug uptime service timestamps log uptime service password-encryption ! hostname Router ! enable secret 5 $oeJpvrQkQWGgsz5S5h.VqQe/ ! Figure 3.2 shows how the enable secret password appears in a show running-config command. Figure 3.2. Displaying the enable secret password command output in a show running-config command. If you forget your enable secret password, the only way to access the router's privilege EXEC mode would be by doing a password recovery. Different Cisco routers have different ways of doing password recovery. You can get information on password recovery by doing a search on the keywords "password recovery" on http://www.cisco.com. Always use the enable secret command instead of the older enable password command; enable password uses a very week encryption algorithm. Securing Console Access Using a Console PasswordA Cisco router's console port is the most important port on the device. Password recovery on the router can only be done using the console port. This port can be used to access the ROMMON mode on the router as well. The console port allows a hard break signal that interrupts the boot sequence of the router. You can issue the break sequence on a router within 60 seconds of the reboot, and it gives complete access to the user issuing this command. Cisco routers are vulnerable if you have physical access to the devices. However, if someone is trying to access the console port of the router remotely, you can apply an additional layer of security by prompting the user for a password. Here is how you protect the console port on the router: Router> enable Router# configure terminal Router(config)# line console 0 Router(config-line)# password Ciscorocks123 Router(config-line)# login Router(config-line)# end Router# Figure 3.3 shows how to configure password protection on the console port of a router. Figure 3.3. Configuring a password on the console port of a router. Remember, to assign a password to the console port of the router, you first have to access the global configuration mode of the router. Once in the global configuration mode, you access the console port by issuing the line console 0 command. Remember, the console port is always 0 because there is only one console port on every Cisco device, and Cisco starts its numbering of the ports with 0: Router> enable Router# configure terminal Router(config)# line console 0 Once in the line configuration mode, you issue the password command followed by the password. This password by default is not encrypted: Router(config-line)# password Ciscorocks123 Once you issue the password command, you issue the login command. The login command tells the router to ask for the password when someone is typing to access the router using the console port: Router(config-line)# login When you do a show running-config on the router, you note that the password is not encrypted. This output is truncated to fit the page; however, you must note that the line console information is always at the bottom of the configuration: Router# show running-config ! line con 0 login password Cisco123 line aux 0 line vty 0 4 ! end Securing VTY Access Using a Telnet PasswordBy default, all Cisco routers support up to five simultaneous Telnet sessions, and by default, no passwords are assigned to these Telnet or VTY lines. There is built-in security on the VTY lines that mandates the use of passwords to access the router via a Telnet session. If a Telnet session is initiated to a router that does not have a password assigned to the VTY lines, the following message appears on the screen: telnet 172.31.100.11 Trying... Connected to 172.31.100.11 Escape character is '^]'. Password required, but not set Connection closed by remote host Figure 3.4 shows how Telnet behaves when there is no password and login assigned to the VTY lines. Figure 3.4. Displaying the Telnet behavior when no password is assigned to the VTY lines. Essentially, no Telnet sessions are allowed to the router. This measure is good security, but it disallows everyone to access the router, even the legitimate user. To remotely manage the routers using Telnet, it is imperative that you assign a password to the VTY lines. Here is how you protect the Telnet lines on the router: Router> enable Router# configure terminal Router(config)# line vty 0 4 Router(config-line)# password VtyLines123 Router(config-line)# login Router(config-line)# end Router# In this example, the configuration logic is the same as that for the console port. The only difference is the following line: Router(config)# line vty 0 4 This line can be interpreted as follows : As we said earlier, by default, Cisco routers allow up to five simultaneous Telnet sessions, and in the Cisco world, all counting begins with 0. Hence, 0 4 would give you five Telnet lines. In the example, the password VtyLines123 is assigned to all five VTY lines. You can assign separate passwords to each and every line. However, managing the passwords becomes an administrative nightmare. You should consider a few guidelines when configuring VTY access to the router:
Our recommendation : Do not use Telnet, use SSH instead. SSH encrypts all data flowing between you and the router, thus providing high-level security.
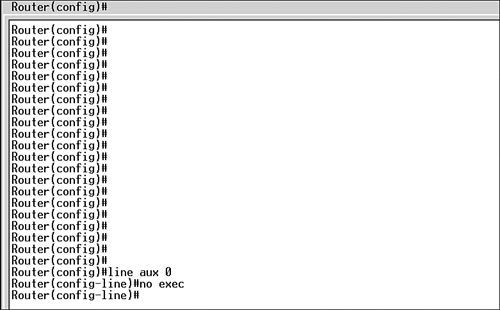
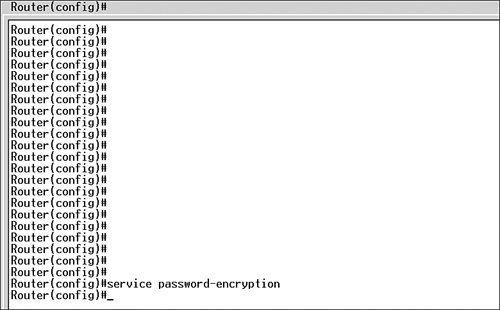
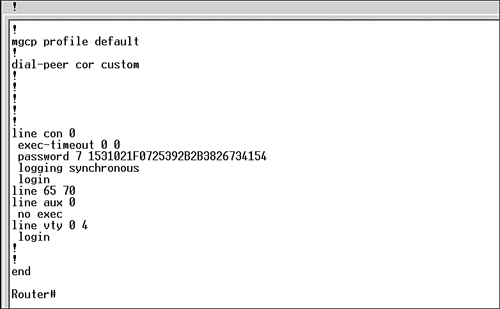
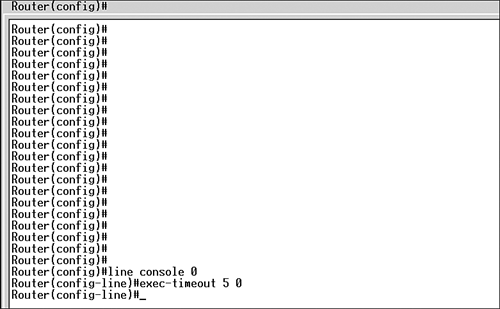
The aux port on the router is another way you can gain access to the router. You can protect the aux port on the router by assigning a password to it. Here is how you accomplish the task: Router> enable Router# configure terminal Router(config)# line aux 0 Router(config-line)# password ProtectAux0 Router(config-line)# login Router(config-line)# end Router# In this example, every time a user accesses the router via the aux port, he or she will be prompted for a password. If you are not using the aux port on the router, you can disable it by issuing the following command: Router(config)# line aux 0 Router(config-line)# no exec Figure 3.5 shows how to disable the aux port if it is not being used. Figure 3.5. Disabling the aux port. The no exec command disables all EXEC sessions to the router via that port. Do not issue this command on the console port of the router because it will disallow all exec sessions to the router's console port. Encrypting All Passwords on the RouterBy default, only the enable secret password is encrypted. To encrypt all other passwords configured on the router, issue the following command in global configuration mode: Router(config)# service password-encryption In Figure 3.6, the administrator is encrypting all the passwords except the enable secret password. Figure 3.6. Configuring the service password-encryption command. The service password-encryption command uses a Cisco proprietary Vigenere cipher to encrypt all other passwords on the router except the enable secret password (which uses MD5). The Vigenere cipher is easy to break, and if you do a show running-config on the router, it appears as follows: line con 0 password 7 110A1016141D logging synchronous login transport input none Figure 3.7 shows the password parameters after configuring the service password-encryption command. Figure 3.7. Output of the service password-encryption command. The number 7 after the keyword password indicates that the password has been encrypted using the Vigenere cipher. This command does not change the fact that the Vigenere cipher can be cracked. In fact, you can download the GETPASS utility, which will decrypt the Vigenere cipher for you. Configuring Session Activity TimeoutsYou can also control access to the router by configuring activity timeouts. You can use the exec-timeout command to accomplish this task. Here is an example of the configuration: line console 0 exec-timeout 5 0 end In Figure 3.8, the administrator is configuring the exec timeout value for the console port on a router. Figure 3.8. Configuring the enable timeout value for the console port on a router. This command sets the no activity timeout to 5 minutes. Setting a lower activity timeout automatically locks up the console once the timeout expires .
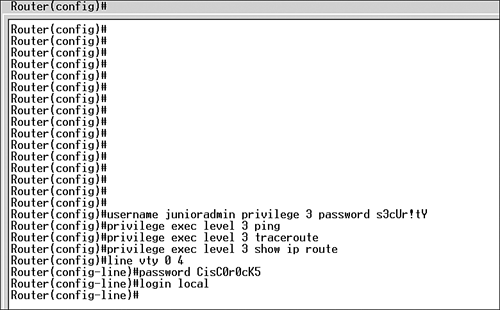
Configuring Access Levels on the RouterYou can configure access levels on the routers so the junior administrators do not have complete access to the router. Cisco routers have 16 different privilege levels that you can configure. The 16 levels range from 0 to 15, where 15 is equal to full access. You can customize levels 2 to 15 to provide monitoring abilities to the secondary administrators. Here is a sample configuration for privilege levels on the router: Central(config)#username junioradmin privilege 3 password 0 s3cUr!tY . . . Central(config)#privilege exec level 3 ping Central(config)#privilege exec level 3 traceroute Central(config)#privilege exec level 3 show ip route Central(config-line)#line vty 0 4 Central(config-line)#password CisC0r0cK5 Central(config-line)#login local Figure 3.9 displays the configuration of a privilege level for specific commands and applying local authentication to the VTY lines. Notice that in addition to the login local command a password is configured on the VTY lines. However, users will need to use the local router database to log in to the VTY lines because the login local command takes precedence over the password command. Figure 3.9. Configuring Privilege Level and Local Authentication. Looking at this config, whenever junioradmin logs into the router, he or she is allowed only three commands: ping , traceroute , and show ip route . Using the privilege command, you can provide another layer of security to your network backbone. Configuring Routers with a Statutory WarningIt is imperative that you configure a statutory warning on all your networking devices that clearly states the repercussions of attempting to log on to an unauthorized system. You can achieve this by using various banner messages:
You can configure a few more banner messages on routers to ensure that you get the word out that unauthorized users will be prosecuted. Just an FYI : Do not use such phrases as " Welcome to the ABC Network" because they can create a loophole that a hacker can use to avoid legal action. We highly recommend that you consult your legal department to come up with the correct verbiage. Securing SNMPSNMP is one of the most exploited protocols and can be used to gain administrative access to Cisco routers by establishing communication between a router's internal SNMP agent and management information base (MIB). SNMP uses community strings that act as the passwords to access the routers. Whenever you are setting up SNMP community strings, make sure you know which strings will have read-only access; which ones will have read-write access; and, most of all, which systems will be allowed SNMP access via ACLs.
|