Learning As You Go
New Feature As you work in your project plan, you can quickly get assistance when you need it. This section details the different types of information accessible to you through Microsoft Project.
Getting Started with Office Online
When you first start Microsoft Project, Office Online appears in the task pane on the left (see Figure 1-14).
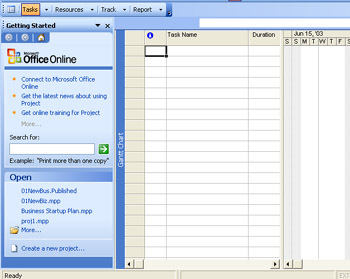
Figure 1-14: With Office Online, you can easily connect to Web sources for Project assistance.
Office Online provides links to Web resources having to do with Microsoft Project, including news, downloads, and templates. For example, click the Connect To Microsoft Office Online link, and the associated Web site appears in a new window (see Figure 1-15). You might see Spotlight links that provide information about highlighted services and features having to do with Microsoft Project or Microsoft Office.
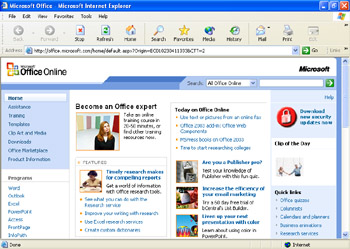
Figure 1-15: Find spotlighted features, downloadable templates, and user assistance from Microsoft Office Online on the Web.
Back in the Office Online pane in Microsoft Project, you can enter a word or phrase in the Search For box. If you're not connected to the Internet, Microsoft Project searches through your local installed Help system for topics matching your search phrase. If you're connected to the Internet, Microsoft Project also searches through Web resources. Either way, a list of Help topics appears in the Search Results pane.
Under the Open section, your four most recently opened project files are listed. If you click More, the Open dialog box appears. You can also click the Create A New Project link, and the New Project task pane appears.
In Microsoft Project 2002, the Project Guide was the first window we saw in the task pane. Now in Microsoft Project 2003, the Office Online pane is the first window. If you want to see the Project Guide, click the Close button in the upper-right corner of the Office Online pane. The Project Guide appears.
Any time you want to see Office Online, click Help, Project Help, or simply press F1. The Project Help pane appears; the Office Online links appear below the Assistance section (see Figure 1-16).
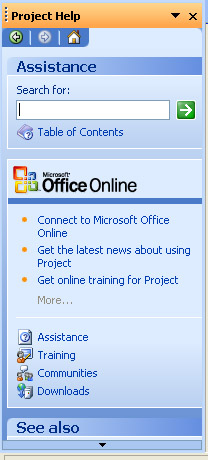
Figure 1-16: Press F1 to open the Project Help pane with its Office Online links.
| Tip | Turn off Office Online If you don't want to use Office Online and want to go straight to the Project Guide content in the task pane, you can turn it off. Click Tools, Options and then click the General tab. Clear the Show Startup Task Pane check box. With this check box cleared, the task pane still appears whenever you start up Microsoft Project. However, the Project Guide will show instead of Office Online. |
Working with the Project Guide
The Project Guide is the interactive interface element, introduced in Microsoft Project 2002, which helps you work through your project from the standpoint of project management processes and goals. The Project Guide complements the existing menus and toolbars , which allow you to approach your project plan from a strictly feature-oriented point of view.
The Project Guide resides in a pane on the left side of the screen that provides topics, instructions, and controls that assist your current work in your plan (see Figure 1-17). The Project Guide takes note of your current view and your current activities and presents a list of relevant topics and tools.
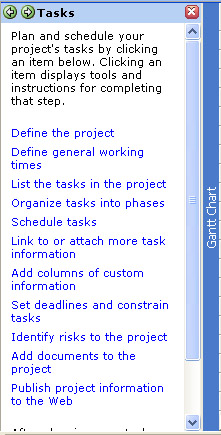
Figure 1-17: The Project Guide is on the left side of the screen.
For example, while you're working in the Gantt Chart, the Project Guide displays the Tasks guide, which contains topics directly related to entering and scheduling tasks . If you then switch to a resource view, the Project Guide displays the Resources guide, now presenting topics and controls related to entering and assigning resources. There are also groups of topics for tracking and reporting.
Helping to control the Project Guide is the Project Guide toolbar just above the Project Guide pane. Use the buttons on this toolbar to display any Project Guide list or topic you want to see. You can view the Tasks, Resources, Track, or Report lists; display any topic on those lists; and toggle the display of the Project Guide pane on or off.
When you click a topic in the Project Guide, you might find concise text about how to carry out the activity. Or you might click a control in the Project Guide, and the activity is done for you on the spot.
| |
By default, the Project Guide and its toolbar are showing. You can close the Project Guide pane using the Close button and open it when you need it by clicking any of the buttons on the Project Guide toolbar.
If the Project Guide toolbar is hidden, you can add it back. Click View, Toolbars, Project Guide.
If the Project Guide toolbar is not listed on the Toolbars menu, the Project Guide has been completely turned off. Click Tools, Options and then click the Interface tab. Under Project Guide Settings, select the Display Project Guide check box.
| |
New Feature In Microsoft Project 2003, the Project Guide has an enhanced reporting section. The Project Guide now includes steps and controls for setting up your project to view specific types of information, such as critical tasks, risks and issues, resource allocation, project costs, and more.
| Tip | |

The Project Guide also includes wizards to help automate certain processes. With a wizard, the Project Guide asks you specific questions about the activity you want to carry out. As you answer the questions, the wizard pulls together your answers and executes the task automatically, without your having to search and complete the appropriate dialog boxes in the appropriate views. The following is a list of Project Guide wizards:
Define The Project Wizard. Helps you create a new project plan, either from scratch or from an existing template (see Figure 1-18). This wizard integrates all the tasks you need to create a new project: entering basic project information, setting team collaboration options, adding supporting documentation, and saving the project file.
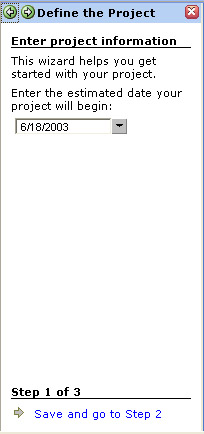
Figure 1-18: Start creating your plan with the Define The Project Wizard.
Project Working Times Wizard. Simplifies the methods of specifying and changing working days and hours, nonworking days and hours, and time units. You can use the Project Working Times Wizard for the project as a whole, in alternative calendars such as a weekend shift, and for specific resources.
Setup Tracking Wizard. Determines how you collect and enter progress information about tasks. Based on the information you provide, the Setup Tracking Wizard designs a tracking view for your specific purposes.
Print Current View Wizard. Sets up the current view to be printed the way you want. You can specify the length of the view to be printed as a report, preview the view as it will be printed, change the dimensions of the report, and modify the content to be included. You can also set the header, footer, and legend for the view.
| Tip | Permanently turn off the Project Guide If you don't want to use the Project Guide at all, you can turn it off so it doesn't appear when you start Microsoft Project. Click Tools, Options and then click the Interface tab. Clear the Display Project Guide check box. The Project Guide and its toolbar are hidden. The Project Guide no longer opens when you start up Microsoft Project, and the Project Guide toolbar is not even listed on the Toolbars menu. |
Getting Help
You can find Help topics to assist you with your project plan. A large set of Help topics is installed and available on your local computer. Another set of Help topics and other forms of assistance are available on the Web through Office Online. You can do the following:
-
Search for topics using key words or phrases.
-
Browse the Help table of contents.
-
Work through Microsoft Project training modules.
-
Join and ask questions from a Microsoft Project community.
-
Download Microsoft Project resources, including project plan templates.
Search for a Specific Topic
New Feature Rather than going through a particular structure of ordered goals and topics, it's often faster to just ask a direct question and get a direct answer. If you prefer to get your Help that way, do a search as follows :
-
Open Microsoft Project.
-
 On the Standard toolbar, click Project Help.
 The Project Help window appears in the task pane.
-
In the Search For box, type your word, phrase, or question, and then press Enter.
-
Review the list of topics that appears in the Search Results pane, and click the one that matches what you're looking for.
The Project Help topic window appears in its own pane, separate from the task pane (see Figure 1-19).
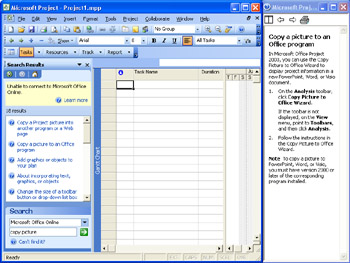
Figure 1-19: The Search Results pane remains in the task pane, whereas the Help pane on the right displays the selected topic. -
If you want to review a different Help topic, click it in the Search Results pane on the left.
The Help pane on the right changes to display the new topic.
Tip Ask a question Instead of using the Search For box in the Office Online pane, you can get help from the Type A Question For Help box in the upper-right corner of the Microsoft Project window. Type your question in the box and then press Enter. The Search Results pane appears with a list of related Help topics. Searching for Help this way is especially useful if you don't keep the task pane open on a regular basis.

If you're connected to the Internet, you can expand your keyword search to Help available on Office Online, as follows:
-
At the bottom of the Search Results pane, under Search, click Microsoft Office Online, or Assistance.
-
 Make sure your key word or phrase appears in the second box; then press Enter or click the Start Searching button.
 Microsoft Project searches for related topics on Office Online on the Web. Any topics found, either on the Web or locally on your computer, appear in the Search Results pane. As usual, click a topic name to view it in the Project Help pane.
| |
When you click a Help topic in the task pane, the Project Help topic window appears in a separate pane, which should dock on the right side of the Microsoft Project workspace. However, it's possible that the Help pane might float in the middle of your Project workspace.
If this happens, drag the Help pane's title bar to the right edge of the Microsoft Project window until it docks. The Microsoft Project workspace resizes itself to accommodate the Help pane. Every time you launch Project Help thereafter, the Help pane should appear neatly as the right pane.
| |
Browsing Help Contents
-
New Feature With Microsoft Project open, click Project Help on the Standard toolbar.
The Project Help window appears in the task pane.
-
In the Assistance section, click Table Of Contents.
The Help Table Of Contents appears in the task pane (see Figure 1-20).
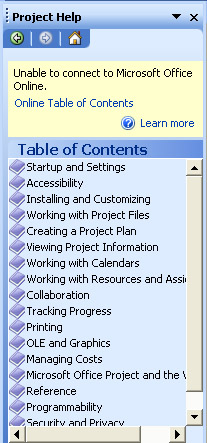
Figure 1-20: Use the Help Table Of Contents to browse through a logical sequence of related Help topics. -
 Click a book link to open that category.
 -
 Click a question mark link to view the Help topic.
 The Project Help topic window appears in its own pane and displays the Help topic you clicked.
Tip Press F1 to launch Project Help In addition to clicking the Project Help button on the Standard toolbar, you can launch the Project Help pane by simply pressing F1. You can also click Help, Project Help.
If your computer is connected to the Internet, and if you want to see any recent additions to Help, click Online Table Of Contents in the Project Help pane on the left.
| |
In the effort to march to the Microsoft Office drumbeat, Microsoft Project Help has lost the goal-based Help that was a showpiece for Project 2000 and Project 2002. That Help structure laid out topics according to specific project management “oriented goals. The Help Table of Contents in Project 2003 is rather less prescriptive. You have better luck when you know what you're looking for.
The good news is some of that project management information and process guidance is being made available through articles on Office Online. Enter searches or look at the online Table of Contents to find the broader-based Web articles about Microsoft Project and project-management solutions.
| |
Getting Help for Project Fields
There is a Help topic for each and every field in Microsoft Project. One way to find such topics is from the Help Table Of Contents, as follows:
-
On the Standard toolbar, click Project Help.
-
In the Assistance section of the Project Help pane, click Table Of Contents.
-
Click the Reference book link.
-
Click the Fields Reference book link.
Categories of fields appear as topics.
-
Click a category you want and then click the field you want to learn more about.
Each field reference topic includes best uses, examples, calculations if applicable , and any special notes to be aware of when working with this field.
You can also open a field reference Help topic if the field is showing in a table. Rest your mouse pointer over the column heading for a field. A ToolTip appears, indicating the name of the field as a link (see Figure 1-21). Click the field name link. The Help topic for that field appears.

Figure 1-21: Click a field's ToolTip to launch the field's reference topic.
Getting Help for Dialog Boxes
There is a Help topic for many of the more complex dialog boxes in Microsoft Project. One way to find such topics is from the Help Table Of Contents, as follows:
-
On the Standard toolbar, click Project Help.
-
In the Assistance section of the Project Help pane, click Table Of Contents.
-
Click the Reference book link.
-
Click the Dialog Box Reference book link.
The dialog boxes are listed in alphabetical order. Each dialog box reference topic includes steps on how to open the dialog box, and contains descriptions of each field and control in the dialog box.
New Feature You can also open a dialog box reference Help topic if you already opened the dialog box. Many dialog boxes include a Help button. Click that Help button and the topic for that dialog box appears.
Surfing the Web for Project Assistance
If you're connected to the Internet, use Office Online to browse for more information about Microsoft Project. To do this:
-
Open Microsoft Project and make sure your computer is connected to the Internet.
-
On the Standard toolbar, click Project Help.
-
In the Project Help pane, click Assistance.
If necessary, your Web browser is launched, and the Microsoft Office Assistance Web site appears.
-
Under Browse Assistance, click Project 2003.
The Project Assistance Web page appears (see Figure 1-22).
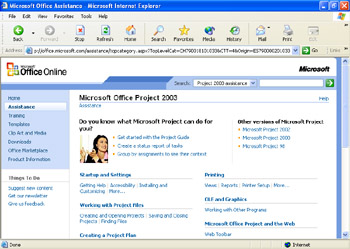
Figure 1-22: Use the Project Assistance page to browse through articles about various aspects of Microsoft Project.
Some articles are step-by-step instructions. Other articles have conceptual information about Microsoft Project features. Still others provide advice about project management solutions using Microsoft Project. There is also access to information in the Microsoft Project Knowledge Base and Microsoft TechNet.
Teaching Yourself Microsoft Project and Project Management
New Feature Web-based online training for Microsoft Project is now available. These training modules include text instructions along with graphics and voiceover. If you're connected to the Internet, use Office Online to browse for your Microsoft Project training options. Where applicable, training modules appear in your Search Results pane.
To browse Web training, do the following:
-
Open Microsoft Project and make sure your computer is connected to the Internet.
-
On the Standard toolbar, click Project Help.
-
In the Project Help pane, click Training.
If necessary, your Web browser is launched, and the Microsoft Office Training Home page appears.
-
Under Browse Training Courses, click Microsoft Project.
The Project Courses Training page appears, showing the list of training courses, their estimated length, and current user rating.
-
Click the training module, or course, you want to use, and it starts up, showing the course goals and other information about the course. The course narration begins as well.
-
Click Next to navigate to each succeeding page in the course.
Joining Project Communities
New Feature It's often easiest to learn from your more experienced buddies . A built-in group of knowledgeable friends willing to help can be found in Microsoft Project communities. Use your Internet connection and Office Online to find the Microsoft Project community that can help you find answers to your questions and also learn from questions posed by other users. To find and join a Microsoft Project community:
-
Open Microsoft Project and make sure your computer is connected to the Internet.
-
On the Standard toolbar, click Project Help.
-
Click Communities.
The Microsoft Newsgroups Web site appears in your Web browser.
-
In the left pane, click the plus sign next to Microsoft Project.
-
Click the type of community, or newsgroup, you're interested in.
Choices include General Questions, Professional And Server, Standard And Server, and Programming.
-
Review the newsgroup topics and click any that you're interested in (see Figure 1-23).
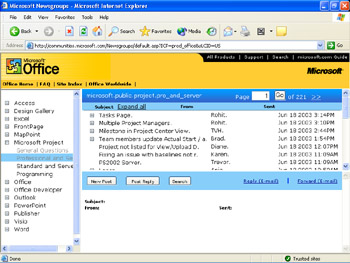
Figure 1-23: The Project newsgroups represent a community of Project users and experts who ask and answer questions. -
To see whether your question has been asked (and answered ) previously, click Search.
It's a great idea to do this before posting a new question, especially if you're new to this newsgroup.
-
If you don't find anything in the archives about your question, click the New Post button and enter and post your question to the newsgroup.
You'll soon find that you're knowledgeable enough to answer others' questions. To reply to an existing question, click the Post Reply button. Enter your answer and post it to the newsgroup.
Finding Project Downloads
New Feature Templates, clip art, and other resources are available on Office Online. More downloadable resources are being added all the time. To find and download resources available on the Web:
-
Open Microsoft Project and make sure your computer is connected to the Internet.
-
On the Standard toolbar, click Project Help.
-
Click Downloads.
The Downloads Home page appears in your Web browser.
-
Browse for any Microsoft Project downloads you might be interested in.
-
If you're interested in downloading a Microsoft Project template, click Templates in the left pane of the Downloads page.
-
In the Templates Home page, under Meetings And Projects, click Project Management.
A set of project management templates is listed (see Figure 1-24).
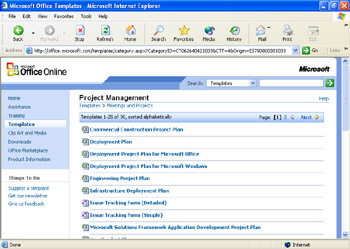
Figure 1-24: Templates marked with the Microsoft Project logo can be downloaded and instantly deployed in Microsoft Project on your desktop. -
Click a template to see what it looks like.
-
If you like the looks of a template, click Download Now. Follow the steps to copy the template onto your hard drive.
Cross-References For more information about working with Microsoft Project templates, see "Working with Project Templates".
Setting Your Preferences for Project Assistance
New Feature You can set up how you want to obtain your assistance from Office Online. To set these assistance options:
-
On the Standard toolbar, click Project Help.
-
In the Project Help pane, under See Also, click Online Content Settings.
The Service Options dialog box appears (see Figure 1-25).
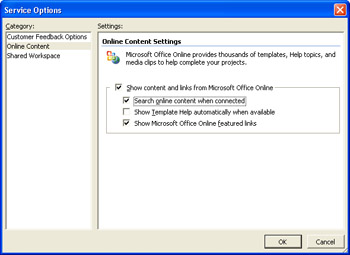
Figure 1-25: Use the Service Options dialog box to set your assistance options, as well as your customer feedback preferences. -
Review the settings, which indicate whether and what kind of information you want delivered from the Office Online Web site.
-
Select the settings you want, and clear the ones you don't.
-
When finished, click OK.
Note These settings, which apply to all Microsoft Office products, will take effect the next time you open any Office product.
Reporting Crashes
New Feature When Microsoft Project experiences a problem and crashes, a message appears, asking whether you want to send information about the malfunction to Microsoft developers. This feature was introduced with Microsoft Project 2002. New with Microsoft Project 2003 is the integration of the more confusing errors with appropriate Help content. In some cases, there are links to Knowledge Base articles for more information.
| Cross-References | For more information about Microsoft Project crash reporting, see "Responding to a Microsoft Project Problem". |
Working with Project Smart Tags
When you make certain types of adjustments to your project plan, Microsoft Project can present Smart Tag indicators with option buttons (see Figure 1-26). These Smart Tags specify the action you've just taken, along with any possible implications that action might have. You get information, especially in certain ambiguous situations, to make sure that the result is really your intention. You also see options to switch to a different action if your intention was for a different outcome.
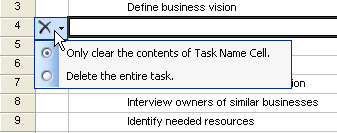
Figure 1-26: A Smart Tag is first marked with a triangle marker in the affected cell . When you move your mouse pointer over the marker, the Smart Tag indicator appears. Click the indicator, and the options appear.
There are four areas in which indicators and option buttons might appear:
-
Adding, changing, or removing resource assignments
-
Changing start or finish dates
-
Editing work, duration, or units
-
Deleting a task or resource in the Name column
The indicator appears in the cell as long as the edit is available for an Undo operation. After you make a new edit, the indicator disappears.
Unlike Microsoft Office Smart Tags, you can't change or create your own feedback messages in Microsoft Project.
You can turn off the display of indicators and option buttons. Click Tools, Options and then click the Interface tab. Under Show Indicators And Options Buttons For, clear the check boxes for the category of changes for which you don't need indicators.
Working with the Sample Database
New Feature If you're working with enterprise features in Microsoft Project Professional and Project Server, you can use the new sample database to experiment and evaluate features. The sample database contains the following elements:
-
Projects
-
Tasks
-
Resources
-
Assignments
-
Views
-
Enterprise global settings
-
Issues
-
Document libraries
-
Custom Project Guide
Use the sample database to train project managers, team members , and other stakeholders in your organization on the effective use of your implementation of Microsoft Project without having to use live project data.
EAN: 2147483647
Pages: 268