Hack24.Choose Your Screens
Hack 24. Choose Your Screens
Choosing the right screen or screens for your vehicle depends on the available space in the vehicle and the intended applications. There are a variety of screens that can be installed in your vehicle. In a large RV or a boat, you can get away with just installing a cheap, small television set. But in a car, you are usually limited to flat screens. There are also many places to install screens in a vehicle, and once you start installing them you may not be able to stop. In-car flat screens vary widely in quality. Based on LCD (liquid crystal display) and the better TFT (thin film transistor) technologies, these screens can cost from less than $100 to over $1,000, depending on size and viewing angle (that is, how good the picture looks when viewed from above or from the side). Both wide screens and conventional screens are available for the car. Wide screens usually have an aspect ratio (i.e., horizontal to vertical ratio) of around 16:9, and just like wide-screen high-definition televisions (HDTVs), they are designed to show movies. As a result, the common 7" touchscreens have an oddball resolution of 800 x 480 pixels. Conventional screens have a 4:3 aspect ratio, like traditional televisions, computer monitors, and video game consoles. Most video games will look a bit stretched on a 16:9 screen. You should choose a screen based on what you will use it for the mostif it's for DVD or computer use, go ahead and get a wide screen. If it's for older console games and standard-definition TV shows, you may want to stick to a 4:3 ratio. Another consideration is how much customization you want to do. A good car installation shop will have a skilled fabricator who can make any screen you buy look like it was factory installed, as long as you have room to install it. If you are installing it yourself and do not have the necessary creative skills or tools available, you should get a screen that installs easily and seamlessly. Some newer screens developed for mobile audio/video will come with an anti-glare ultraviolet coating, similar to what is used for instrument clusters and other displays in the car. These coatings will make it much easier to see the screen during daylight hours (particularly at dawn and dusk). Make sure you ask about how well the screen works in bright conditions before you make your purchase. 3.3.1. Off-the-Shelf Screen OptionsPortable 12V televisions have been around since the mid 1980s. Originally used for watching TV while camping, they evolved into larger versions that install in RVs and boats. Nowadays they can come with VHS tape or DVD players built in. Portable flat-screen DVD players are widely and cheaply available. They aren't particularly designed for in-car integrationthey usually flip open like laptops, and most of them don't take external video inputbut depending on your hacker skills, you may be able to convert many of them into cheap in-car screens. Headrest screens were first seen in airplane in-flight entertainment systems, and then they migrated to cars. Now, you can purchase them for less than $100. If you don't want to cut your headrest, you can even buy replacement headrests with screens preinstalled. You can purchase these in 4:3 or 16:9 aspect ratios, and in low and high resolutions. Many of them have multiple video inputs, so you can choose between, say, a DVD player and a video game console. The higher-end integrated units come with wired or even wireless headphones, so that the screens' users can have their own private audio-visual experiences without bothering other passengers. Headrest screens are great if there are multiple video entertainment options to choose from. They are always visible, however, and may attract thieves (window tinting can help). Fold-down screens range in size from 5" diagonal to the size of in-home screens. Cheap PC screens can even be adapted to fold down in a vehicle [Hack #30]. They are usually installed just behind the driver and passenger on the ceiling, so that the one or more rows of backseat passengers can all see the screen. Most factory-installed DVD playback systems involve a single ceiling-mounted fold-down flat screen. Because they hide away into the overhead console, they are less obvious and potentially less prone to theft. Sun visor screens can be as large as headrest screens and usually come preinstalled in a replacement sun visor with a mirror and light. The video cable to these screens can be cleanly routed down the front pillars of the vehicle for a seamless look. These hide away well and are good for providing customized video entertainment for the front passenger; however, the viewing angle is a bit high. Rearview mirror screens are designed to assist you in backing up, which is why they are usually sold along with a camera designed to be mounted on the rear of your vehicle. These are typically small 4:3 screens installed to the left of the rearview mirror. While they are a bit small for actually watching movies, they can quickly show the driver what his passengers are watching. They are also excellent for showing the currently playing song and track info, album art, or similar information to the driver. Motorized fold-out screens are the most stealthy and slickest installation, but they have their problems. All high-end head units now have an option for a fold-out 7" screen, usually with navigation and DVD options as well as touchscreen menu controls. These are some of the most expensive screens, because they are integrated into a head unit that also receives radio stations, controls other devices such as satellite radio, and plays CDs and DVDs. They usually also come with an auxiliary input option allowing you to connect external video (i.e., a computer), but not at high VGA resolution. Also, the touchscreen interfaces of these screens do not send the keypresses to the computer, so they are ineffective for in-car computer control. "Install a VGA Touchscreen in Your Dashboard" [Hack #26] has more information on this subject. There are actually two types of foldout screens: motorized screens and their cheaper sibling, the spring-assist monitor. As is the case in most things, the more moving parts there are, the more potential there is for breakdowns. A motorized screen not under a warranty will require expensive repair if and when the mechanism fails. A nonmotorized, spring-assisted unit will save you money both in the purchase price and down the road. The trade-off is the lack of automation and having to push/pull things to turn them on and off. 3.3.2. Factory ScreensBuilt-in center console screens with factory navigation features come in many mid- to high-end vehicles. The benefit of these screens is that they are seamlessly integrated with the interior of the vehicle. The drawback is that they are often slaves to their factory-designated functions, and in the U.S., because of various laws against in-car movie viewing, none of them display DVDs without assistance. A number of aftermarket companies have designed adapters for certain models of car that allow external devices to be attached to factory screens [Hack #32], and a Google search on your particular car can also help you find the company or individual out there who has figured out which wires to tap into. (Some good keywords to search for are RGB, NAV, screen, and rearview camera, as well as the make of your car.)
While you will probably be able to find an adapter to get video on your NAV screen, the ability to send the touchscreen or button presses to your in-car computer is highly unlikely unless you tap into and reprogram the factory navigation system itself. At this level of difficulty, you're better off replacing the screen. 3.3.3. Custom ScreensMany of the commercially available screens use the same electronics and simply change the enclosure. They may also add some buttons or video source switching capabilities. In fact, you can purchase the screens from electronics catalogs without enclosures in a very plain-vanilla configuration. Sub-$100 video screens are easy to find in large retail chains, though, and they can be disassembled and custom-installed wherever you need them. For instance, some people have installed screens in the center of their side-view mirrors, so they can see both behind and another view, by way of minicameras located at the rear of the vehicle. Others have installed whole banks of screens in the rear seat, making a video wall of inexpensive screens, just like you see in stores and clubs. 3.3.4. Mounting Your Screen on the DashboardIf you are going to be setting up a temporary in-car screen installation, you can use the mounting equipment that comes with most small screens. There are several standards relating to mounting screens. Almost all screens come with an integrated nut (Figure 3-2) that is the same as the one you find on cameras. This allows the screen to be mounted from below on a tripod or other bracket. Another standard mounting system is a slot in the back of the screen, also shown in Figure 3-2. A slotted nut can be slid into this bracket and tightened. Many pivoting arm supports for screens use this mounting system. When you purchase a screen, you should check what mounting hardware it comes with to ensure that you get what you need for your configuration. If your vehicle doesn't have room in the console or radio area to install the screen, you can use the mounting hardware that comes with the screen, shown in Figure 3-3, to mount it on top of the dashboard. The VGA touchscreens from Xenarc, Lilliput, and Pixellon all come with mounting posts. These posts have flexible metal bases with double-stick tape. Although not the prettiest installation, this tape will stick firmly to most dashboards and will hold the screen in place. While some of these mounting posts have screw holes as well, if you ever decide to remove the monitor you'll find it a lot easier to remove some sticky tape from the dashboard than to fill in and patch any holes you've drilled. Figure 3-2. A standard mounting nut and mounting slot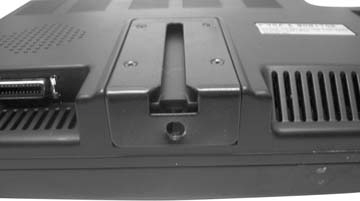 Figure 3-3. A touchscreen mounting bracket If the screen you've set your heart on doesn't come with the mount you need, that doesn't mean you shouldn't buy it. When deciding to tear into your vehicle, it's a good idea to find out how good you are at fabricating brackets and the like. It's not nearly as difficult as you think. Most brackets are simply bent sheet metal with holes. With a vise, a few different hammers, a drill or drill press, a hacksaw, and a grinding wheel, you'll be all set to make the majority of brackets and fittings you'll need. A good way to see what kind of bracket you need is to make a mock-up using malleable materials. Strapping tape, which is not actually tape but comes in a similar rolled-up narrow strip, is a good way to make a test fitment. It can be found at any hardware store and is simply a thin-gauge metal strip with holes every half-inch. Use it to make the basic shape of the needed bracket, fit it up with the screen to be mounted, and once it fits right, use it as a model for a sturdier version. If you know of any metal fabricators in your area, make friends with them. Little brackets can mean the difference between your screen fitting or falling out. Damien Stolarz and Lionel Felix |
