Hack25.Install a Headrest Screen
Hack 25. Install a Headrest Screen
Headrest screens are safe, inexpensive, and very easy to install without ripping your car apart. Headrest screens are probably the most popular aftermarket installation. Giving your vehicle an "in-flight entertainment" look, they can be cleanly installed into a vehicle without expensive or difficult modifications. There are several ways to get screens installed or attached to headrests so that passengers in the rear seats can enjoy video. 3.4.1. Replacing Your HeadrestsFigure 3-4 shows one way, which is simply to buy a headrest with a screen preinstalled. Companies such as Visualogic and Audiovox make these units for a range of vehicles, including many popular SUVs with gray or beige leather headrests. These headrests are slightly wider than OEM headrests, so that they can accommodate 7" wide-screen monitors. They also have the benefit of being tested to comply with Department of Motor Vehicles standards for head protection in a crash (the primary purpose of a headrest). Another company, Starvision, makes a model that can adapt to any size of headrest. And as always, you can just Google "headrest screen kit" and see what you find. 3.4.2. Clamping onto Your HeadrestsAnother option for installing screens is to use a bracket that connects to the headrest posts. These brackets come in various shapes and provide a standard mounting screw that can support a headrest monitor. Although these screens are easy to mount, the cables will be somewhat visible even in the neatest of routings. A good way to hide the cable harness is to use mesh sheathing and shrink tube on the ends. You can pick the color, and the mesh looks better than three wires running down the headrest. Figure 3-4. Headrest with preinstalled screen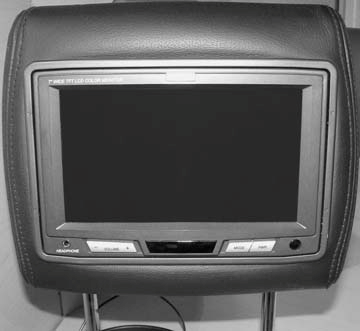 3.4.3. Digging into Your HeadrestsIf there are no pre-manufactured headrest solutions for your vehicle, or you don't mind modifying your headrests, you can install screens yourself (or have them professionally installed). If you're going to do it yourself, you can often get inexpensive used headrests for your car from a local dismantler or junkyardyou can then keep a set of unmodified headrests in reserve, so you can restore the car to its original state if you decide to sell it or move the screens to another car.
To install a headrest screen, the first step is to remove the headrest from the car. Many cars have a button you can press at the bottom of one of the metal posts that frees the headrest and lets the posts slide all the way out. Other cars require you to insert a paper clip in a small hole to release the lock. Once you have the headrest out, center the screen's frame in the headrest and verify that the headrest is deep enough to embed the frame and screen. If it is, draw an outline of the frame on the headrest in the exact location where you plan to install the screen. Make sure that the rectangle is the inside dimension of the frame, so that the frame lip of the installed screen will cover your ink mark (Figure 3-5). Figure 3-5. Installing a headrest screen (courtesy of http://www.xenarc.com)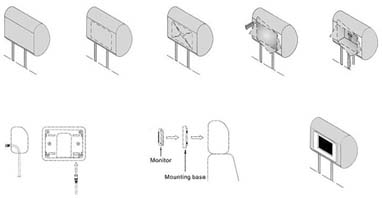 You won't be cutting a rectangle to install the frame. Instead, draw an X from corner to corner in the square you've drawn. Once you're sure the square is in the right place, take a razor blade or knife and cut along this X, so that you have four triangular flaps to fold out. To make room for the screen, you will need to remove some of the guts of the headrest (such as foam or stuffing). You can use whatever cutting tools you have on hand; razor blades or scissors will work, but an adjustable-length utility blade is best. Dig out the stuffing until you have enough depth (usually about an inch) to push in the screen frame. If you run into harder stuff than foam, you may have to cut it away with another tool, such as a rotary cutting drill (i.e., a Dremel). You should not cut to the very edge of the lines, but rather cut inward so that there is enough material to tightly hold the frame once it is inserted. After you have removed an inch or so of material and made a nice indentation for your frame, you need to secure it. Most likely, your headrest has hard material in the middle, such as plastic, that you can screw the frame into. (Use short screws, because you don't want these screws impaling your head should you subsequently whiplash into your headrest while driving.) 3.4.4. Velcroing onto Your HeadrestsI wanted to simply purchase new headrests with screens installed for my vehicle, but none of the models I could find matched the gray fabric interior of my 2005 Dodge Grand Caravan. So I went to get a pair of screens that I could install in the headrestsagain, no luck. My headrests are unusually thin, only a couple of inches deep. I was frustrated, because I wanted a clean look. I initially zip-tied the metal stand that came with the screen to the metal posts of the driver's-side headrest, but that didn't look very good, and I kept having to tighten the nut on the stand or the screen would sag and point at the floor. Finally, I got a bright idea. I have a reel of strong industrial Velcro that I bought at Fry's Electronics. I had been using it for a temporary installation of a touchscreen on my front console, and it was holding well. I decided to sew two strips onto the back of the headrest. You can see the result in Figure 3-6. Figure 3-6. Mounting a headrest screen with Velcro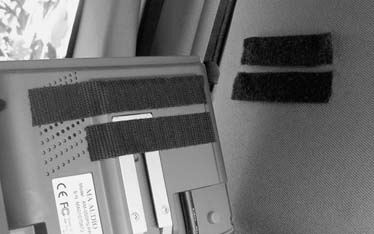 Voilà!I'm not much of a tailor and this Velcro does not match my fabric color, but one day I may try to dye a patch of gray Velcro. The handy thing is, I can now quickly take off the screens and stash them if I need to, and if I ever decide to upgrade the screens (e.g., to wide VGA touchscreens for head-to-head computer gaming), I can replace them easily. If you use sufficient Velcro (I use a 2" by 5" strip) the screen should be quite securely fastened; however, a permanent installation is safer in an accident because there is no chance of it flying off the headrest. Sun visor screens [Hack #27] are only half as deep as screens designed for headrests (less than 1"), and could be adapted to fit in a particularly shallow headrest or behind a racing-style seat. 3.4.5. Installing the WiringOnce you have a screen mounted, you need to get the video to the screen somehow. Most good screens have a single wire (or two, in the case of USB touchscreens) that carries the video and the 12V power to the screen. The screen comes with only a couple of inches of wire, which mates with a longer cord that breaks out into the video and power inputs. Facing the screen, you can see whether the thick wire (or bundle of wires) comes out of the right or left side. You will need to pull the longer wire up to that side through the seat itself, in the space between the seat covering (fabric or leather) and the padding of the seat. Starting on the appropriate side, insert the wire into the side or back of the seat and start fishing it upward. If you pull the end of the video cable with your fingers through the fabric while pushing on the wire from below, you can inch the wire up a bit at a time. Eventually you'll get to the top of the seat. Another approach is to straighten a coat hanger, create a hook on the end, lower it down between the seat fabric and foam, hook the wire, and pull it up. If you wrap the hook end in tape it won't tear the fabric as you pull it back up. If you look at the plastic receptacles that the headrest poles insert into, you should find that the fabric or leather underneath them has a little bit of play. If not, you will need to carefully choose where you want to cut a hole, or extend the hole under one of those receptacles. You will need to feed the wire that goes to the screen through this hole. Once you connect the short pigtail wire that comes from your screen to the long wire you've fed through the seat, you should have a working screen. Most screens are designed so that they're powered off when you start the car, and the passenger can turn them on by pressing the power button. If you've supplied multiple video sources to the screen, your passenger will be able to select them with the screen's input button. Some higher-end screens come with their own audio jacks or even infrared audio receivers, allowing each passenger to have wired or wireless headphones connected to their audio/video sources. To get the most out of this setup, you'll want to get a multiple-in, multiple-out video switcher so that each passenger can fully customize his or her video [Hack #35]. |
