Working with Folders, Files, and Shortcuts
Windows Explorer is a complete file-management tool. In the sections that follow, we explore the many ways in which Windows Explorer allows you to organize and reorganize your local disk resources.
Refreshing the Contents of a Window
The Refresh command, on the Windows Explorer View menu, ensures that a Windows Explorer window's display reflects any changes to the folder's contents that might have taken place since you opened the window. For example, if you're looking at a folder on a network server, other users might be adding, deleting, or renaming files in that folder while your window is open. To be sure that what you see matches what's out there, choose Refresh from the View menu—or press F5.
Selecting Folders and Files
The first step in many operations in Windows—opening, copying, or moving a document, for example—is to select the folder or file you want to use. When a folder or file is selected, its icon and title appear in a color that's different from unselected items. You can select a folder or file in a Windows Explorer window in any of the following ways:
- If you're using double-click mode, click the folder or file's icon or title; if you're using single-click mode, hover the mouse pointer over its icon or title. (Note that in Details view, you must click or hover over the icon or title to select an object—not the other parts of the description line.)
- Type the first few letters of the title.
- Use the arrow keys to move the highlight.
You'll often want to select more than one item at a time. Here are some ways to select a group of objects:
- Lasso them: hold down the mouse button while you drag a rectangle around all members of the group. (Click the mouse slightly away from the first icon so you don't select or launch it instead of drawing a box around it.)
- Hold down the Ctrl key and click (or hover over) each item in the group.
- If the items are next to one another in the window, click (or hover over) the first item. Then hold down the Shift key while you click (or hover over) the last item.
- Choose Select All from the Edit menu—or use its keyboard shortcut, Ctrl+A—to select all the items in the window.
TIP
When You Want Almost EverythingTwo commands on the Windows Explorer Edit menu can be useful when you need to select nearly all the items in a folder. The first method is to select everything in the folder by pressing Ctrl+A or by choosing Select All from the Edit menu. Then hold down the Ctrl key and click (or hover over) each item you want to clear. The second method is to begin by selecting the items you don't want. Then choose Invert Selection from the Edit menu. This action clears what you've already selected and selects everything else.
Inspecting Folder and File Properties
Windows provides you with a simple way to learn a folder or file's size, creation date, and other vital statistics. Simply right-click a folder or file and choose Properties from the shortcut menu. Figure 8-9 shows the dialog box for a folder.
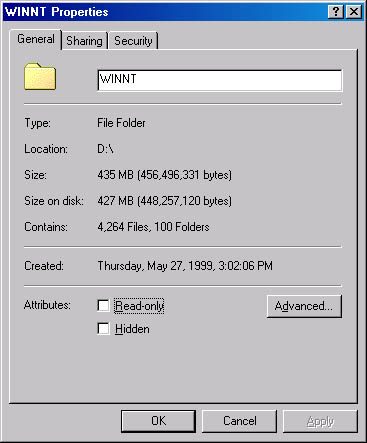
Figure 8-9. The WINNT Properties dialog box shows that the folder includes 4,264 files and 100 subfolders, occupying a total of 435 MB.
TIP
To read the properties dialog box for an open folder, right-click anywhere within the folder's unoccupied space. Then choose the Properties command.
Notice that the folder's properties dialog box shows how many sub-folders the folder contains as well as the number of files. The number of folders and files, along with their cumulative size, includes the contents of the folder and all its subfolders. (The statistics in the Windows Explorer status bar don't take into account the contents of subfolders.) The Advanced button, available only on NTFS volumes, lets you assign encryption and compression attributes, as well as archive and index the folder.
If your computer is part of a network and your system has been set up to allow file sharing, the folder's properties dialog box might include a Sharing tab. By clicking it, you can make the folder available to others on your network (or make it unavailable).
SEE ALSO
For information about sharing folders, see "Sharing Folders with Other Users."
Figure 8-10 shows the properties dialog box for a file. As you can see, the properties dialog box provides information about the file's size, location, dates, parent application, and other attributes. There's even a button you can use to change the parent application, should you need to do that.
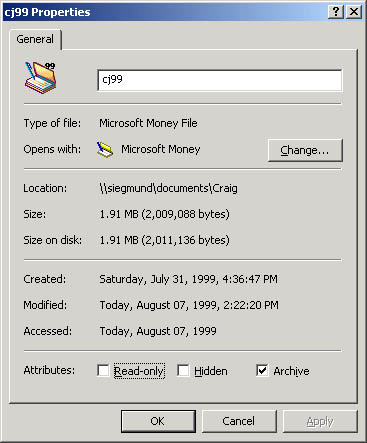
Figure 8-10. The properties dialog box for this file provides basic information about the file's size, location, dates, and other attributes.
![]()
Additional File Properties on NTFS Volumes
The file shown in Figure 8-10 was stored on a FAT32 volume. FAT is a file system, a method of allocating space and storing files, found on systems running Windows 98 and earlier versions of Windows. FAT32 is a newer file system introduced with the OSR2 release of Windows 95 and also found in later Windows versions. Compared to FAT, FAT32 can address larger hard disks and larger partitions of hard disks, and it also wastes less space in the way it stores files. The NTFS file system is the system of choice for Windows NT and Windows 2000, largely because of its additional security features.
SEE ALSO
For more information about file systems, see "Understanding File Systems."
Figure 8-11 shows the properties dialog box of a file stored on an NTFS volume. The NTFS file system records a great many additional file properties, some of which are visible in the figure. Because the properties are more numerous, the system groups them under outline headings.
Moreover, while some properties of files on an NTFS volume (the dimensions and resolution of the image file shown in Figure 8-11, for example) are read-only, others can be changed from within the properties dialog box. When you click a modifiable property, such as Subject in Figure 8-11, an edit field appears. You can type there, or click the arrow to choose from property values you have entered before.
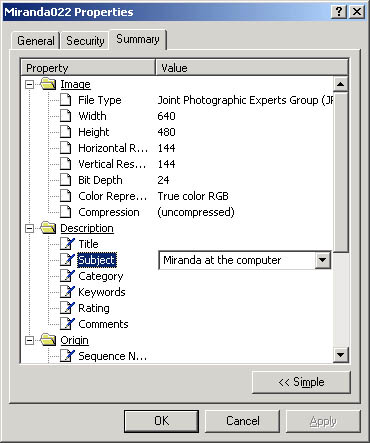
Figure 8-11. The properties dialog box for this file on an NTFS volume includes many additional properties, some of which you can change from within the dialog box.
Certain other files, among them Microsoft Office documents, offer extended and modifiable properties, whether or not they are stored on NTFS volumes. Figure 8-12 shows an example of such a file—a Microsoft Word document stored on a FAT32 volume. On FAT and FAT32 volumes, the files that have these additional properties store the property values in the files themselves, not in the external file tables maintained by the file system.
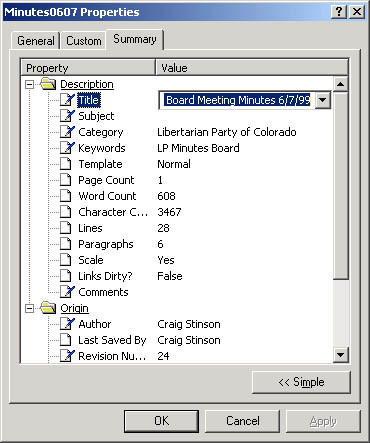
Figure 8-12. This Microsoft Word document was stored on a FAT32 volume, but, like other Microsoft Office documents, it offers the extended properties typical of files on an NTFS volume.
TIP
The Accessed line in a file's properties dialog box can help you determine whether a file might be a good candidate for deletion. If it hasn't been accessed any time during the last two years, perhaps you no longer need it.
Inspecting Properties for Groups of Objects
By selecting two or more folders or files and then right-clicking, you can inspect properties for groups of objects. The resulting properties dialog box tells you the total size of the selected objects, whether they're all of the same type, and whether they're all located in the same folder. Figure 8-13 shows a properties dialog box for a group of files.
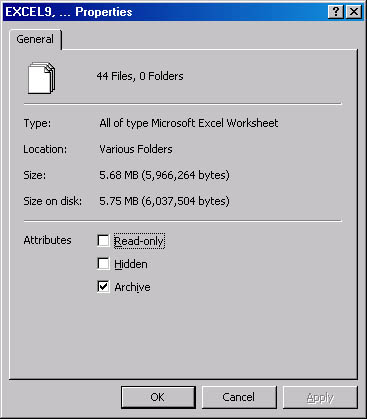
Figure 8-13. This properties dialog box indicates that the 44 selected files are all Microsoft Excel worksheets, that they're stored in various folders, and that together they occupy 575MB.
TIP
To select a group of folders or files that aren't all in the same folder, use the Search command. Then select each object you're interested in.
Inspecting a Disk's Properties
The properties dialog box for a disk's top-level folder is different from all others. It uses a large pie graph to show how much of the disk is in use and how much remains available. Figure 8-14 shows an example.
To get to the top-level folder for a disk, begin by opening My Computer. Then right-click the icon for the disk you're interested in. That icon might look like a disk instead of a folder, but the object it represents is still a folder—as you can see by opening it.
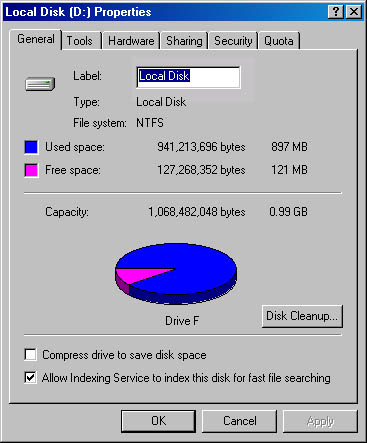
Figure 8-14. The properties dialog box for a disk's top-level folder lets you see how much space is available.
Creating New Folders
Folders in Windows can be nested to any level. That is, you can have folders within folders within folders—to whatever degree of complexity you want.
To create a new folder, begin by displaying the folder in which you want the new folder to reside. Right-click anywhere within this parent folder's unoccupied space, and then choose New from the shortcut menu. When the submenu appears, choose Folder. (Alternatively, you can choose New from the folder window's File menu, and then choose Folder from the submenu.)
Your new folder begins with a default name, such as "New Folder" or "New Folder #2." To rename it, type the name you want and press Enter.
SEE ALSO
For more information about renaming folders, see "Renaming Folders, Files, and Shortcuts."
If you click away from the new folder before renaming it, simply right-click it and choose Rename from the shortcut menu. (Alternatively, choose Rename from the folder window's File menu.)
Moving or Copying Folders, Files, and Shortcuts
To move or copy an object in a Windows Explorer window, right-drag it from its current position to its destination. When you release the mouse button, a shortcut menu appears. From this shortcut menu, you can choose Copy Here, Move Here, or Create Shortcut(s) Here. Make the appropriate selection, and you're done.
To move or copy an entire folder, simply display the folder's parent folder. Then right-drag the folder icon (or the folder entry, if you're working in List view or Details view). Be aware that this action moves or replicates not only the folder, but everything within the folder as well.
If you copy an object to a new destination in the same folder, Windows gives the copy a default name, such as "Copy of Myfile." While the object is still selected, you can give it a new name by typing and pressing Enter. Later you can right-click it and choose Rename.
If you prefer to drag with the left mouse button, you can do so, but in this case you need to know the following:
- If you drag a program file from one folder to another, Windows leaves the program in its source folder and creates a shortcut to the program in the destination folder. (Note that Windows ignores this rule if more than one file is selected and at least one selected file is not a program.)
- If you drag any other file type from one folder to another on the same disk, Windows performs a move.
- If you drag from a folder on one disk to a folder on a different disk, Windows performs a copy.
- If you drag a folder or any file other than a program file from a folder to the desktop, Windows performs a move—provided the source folder resides on the disk where you installed Windows. If the source folder is on a different disk, Windows performs a copy instead of a move.
TIP
You can force Windows to copy the selected objects—regardless of file type and destination—by holding down the Ctrl key as you drag. You can force Windows to move objects by holding down the Shift key as you drag. And you can force Windows to create a shortcut by holding down the Alt key as you drag.
TIP
If you display the Folders bar, you can use it as a target for moves and copies. Simply drag files or folders from the right side of your Windows Explorer window and drop them in the appropriate entry on the Folders bar. You can also move entire folders by dragging them from one location on the Folders bar and dropping them in another location on the Folders bar.
Moving or Copying Objects to Unopened Folders
In many cases, you can move or copy an object to a new folder without opening the destination folder. For example, suppose the file Rough Draft is stored in the folder PMFeature and you want to move it to the folder Outtakes, which is also stored in PMFeature. Simply grab Rough Draft with your mouse, drag it to the folder icon for Outtakes, and then release the mouse button.
TIP
What Will Happen When You Release the Mouse Button?As you drag an object from one folder to another or to the desktop, Windows displays a ghost image of the object you're dragging. If you're dragging with the left mouse button, you can look at the lower right corner of this image to see what action Windows will perform when you release the button. If Windows is going to create a copy, you'll see a plus sign in the lower right corner. If Windows is going to create a shortcut, you'll see a shortcut arrow. If Windows is going to move the object, you won't see anything in the lower right corner. If you don't like the proposed action, click the right mouse button before you drop the object on the destination to cancel the drag operation in process.
If your destination folder is minimized on the taskbar, you can move or copy an object to it by dragging the object to the taskbar and hovering over the folder button. When the Windows Explorer window opens, you can drop the item inside it.
TIP
If you have a shortcut for a folder on your desktop, you can move or copy items to that folder by dragging them to the shortcut.
Moving or Copying Objects with Menu Commands
If dragging and dropping is not convenient, you can move or copy objects by using the Edit menu's Cut, Copy, and Paste commands.
- To move an object, select it and choose Cut from the Edit menu. Then select the destination folder and choose Paste from the Edit menu. (If the desktop is your destination, right-click the desktop and choose Paste from the shortcut menu.)
TIP
When you cut an item, that item isn't removed from its source folder until you paste it somewhere. If you change your mind in midstream, simply press Esc.
- To copy an object, select it and choose Copy from the Edit menu. Then select the destination folder and choose Paste from the Edit menu. (If the desktop is your destination, right-click the desktop and choose Paste from the shortcut menu.)
TIP
It's often quicker to use the keyboard shortcuts for Cut, Copy, and Paste than it is to visit the Edit menu. Press Ctrl+X to cut or Ctrl+C to copy, and then press Ctrl+V to paste.
Moving or Copying Groups of Folders and Files
To move or copy a group of folders or files, select all members of the group, and then follow the same procedure you would use to move or copy a single item. To select a group, hold down the Ctrl key while you select each member. Alternatively, if the items are located next to one another in the Windows Explorer window, you can select the first item, and then hold down the Shift key while you select the last item.
SEE ALSO
For more information about selecting a group of folders or files, see "Selecting Folders and Files."
Moving or Copying Objects with the Send To Command
When you right-click a folder or file, the shortcut menu includes a Send To command. In response to this command, Windows displays a submenu of destinations, typically including any floppy-disk drives on your system, as well as various other destinations. You can use the Send To command as a quick and easy way to copy or move a folder or file to any destination. You can also customize the Send To menu so that it includes destinations you frequently use.
NOTE
When you use the Send To command with a folder destination, Windows treats the object just as if you dragged the object to the folder using the left mouse button. That is, if the destination and source folders are on the same disk, Windows performs a move; if the destination and source folders are on different disks, Windows performs a copy.
The contents of the Send To menu are determined by the contents of a hidden folder named SendTo. That folder is located within a folder identified by the name you use to log on to Windows 2000. For example, if Windows 2000 is installed on drive C and you're logged on as JoeUser, the default path of your SendTo folder will be
C:\Documents and Settings\JoeUser\SendTo
Using Programs and Other Kinds of Destinations on the Send To Menu
Your Send To menu can include programs, printers, and other types of "destinations," as well as folders. If you right-click a document and then choose a program from the Send To menu, Windows launches the program and attempts to open the selected document. If you right-click a document and choose a printer from the Send To menu, Windows tries to print your document using that printer. In all cases, Windows does what it would have done had you dragged the selected document to a shortcut for the destination object. In other words, the Send To command is a menu alternative for a drag-and-drop operation.
Customizing the Send To Menu
To add destinations to the Send To menu, open the Send To folder and create shortcuts to additional destination items simply by dragging them into the SendTo folder. For instance, you could drag the Recycle Bin from the desktop into the Send To folder and then send an item to the Recycle Bin by right-clicking the item, pointing to Send To on the shortcut menu, and then choosing Recycle Bin.
SEE ALSO
For more information about creating shortcuts, see "Creating a Shortcut."
TIP
If you haven't set Windows Explorer to display hidden files and folders, you won't be able to navigate to the SendTo folder. You can, however, get to the Send To folder by using the Run command. Choose Run from the Start menu, type %UserProfile%\SendTo, and press Enter.
Renaming Folders, Files, and Shortcuts
The simplest way to rename an object is to right-click it, choose Rename from the shortcut menu, and then type a new name. But other methods are also available:
- Select the object and choose Rename from the Windows
- Explorer File menu.
- Select the object. Then click the object's name. When a rectangle appears around the object's name, type a new name or edit the current name.
- Select the object and press F2. Then type a new name or edit the current name.
- Display the properties dialog box for the item you want to rename. Type a new name into the dialog box.
When you use this method, you need to pause a moment between selecting the object and clicking the object's name. Otherwise, Windows interprets your action as a double-click and opens the selected object. (And this method won't work at all if your computer is set up for single-click launching.)
![]()
TIP
If you make a mistake while changing a name, simply press Esc to cancel the process.
Filename RestrictionsNames of folders and files can include as many as 255 characters. Thus, there's no need to be cryptic or overly compact in your choice of a filename. Instead of naming that departmental budget worksheet EBUD00-1, you can call it Editorial Budget for 2000—First Draft.
Programs designed for Windows 3.x and not yet updated for later versions of the operating system still adhere to the old limit of eight characters plus an optional three-character extension. If a program you're using rejects long filenames, check with the vendor to see if an updated version is available.
In any filename, long or short, certain characters are prohibited. These characters are the following: * | \ < > ? / " :
Spaces and the following additional characters are prohibited in MS-DOS (short) filenames: + , . ; = [ ]
These prohibited characters are reserved for use by the operating system.
Reversing Moves, Copies, and Name Changes with the Undo Command
If you change your mind after moving or copying something, you can reverse your action by choosing the Undo command from the Windows Explorer Edit menu. (If the Standard Buttons toolbar is visible, you can simply click the Undo button.) Be aware, however, that you must use the Undo command right away. As soon as you perform some other action, Undo will reverse that action, not your move or copy.

TIP
If you've chosen not to display extensions for registered files, be careful not to type the extension when you rename a file. For example, suppose you have a file named My Picture.bmp, and your Windows Explorer window displays that file's name as simply My Picture. If you change the name to Your Picture, be sure to type Your Picture, not Your Picture.bmp. Otherwise, the file's name will be recorded as Your Picture.bmp.bmp.
Deleting Folders, Files, and Shortcuts
To delete an object or a group of objects, select what you want to delete and press the Delete key or click the Delete button. If you prefer a more complicated method, try one of these:

- Right-click an object and choose Delete from the shortcut menu.
- Select an object or group of objects, and choose Delete from the Windows Explorer File menu.
- Select an object (or a group of objects), and then drag it to the Recycle Bin icon on your desktop—or to a shortcut for Recycle Bin.
However you do the deed, Windows presents a prompt and asks you to confirm your intent. This protects you from accidental deletions.
TIP
If you don't want Windows to prompt for confirmation when you delete folders or files, clear the Display Delete Confirmation Dialog check box at the bottom of the Recycle Bin Properties dialog box.
As further protection, items you delete from hard disk folders or the desktop are automatically transferred to the Recycle Bin, whence you can retrieve them if you change your mind.
TIP
If you change your mind right away about a deletion, you can restore whatever you deleted by choosing the Undo Delete command from the Windows Explorer Edit menu.
Restoring Deleted Folders, Files, and Shortcuts
Have you ever deleted one file when you really meant to delete a different one? Wiped out a whole folder by mistake? Or simply trashed a document you thought you were finished with, only to discover the following week that you desperately needed it back?
Windows provides a way to recover gracefully from accidents such as these. For a period of time after you delete an object, that object remains accessible via the Recycle Bin. If you change your mind, a simple menu command or mouse action restores selected items to the folders from which they were deleted.
The Recycle Bin is like that large trash barrel outside your house or the dumpster in the alley behind your office. Until the big truck comes to empty that container, anything you've tossed out can still be retrieved. For information about when the big truck arrives, see "Setting Your Recycle Bin's Capacity."
When you open the Recycle Bin, Windows displays the names of recently deleted items in an ordinary Windows Explorer window. (See Figure 8-15.) Displaying the window in Details view includes columns that show when each item was deleted and which folder it was deleted from. As in other Windows Explorer windows, you can click column headings to change the sort order, and you can use toolbar icons or commands on the View menu to switch to List view, Large Icons view, or Small Icons view.
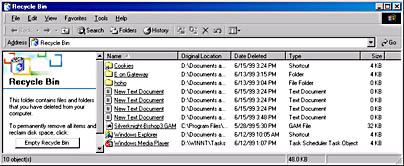
Figure 8-15. Opening the Recycle Bin reveals an ordinary Windows Explorer window. Displaying the contents in Details view lets you see when each item was deleted.
To restore an item from the Recycle Bin, simply select it and choose Restore from the File menu (or right-click the item and choose Restore from the shortcut menu). The Restore command puts the item back in the folder from which it was deleted. If that folder doesn't currently exist, Windows asks your permission to re-create it.
You also have the option of restoring a deleted item and putting it in a different folder. To do this, select the item and do any of the following:
- Right-click the item and choose Cut from the shortcut menu. Go to the folder in which you want the item to be restored, and then choose the Paste command on that Windows Explorer window's Edit menu.
- Select the item and click the Move To button on the Standard Buttons toolbar. Then select the destination folder from the Browse For Folder dialog box.
- Drag the item directly to the destination folder, either another Windows Explorer window or to a shortcut on your desktop.
Here are three other important facts to know about the Recycle Bin:
- Items deleted from floppy disks or network servers aren't stored in the Recycle Bin. When you delete such an item, Windows asks you to confirm the deletion. Exception: Windows does provide Recycle Bin service for My Documents, even if My Documents resides on a network server.
- Some programs provide their own commands for deleting files. If you use a program's Delete command, your deleted file might not be transferred to the Recycle Bin.
- If you delete a folder, the Recycle Bin shows the deleted folder but doesn't record separate entries for the folder's files and subfolders. If you restore the folder, however, Windows re-creates the folder and its contents.
TIP
The Search command can't be used to locate items in the Recycle Bin. To search for items in the Recycle Bin, sort the Recycle Bin display on the column heading of interest. For example, to find an item when you know its name, click the Name heading so that all deleted items' names appear in alphabetical order. To find items that were deleted on a particular day, click the Date Deleted column heading.
Setting Your Recycle Bin's Capacity
Although you have only one Recycle Bin icon (plus any shortcuts to that icon that you've created), Windows actually maintains a separate recycle bin for each hard disk on your system. The default size of each recycle bin is 10 percent of the capacity of the hard disk on which it's stored. When a recycle bin exceeds that limit, Windows begins removing files permanently, starting with the files that have been in the Recycle Bin the longest.
You can make your recycle bins larger or smaller by right-clicking the Recycle Bin icon and choosing Properties. (If the Recycle Bin is already open, you can get to the shortcut menu by right-clicking the window's Control-menu icon or by right-clicking any blank area of the window.) You'll see a dialog box similar to the one shown in Figure 8-16, with a tab for each of your system's hard disks (and a tab for My Documents, if My Documents resides on a server).
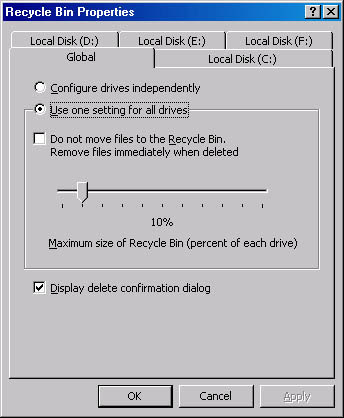
Figure 8-16. The Recycle Bin Properties dialog box lets you configure each hard disk's recycle bin.
To adjust the size of all recycle bins on your system, select the Use One Setting For All Drives option, and then adjust the slider on the Global tab. To adjust the size of recycle bins individually, select the Configure Drives Independently option, and then adjust the sliders on each disk drive tab. To turn off recycle bin functionality globally, select the check box labeled Do Not Move Files To The Recycle Bin. Remove Files Immediately When Deleted. To apply this setting to only a particular hard disk, select the Configure Drives Independently option, select the tab of the drive you want to set, and then select the check box only on that tab.
TIP
To delete a file without moving it to the Recycle Bin, hold down the Shift key while you press Delete.
Purging the Recycle Bin
A deleted file sitting in your Recycle Bin takes up just as much space as it did before it was deleted. If you're deleting files to free up room for new programs and documents, simply transferring them from ordinary disk folders to the Recycle Bin folder won't do you much good. You need to get the old files off your system permanently. The safest way to do this, of course, is to move the files to another storage medium, such as a floppy disk, a tape drive, or a file server. That way, you can always get your files back if you change your mind.
If you're sure you'll never need a particular file again, however, you can delete it in the normal way and then purge it from the Recycle Bin. To delete an item from the Recycle Bin, simply display the Recycle Bin, select the item, and then press the Delete key. Be aware as you answer the confirmation prompt that this deletion removes your selection permanently.
To delete a group of items from the Recycle Bin, hold down the Ctrl key while you select each one, and then press the Delete key. (If the files are located next to one another in the Recycle Bin window, you can select the first member of the group, and then hold down the Shift key while you select the last member.)
TIP
You can check the properties of a file before deleting it by double-clicking the file's icon in the Recycle Bin window.
To empty the Recycle Bin in one fell swoop, simply right-click the Recycle Bin icon and choose Empty Recycle Bin from the shortcut menu. If you're already in the Recycle Bin window, choose this command from the File menu, or click the Empty Recycle Bin button (if you have Web content enabled and you're using the Recycle Bin's default HTML template).
Setting Attributes for Folders, Files, and Shortcuts
Attributes are markers that file systems employ to identify certain characteristics of files. In Windows 2000, folders, files, and shortcuts can have no attributes or any combination of the following attributes: archive, hidden, read-only, and system. The system attribute is known only to the system—you can't even inspect its state, let alone change it. You can inspect and modify the other three attributes for a file by visiting the file's properties dialog box.
NOTE
On NTFS volumes, the archive attribute is accessible via the Advanced button on the General tab. It is identified there as "File is ready for archiving."
The archive attribute indicates that an item has been modified since it was last backed up. Each time you create a new file or change an old one, Windows sets (turns on) the archive attribute for that file. Backup programs typically clear (remove) the archive attribute when they back up a file. If you change the file after backing it up, the file again gets the archive attribute so your backup program can recognize it as needing to be backed up again.
A few programs use the hidden attribute and system attribute (either, but usually both) to mark important files that must not be modified or deleted because they are critical components of the program or critical components of Windows.
You can open a file with the read-only attribute, but you can't save it unless you first rename it. Some programs—and many users—set this attribute to prevent accidental changes to a file.
In many contexts, the read-only attribute not only prevents an item from being altered, but also keeps it from being deleted. For example, the MS-DOS Erase and Del commands refuse to delete files that are marked read-only. (You'll get the error message "Access denied" if you try.) If you select a read-only file in a Windows Explorer window and press the Delete key, Windows presents a confirmation prompt, reminding you that the file is read-only.
TIP
Assigning the read-only attribute to important files prevents you from altering them and makes it less likely that you will delete them accidentally. To assign this attribute, right-click the file, choose Properties from the shortcut menu, and then select the Read-Only check box. Note, however, that you will need to remove this attribute (by clearing the check box) if you want to edit the file without changing its name.
You can assign attributes to entire folders as well as to individual files. Making a folder read-only doesn't alter the attributes of files or folders contained within the read-only folder, but it does afford some protection against accidental deletion of the folder.
NOTE
Files stored on NTFS volumes have additional attributes dealing with indexing, compression, encryption, and permissions.
EAN: 2147483647
Pages: 317