Working with the File Types List
If you choose Folder Options on the Windows Explorer Tools menu and then click the File Types tab, Windows displays a list of all registered file types. A sample of this list is shown in Figure 8-17.
Working with this list, you can perform a number of tasks:
- Change the default action associated with a file type
- Change the application associated with a file type
- Change a file type's icon
- Specify whether the file type's extension should be displayed in Windows Explorer windows
- Specify whether a file type should be opened immediately after being downloaded
- Remove a file type from the registry
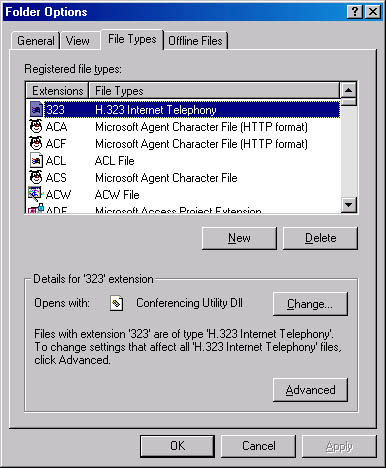
Figure 8-17. The File Types tab in the View menu's Folder Options dialog box lists all file types known to the registry, provides details about how they're associated, and allows you to change document icons.
Changing the Default Action Associated with a File Type
A file type's default action is the action that occurs when you double-click (or simply click, if you've set up your system for single-click launching) a file of that type in Windows Explorer or on your desktop. If you right-click a file in Windows Explorer or on your desktop, the file type's default action appears in boldface type on the shortcut menu. Most commonly the default action is to open a program or to open a document in its associated program.
To change a file type's default action:
- In any Windows Explorer window, choose Folder Options from the Tools menu, and click the File Types tab.
- In the Registered File Types list, select the file type whose default action you want to change.
- Click the Advanced button.
- In the list of available actions, select the action you want to be the default.
- Click the Set Default button, and then click OK.
TIP
Making Windows Explorer Always Display the Folders BarYou can change the default action associated with folders from Open to Explore so that Windows Explorer always includes the Folders bar. Open the File Types list as described previously. Click the heading File Types in the Registered File Types list so that the list is sorted by type, not by extension. Select the item named Folder (not the one named File Folder!). Click Advanced, select Explore, and then click Set Default.
Changing the Application Associated with a File Type
To change the application associated with a file type:
- In any Windows Explorer window, choose Folder Options from the Tools menu, and click the File Types tab.
- In the Registered File Types list, select the file type whose default action you want to change.
- Click the Change button and select the program you want to associate with the file type.
Changing a File Type's Icon
Just as you can change the icons used by your programs (see "Changing a Menu Item's Icon"), you can also reassign document icons. To do this:
- In any Windows Explorer window, choose Folder Options from the Tools menu, and click the File Types tab.
- Find the file type of the document icon you want to change in the Registered File Types list.
- Click the Advanced button.
- Click the Change Icon button.
- Choose a new icon from the Change Icon dialog box and click OK.
If you don't see a suitable icon in the Change Icon dialog box, click the Browse button in the Change Icon dialog box and navigate to another program that might have more suitable icons. Choose the icon you want and click OK.
Specifying Display of Extensions
SEE ALSO
For more information about enabling or suppressing filename extension display, see "Setting Other Global Options."
By default, Windows Explorer windows don't show extensions for registered file types. You can turn on the extension display for all file types using the Windows Explorer Folder Options command. You can also show extensions for a particular file type while suppressing the extensions for other registered file types. Here's how:
- In any Windows Explorer window, choose Folder Options from the Tools menu, and click the File Types tab.
- In the Registered File Types list, select the file type whose extension you want to make visible.
- Click the Advanced button.
- Select Always Show Extension and click OK.
Specifying Download Behavior
To specify that files of a particular type should always be opened as soon as you have finished downloading them:
- In any Windows Explorer window, choose Folder Options from the Tools menu, and then click the File Types tab.
- In the Registered File Types list, select the file type you want to be opened immediately after downloading.
- Click the Advanced button.
- Clear the Confirm Open After Download check box, if set.
Removing a File Type from the Registry
If you use the Add/Remove Programs Wizard to uninstall Windows-based programs that you no longer need, you should not have to "unregister" the file types used by those programs. The wizard should take care of that detail for you. But if you remove a program without the wizard's assistance, you might want to visit the File Types list to clean up.
SEE ALSO
For information about the Add/Remove Programs Wizard, see "Installing New Programs."
You can remove a file type from the registry as follows:
- In any Windows Explorer window, choose Folder Options from the Tools menu, and then click the File Types tab.
- In the Registered File Types list, select the file type you want to remove from the registry.
- Click Delete and confirm your choice in the File Types dialog box.
EAN: 2147483647
Pages: 317