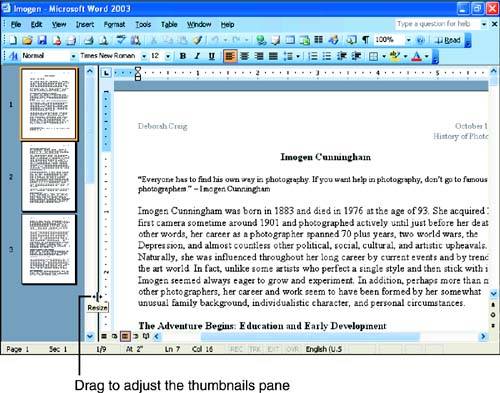
Viewing ThumbnailsRegardless of what view you are using, you can choose View, Thumbnails to display a vertical pane along the left side of the Word window that contains thumbnails of each page (or screen in the case of Reading Layout view) in the current document (see Figure 4.8). Figure 4.8. Thumbnails enable you to quickly jump from one spot to another in your document.
If you want to enlarge the Thumbnails pane to see more thumbnails at one time, drag the right border of the pane to the right. When you want to hide the thumbnails, drag the border all the way to the left edge of the Word window. You can also choose View, Thumbnails again to hide the Thumbnails pane. |
Magnifying Your DocumentWord normally displays text at approximately the size it is when printed. In some situations, you might want to enlarge or shrink the text onscreen to make it easier to read, edit, and format. You change your document's magnification by adjusting the Zoom setting.
You might want to change your Zoom setting if your document has
To change the Zoom setting, click the down arrow in the Zoom box at the right end of the Standard toolbar to display the Zoom list (see Figure 4.9), and then click the desired setting. Figure 4.9. Choose the desired magnification setting in the Zoom list.
In Figure 4.10, the document has been zoomed to 200 percent. Word remembers the setting and uses it the
Figure 4.10. The Zoom setting was changed to 200 percent.
If you enlarge the magnification of your document, as shown in Figure 4.10, you may need to use the horizontal scrollbar at the bottom of the Word window to bring the right side of the document into view. The four options at the bottom of the Zoom list also come in handy. They automatically adjust your document's magnification just the right amount to display the full width of the page (Page Width), the width of the text only (Text Width), the entire page (Whole Page), and two entire pages (Two Pages). In Normal view, the Text Width, Whole Page, and Two Pages options are not available.
|
Viewing Separate
|
|
|
Another way to create a split is to choose Window, Split. Word displays a gray horizontal line and moves the mouse pointer over it. Move the mouse to get the line in the right spot, and then click to create the split. When you want to remove the split, choose Window, Remove Split. |