| Creating an index in Word involves two steps. The first step is the time-consuming onemarking entries for indexing. After you've marked all of your entries, generating the index takes only a moment. You can mark all of the words that you want to include in the index in one of three ways: -
Insert an index entry field just after a word. -
Bookmark a block of text, and then insert an index entry field just after the bookmarked text. If you use this technique, the index will list a range of pages for the index entry if the bookmarked text spans multiple pages. -
Create a concordance file , which is a list of words that you want indexed. Word will then use this file to automatically mark all of the index entries in your document. (For information on this method, search the Microsoft Word help system for the word concordance file .) Regardless of which method you use to insert index entry fields in your text, the fields are formatted as hidden text, which means they are only visible when you have the Show/Hide button in the Standard toolbar turned on. Figure 13.8 shows two index entry fields in a paragraph, one for the word street photos , and the other for the word pictorialism . The fields are enclosed in curly brackets and lead with XE (for index entry ). The words that will appear in the index itself are displayed in double quotes inside the fields. (In the example shown here, the words that will appear in the index match those they are marking in the text exactly, but as you'll find out in a moment, you can use a different word for the index entry if you like.) The dotted underline under the entries indicates that the fields are formatted as hidden text. Figure 13.8. This paragraph contains two index entry fields.  After you've marked your entries, you can generate the index. This process is similar to generating a table of contents. You click where you want the index to appear and select the desired formatting options for the index. Word then finds all of the entries and creates the index for you. The next two sections describe this process in more detail. Marking Your Index Entries To mark a word in your document as an index entry, follow these steps: -
Select the word that you want to add to the index.  | If you want the index entry to point to the page number the word appears on, but want to use a different word for the entry itself, you can click just past the word in step 1 instead of selecting it. |
-
Choose Insert, Reference, Index and Tables , click the Index tab, and click the Mark Entry button to display the Mark Index Entry dialog box, shown in Figure 13.9 (The keyboard shortcut for displaying this dialog box is Alt+Shift+X .) Figure 13.9. The Mark Index Entry dialog box lets you specify the details of your index entry. 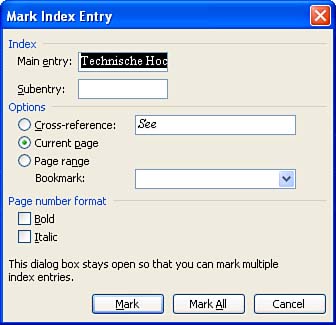 -
If you want the index entry to point to the page containing the insertion point, mark the Current Page option button. If you want the index entry to instead just refer the reader to a different entry in the index, mark the Cross-reference option button and type the index entry to which you want to refer the reader after See in the Cross-reference text box. -
Optionally edit the text in the Main Entry text box, and type any index entries in the Subentry text box that you want to appear under this main entry. (To include a third-level entry, type the subentry followed by a colon (:) and then type the third-level entry.) | | If you want to include multiple subentries, you have to insert a separate index entry field for each one, using the same word in the Main Entry text box. By the same token, if you want to include multiple third-level entries under the same subentry, you need to insert an index entry field for each one, using the same word in the Main Entry field and the same word to the left of the colon in the Subentry field. |
 | If you want to apply any special formatting to the text for the main entry or subentry, right-click the text box and choose Font to display the Font dialog box. Make your changes and click OK. |
-
Mark the Bold and/or Italic check boxes if you want to apply those formatting options to the index entry. -
Click the Mark button to mark just this one entry, or click Mark All to mark all instances of this word in your document. -
If you like, you can leave this dialog box open as you repeat steps 3 to 6 to mark other entries. Click outside of the dialog box to activate the document. Select another word or click in another location, and then click the title bar of the dialog box again. When you are finished, click the Close button. Follow these steps to add an index entry field for a block of text that spans a range of pages: -
Create a bookmark for the text now (see "Bookmarking Locations in Your Document" later in this hour ). Then click just past the bookmarked text. -
Press Alt+Shift+X to display the Mark Index Entry dialog box. -
Under Options, mark the Page Range Bookmark option button, and select a bookmark from the drop-down list. -
Continue with step 4 of the previous set of steps. (In step 6, the Mark All button will be dim because you are only marking the one bookmarked block of text.) After you've added an index entry field to your document, you can edit it directly. For example, if you want to change the word that will appear in the index, you can edit the word in the double quotes in the field (refer back to Figure 13.8). If you want to delete an entry, select the field, including the curly brackets, and press Delete. If you make these kinds of changes, be sure to update your index, as described in the next section. Generating the Index After you have marked all of your entries, follow these steps to generate your index: -
Click at the location where you want your index to appear. You'll probably want to insert a manual page break ( Ctrl+Enter ) at the end of your document and place the index on a new, final page. -
If the Show/Hide button is turned on, click it again to turn it off. The index will not display the correct pagination if the index entry fields are visible at the time the index is generated. -
Choose Insert, Reference, Index and Tables to display the Index and Tables dialog box, and click the Index tab (see Figure 13.10). Figure 13.10. Use the Index tab in the Index and Tables dialog box to generate your index. 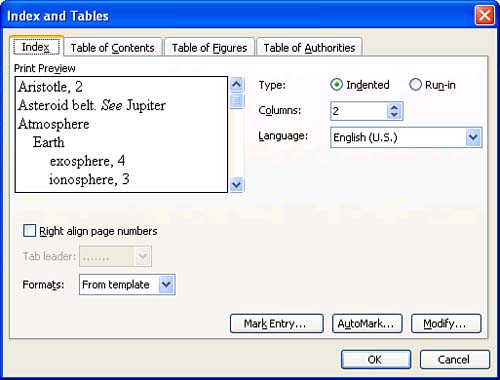 -
Try out different "looks" in the Formats drop-down list (Classic, Fancy, Modern, and so on) to find one that you like. If you want to use the formatting of the index styles stored in the template attached to your document, choose From Template. (If you choose this option, you can click the Modify button to display the Style dialog box, where you can modify the formatting of these styles.) -
Under Type, mark the Indented option button if you want subentries to be on separate lines, indented from the main entry. Mark Run-in if you want subentries to be listed to the right of their main entry with no line breaks. To see how these options look, click them and then view the Print Preview area of the dialog box. -
Use the Columns text box to specify the number of columns you want to use for your index. -
Mark the Right Align Page Numbers check box if you want the numbers to be aligned at the right edge of the column. If you mark this check box, the Tab Leader drop-down list becomes active so that you can specify what type of tab leader you'd like to use. -
Click the OK button to generate the index. Figure 13.11 shows an index created using the index styles in the current template. It has two columns, and the page numbers are right-aligned. This index has examples of all three types of index entries: ones that reference the page(s) the word appears on, ones that reference a range of pages for a block of text, and ones that reference other index entries. It also includes one main entry (double images) that contains subentries. Figure 13.11. This two-column index includes all three types of index entries. 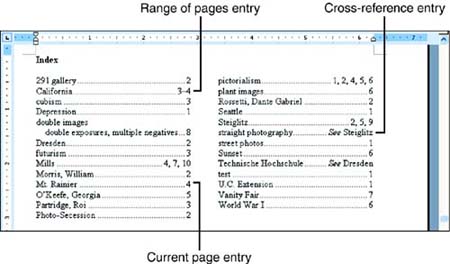 After you add or delete index entry fields, you need to update the index. To do so, right-click anywhere in it and choose Update Field in the context menu. (You can also click to the left of the index to highlight it and then press F9.) If you haven't configured Word to update fields before printing (Tools, Options, click the Print tab, mark the Update Fields check box), be sure to update the index right before you print.  |