Exam 70-124: Objective 3.1, 3.1.1, 3.2: Deploying and Troubleshooting Windows IP Security
|
|
Planning takes on special importance when designing a security infrastructure that includes implementation of IPSec within an organization. After the planning phase comes the implementation phase. The Windows graphical interface makes it easy to develop an IPSec policy for any organization. IPSec policy, filters, and filter actions and interoperability with down-level clients and other operating systems are vital parts of implementation.
Evaluating Information
The first step in deploying Windows IP Security is to identify the technology assets. A company can break down their investment in information technology (IT) resources by enumerating their software, hardware, intellectual property (data), and human assets. What would it cost the organization if those assets were lost or destroyed? What expenditures in time and money would the organization incur if these assets were to fall into the hands of unscrupulous individuals?
Developing a security plan starts with the awareness that security represents a balance. Total security means that no one has access to anything. All assets would be protected at the cost of no one being able to use them. On the opposite end of the spectrum is total openness; no security controls are placed on assets or resources. In that scenario, no one has difficulty obtaining the information or resources they need but your assets have essentially become public domain.
To implement an effective security policy, accessibility and security must be balanced. The more secure the resource, the more difficult it is to access, even for those who are allowed access. Keep this point in mind when developing a security plan. Use Table 6.1 as an sample way to categorize your assets.
| Type of Asset | Examples |
|---|---|
| Software | Word processor, spreadsheet, database, operating systems, accounting, inventory, human resource, utilities, diagnostic programs, drivers, communication programs, and enterprise integration systems |
| Hardware | Workstations, servers, RAM, hard disks, monitors, network interface cards, hubs, switches, bridges, routers, storage area networks, tape devices, modems, ISDN terminal adapters, and printers |
| Intellectual property (data) | Customer databases, human resource databases, payroll records, research and development databases and files, project development files, sales information, marketing information, backup tapes, offline storage facilities, floppy disks, removable hard disks, audit logs, information crossing the wire, documentation, and help databases |
| Human | Executives, administrators, developers, marketing staff, sales staff, clerical staff, help desk staff, and hardware technicians |
Evaluating the "Enemy"
The "enemies" of a security plan are all those who seek to access a resource to which they have no explicit right. Most administrators envision the "black-hat hacker" as the foremost enemy of their information store. This image is not entirely accurate. More likely dangers are:
-
Power users who are interested in "experimenting" to discover what can be done over a network
-
Casual users who stumble upon information that was not secured properly
-
Authorized users who access documents or files that have poorly designed access control, leading to misinformation situations that can create havoc in an organization
-
Disgruntled employee seeking revenge on a current or former employer
-
Greed-driven individuals who sell legitimate access controls to others for a profit
-
Competitors who hire agents to carry out corporate espionage to access proprietary secrets
A common thread is that many of the risks emanate from within an organization. Although shoring up portals to the Internet and other external networks is important, the security analyst's concern and effort must also be aimed at breaches from within.
Keep in mind that someone within an organization can easily plug a notebook computer into an available port at a hub or switch and run sniffing software. These insiders listening on the wire should be of just as much concern as outside intruders.
Determining Required Security Levels
As mentioned, a mainstay approach to assessing security levels is to consider what the cost would be if resources were lost, altered, or stolen. Consider how important various resources are to an organization in the short, intermediate, and long term. How much time and money will it cost to return to normal operations if an organization's assets are compromised?
Security-level assessment can be accomplished by assigning an impact level to each item in the list of secure objects. Objects that do not appear to be the focus of security concerns should not be considered to have no impact on the security plan, because unsecured objects can create a backdoor access route to secured objects.
Assets should be rated as high, medium, or low in terms of their impact on the organization should they be compromised. Table 6.2 provides some examples of how to categorize security requirements for various types of information.
| Type of Information | Impact Level |
|---|---|
| Corporate accounting data | High |
| Research data | High |
| Proprietary or patented information | High |
| Marketing information | Medium |
| Human resource information | Medium |
| Prospects database | Low |
| Parking permit database | Low |
The security-level assessment is not the sole province of the security analyst. It is important to meet with all department managers to assess their views and level of understanding of security issues. Polling non-managerial employees is also important in making a security assessment, because employees are often the first ones to be encumbered when they try to access needed information that has been secured.
Building Security Policies with Customized IPSec Consoles
IPSec configuration and deployment in a Windows 2000 or .NET network are intimately intertwined with Active Directory and Group Policy. A policy must be created to deploy IPSec in an organization. A policy can be applied to a forest, a tree, a domain, an OU, or a single computer.
Within the Group Policy console, the administrator can choose from built-in policies or create custom policies to meet their specialized needs. These policies are configured by creating a MMC and then using the appropriate MMC plug-in. Exercise 6.01 walks through building an IPSec MMC console. A custom IPSec console can also be designed that is used to configure IPSec policy and monitor significant IPSec-related events.
Exercise 6.01: Building an IPSec MMC Console
-
Create a new console by starting the Run command and typing mmc. Click OK to open an empty console.
-
Click the Console menu, and then click Add/Remove Snap in. Click Add, select Computer Management, and click Add. A dialog box appears that asks which computer the snap-in will manage. Select Local Computer (the computer on which the console is running). Then click Finish.
-
Scroll through the list of available snap-ins, select Group Policy, and then click Add. At this point a wizard appears and queries you on what Group Policy object you want to manage. In this case, confirm that the text box states Local Computer, and click Finish. If you want to define a policy for another Group Policy object, click Browse and select from the list.
-
Scroll through the list of Group Policy objects again, this time looking for Certificates. Select Certificates and click Add. A dialog box appears, asking you for what account you want the snap-in to always manage certificates (see Figure 6.8). Select Computer Account, click Next, and then select Local Computer for the computer that you want the snap-in to manage. Then click Finish.
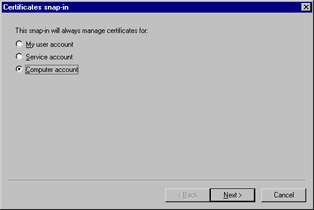
Figure 6.8: Adding the Certificate Management Snap-in for the Local Computer -
Click Close in the Add Standalone Snap-in dialog box and then click OK in the Add/Remove Snap-in dialog box. Expand the first level of each of the snap-ins (see Figure 6.9).
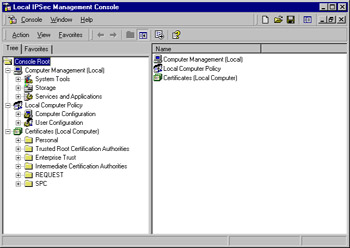
Figure 6.9: The Custom IPSec Security Management Console
From this custom IPSec Management Console, IPSec policies are configured and monitored. In this example, IPSec policy is managed for the local machine only. This might be appropriate if configuring IPSec policy for a file or application server. If you want to manage policy for an entire domain or OU, you would select the appropriate policy when selecting the Group Policy snap-in configuration.
Flexible Security Policies
Now that the console is configured, you can begin building your IPSec security policy. Because IPSec policies are implemented via Group Policy, there is a great deal of flexibility in the places where they are implemented. You can choose from three built-in IPSec policies or create your own custom policies.
To begin, you need to navigate in the console to where the IP security policies are located. Expand the Local Computer policy; expand the Computer Configuration object; expand the Windows Settings object; then click IP Security Policies on Local Machine. In the right pane, you will see listed the three built-in IPSec Policies:
-
Client (Respond Only)
-
Secure Server (Require Security)
-
Server (Request Security)
Your screen should look like the one shown in Figure 6.10.
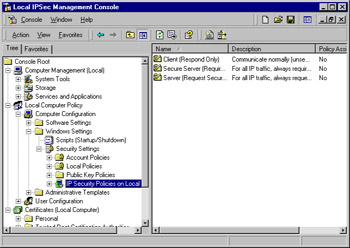
Figure 6.10: The Three Built-in IPSec Policies
-
Client (Respond Only) The Client (Respond Only) policy is used when you require secure IPSec connections only when another computer requests them. For example, if you are using a machine as a workstation that wants to connect to a file server and the file server requires IPSec security. The workstation with the built-in Client policy enabled will negotiate an IPSec security association. However, this client never requires IPSec security itself; it only uses IPSec to secure communications when requested to do so by another computer.
-
Secure Server (Require Security) The Secure Server (Require Security) policy is used when all communications with a particular server need to be secured. Examples include file servers with highly sensitive information and security gateways at either end of an L2TP/IPSec tunnel. The server with the Secure Server policy always requests a secure channel. Most importantly, connections are denied to computers not able to respond to the request. Thus, a non-IPSec-aware computer will be unable to connect.
-
Server (Request Security) The Server (Request Security) policy is used when you want to request IPSec security for all connections. This policy might be used for a file server that must serve both IPSec-aware clients (such as Windows 2000/XP) and non-IPSec-aware clients (such as Windows 9.x and NT). If a connection is established with an IPSec-aware computer, IPSec will be used to secure the session. With non-IPSec-aware computers, unsecured sessions are established. This scheme allows greater flexibility during the transition from mixed Windows networks to native Windows 2000 networks.
| Test Day Tip | You should take the time to become familiar with the functions and purposes of each of the three built-in IPSec policies, both for this exam and for use in your organization. |
Security policies are bidirectional. If a secure server attempts to connect to non-IPSec-aware network servers (such as Domain Name System [DNS], Windows Internet Naming Service [WINS], or Dynamic Host Configuration Protocol [DHCP] servers) the connection will fail. It is imperative that all scenarios be tested in a lab that simulates the production network before implementing IPSec policies on a live network. During the testing phase, the event logs must be assiduously checked to ascertain what services fail due to IPSec policies.
IPSec Finer Points
Implementing IPSec security affords a large measure of comfort in knowing that traffic as it traverses the wire is safe from interception and manipulation. However, IPSec can significantly impact network service interoperability.
Network servers that run the DHCP, WINS, or DNS services are a point of concern. This is particularly problematic when you run the Secure Server policy on a machine providing one of these services. Should you need to do so, be aware that negotiation will fail on non-IPSec-enabled computers. The result of the failed negotiation is that those clients will not be able to use that network service.
A special case is when you use DNS names in the IP filter list, and the DNS server you are using is not IPSec aware. The unaware DNS server will not be able to successfully negotiate secure communication, and therefore name resolution attempts will fail, with cascading results. To solve this problem, create a new filter list and rule to exempt traffic from the DNS from IPSec negotiation.
When you set the rule, use the Permit option to allow traffic to flow unimpeded. The filter should be for computer-to-computer IP addresses (not network IDs) and for the port number.
Rules
An IPSec policy has three main components: IP security rules, IP filter lists, and IP filter actions. Double-click the Server Policy to see the Server (Request Security) Properties dialog box, as shown in Figure 6.11.
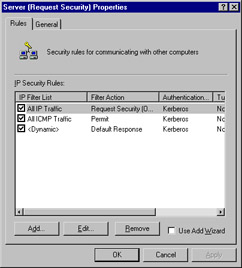
Figure 6.11: The Server (Request Security) Properties Dialog Box
Rules are applied to computers that match criteria specified in a filter list. An IP filter list contains source and destination IP addresses. These can be individual host IP addresses or network IDs. When a communication is identified as a participant included in an IP filter list, a particular filter action that is specific for that connection is applied.
The All IP Traffic filter list includes all computers that communicate with the server via TCP/IP. Any instructions in the filter action associated with All IP Traffic are applied.
First, double-click the All IP Traffic filter list. This opens the Edit Rule Properties dialog box for the All IP Traffic filter. You should see a tabbed dialog box consisting of five tabs, as shown in Figure 6.12.
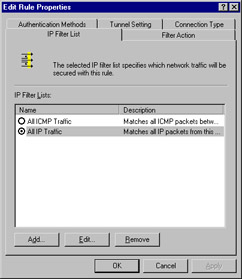
Figure 6.12: The All IP Traffic Edit Rule Properties Dialog Box
An option button for the IP filter list is selected and a description is included that explains the purpose of the list. Double-click the All IP Traffic filter list option to see the details of the All IP Traffic filter. The name, description, and details of the filter are displayed (see Figure 6.13).
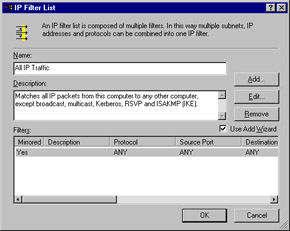
Figure 6.13: The IP Filter List Dialog Box
To see more details regarding the addressing, protocol, and description of the filter, click Edit. Then, click Cancel twice to return to the Edit Rules Properties dialog box.
Filter Actions
Filter actions define the type of security and the methods by which security is established. The primary methods are "Permit," "Block," and "Negotiate security." The Permit option blocks negotiation for IP security. This action is appropriate if you never want to secure traffic to which a rule applies. The Block action blocks all traffic from computers specified in the IP filter list. The Negotiate security action allows the computer to use a list of security methods to determine security levels for the communication. The list appears in descending order of preference. If the Negotiate security action is selected, both computers must be able to come to an agreement regarding the security parameters included in the list. The entries are processed sequentially in order of preference. The first common security method is enacted.
Click the Filter Action tab, and click Request Security (Optional) to view the options, as shown in Figure 6.14.
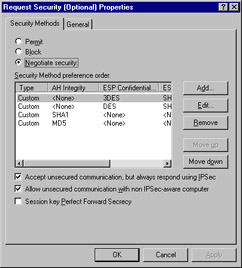
Figure 6.14: The Request Security (Optional) Properties Dialog Box
Checking the Accept unsecured communication, but always respond using IPSec check box allows unsecured communication initiated by another computer but requires the computers to which this policy applies to always use secure communication when replying or initiating. This is essentially the definition of the secure policy.
The Allow unsecured communication with non IPSec-aware computer option allows unsecured communication to or from another computer. This is appropriate if the computers listed in the IP filter lists are not IPSec enabled. However, if negotiations for security fail, this option disables IPSec for all communications to which this rule applies.
Perhaps the most important of these options is the Session key Perfect Forward Secrecy option. When you select this option, you ensure that session keys or keying material are not reused, and new Diffie-Hellman exchanges will take place after the session key lifetimes have expired.
Click Cancel to return to the Edit Rule Properties dialog box. Click the Authentication Methods tab. Here, you can select your preferred authentication method. Kerberos is the default authentication method. Other methods can be included in the list, and each will be processed in descending order. Click Add to include additional authentication methods, as shown in Figure 6.15.

Figure 6.15: The Authentication Methods Configuration Tab
| Note | Remember that if you are configuring a preshared key that both ends of the connection must have the same key configured. |
Click the Tunnel Setting tab if the endpoint for the filter is a tunnel endpoint. Click the Connection Type tab to apply the rule to all network connections, LAN, or remote access, as shown in Figure 6.16.
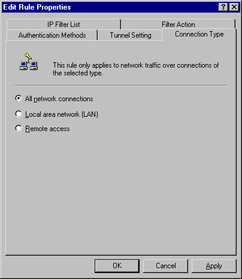
Figure 6.16: The Connection Type Tab
| Note | You cannot delete the built-in policies, although you can edit them. However, it is recommended that you leave the built-in policies as they are and create new policies for custom requirements. |
Flexible Negotiation Policies
Security method negotiation is required to establish an IPSec connection. You can use the default security policies, or you can create custom policies using a wizard-based approach. To add a new filter action that will be used to create a new security policy, click Add after selecting the Filter Action tab. When the wizard has completed, you can edit the security negotiation method.
When you double-click the Request Security (Optional) filter action, you will see the Request Security (Optional) Properties dialog box. If you select the Negotiate security option and then click Add, you can add a new security method, as shown in Figure 6.17.
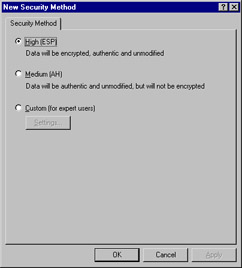
Figure 6.17: The New Security Method Dialog Box
You can fine-tune your security negotiation method by selecting the Custom (for expert users) option and then clicking Settings. After doing so, you will see the Custom Security Method Settings dialog box, as shown in Figure 6.18.
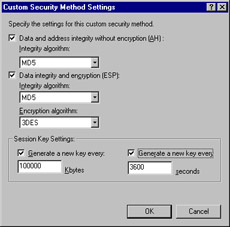
Figure 6.18: The Custom Security Method Settings Dialog Box
Here, you can configure whether you want to use AH, ESP, or both. For each option, you can select the integrity algorithm, the encryption algorithm, or both. All algorithms supported by the operating system are included. Session key lifetimes can be customized by entering new key generation intervals, based on the amount of data transferred (in kilobytes) or time span (in seconds).
Filters
Rules are applied to source and destination computers or networks based on their IP addresses. Filters specify the source and destination addresses of the IP traffic as well as the protocols that will be affected by the filter. To create a new filter, you can avail yourself of the Filter Wizard. To do this, return to the Edit Rule Properties dialog box, click the IP Filter List tab, and then click Add. This brings up the IP Filter List dialog box, where you enter the Name of the new filter and a description of the filter. Click Add to start the wizard.
When the wizard starts, you see the Welcome dialog box. Click the Next button. As shown in Figure 6.19, you choose the source address of the wizard. Your options appear after you click the down arrow on the list box. Note that you can identify the source by individual IP address, all IP addresses, DNS name, or subnet. Click Next to continue.
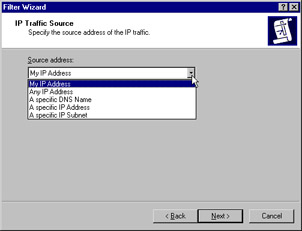
Figure 6.19: Specifying a Source IP Address for a New Filter
The next dialog box asks for the destination IP address. You are afforded the same options as when you designated the source. Click Next to continue with the wizard. At this point, you can select the protocols that will be included in the filter. All protocols are included by default, but you can select from a list of protocols or define your own by selecting Other and entering a protocol number. The IP Protocol Type dialog box is shown in Figure 6.20.
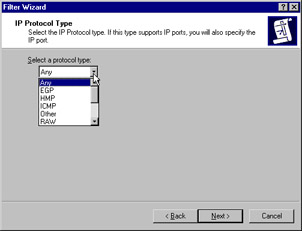
Figure 6.20: Selecting a Protocol Included in the New Filter
Click Next | Finish. Your new filter will appear in the IP filter lists included in the IP Filter List tab of the Edit Rule Properties dialog box.
Creating a Security Policy
To illustrate the process of creating a security policy, consider the following scenario: You are the network administrator for a large hospital. The network is subdivided into multiple subnets. The medical records department contains a large amount of data that must be kept secure. The hospital would incur significant legal liability if security were breached. Computers within the medical records department are closely monitored, and therefore the overhead of confidentiality is not required, but authentication and integrity should be applied to intradepartmental communications.
The medical records department must regularly send information to the hospital floor. The network infrastructure is more open to attack between the well-guarded medical records department and the less secure, open hospital environment. All computers within the medical records department are located in network ID 192.168.1.0, and all floor computers that access medical records database information are located on network ID 192.168.2.0. The default Class C subnet mask is used.
In order to implement your new security policy, you need to:
-
Create a security policy for the hospital's domain. In this way, all computers in the domain will inherit the IPSec policy.
-
Computers in the medical records department need to communicate with two sets of computers-machines within their own department and machines on the hospital floor. Characterizing these machines by subnet, you could say that machines on subnet 192.168.2.0 need to communicate with machines on 192.168.1.0, and machines on 192.168.1.0 need to communicate with machines on 192.168.2.0. When selecting the protocols, you select All so that all IP traffic is filtered. Therefore, you need to create two filters so that you can assign different filter actions to each filter.
-
Now you need to create two filter actions (negotiation policy); the first filter action will be applied to intradepartmental communications, in which only authentication and integrity are important, and the second filter action will be applied to extra-departmental communication, where authenticity, integrity, and confidentiality are required. The first filter action might use AH, which provides for authenticity and integrity. The second filter action might use a combination of AH and ESP, to provide the highest level of authentication and integrity while also providing confidentiality.
By implementing these combinations of filters and filter rules, you can effectively secure traffic in a customized fashion. You can easily implement this solution by invoking the Security Rule Wizard after you create the new security policy.
Making the Rule
The rule you make will create a filter for all communications emanating from 192.168.1.0 that are directed to 192.168.2.0. After the filter is created, you create a filter action. In this case, you need to ensure secure communications, because you are communicating with the unsecured hospital floor. You need to ensure integrity, authentication, and confidentiality. Perform Exercise 6.02 to accomplish these goals.
Exercise 6.02: Creating a New IPSec Policy
-
Click Start | Programs | Administrative Tools | Active Directory Users and Computers. After the Active Directory Users and Computers console is open, right-click the domain name, then click Properties. In the Domain Properties window, click the Group Policy tab.
-
Select Default Domain Policy and click Edit.
-
This opens the Group Policy Editor. Expand Computer Configuration, expand Windows Settings, expand Security Settings, and then right-click IP Security Policies on Active Directory. Click Create IP Security Policy.
-
A wizard starts, welcoming you. Click Next.
-
You now need to enter the name of the policy, as shown in Figure 6.21. Name it MedRecToFloor then click Next.
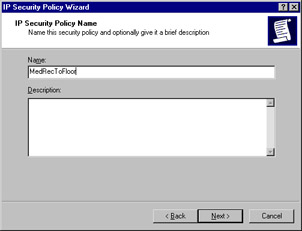
Figure 6.21: Entering an IP Security Policy Name -
You will see the window shown in Figure 6.22. Remove the check mark in the Activate the default response rule check box. Click Next.
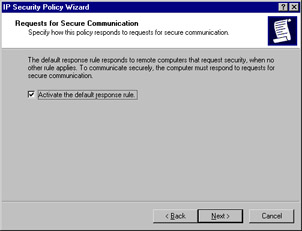
Figure 6.22: Handling Requests for Secure Communication -
Now you are at the end of the wizard. Leave the check in the Edit Properties box, and click Finish (see Figure 6.23).
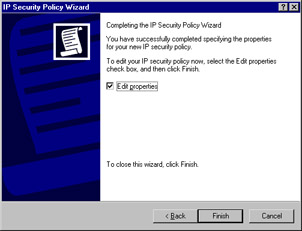
Figure 6.23: Completing the IP Security Policy Wizard -
At this point, you have no IP filter lists. Use the Add Wizard to create a new filter list and filter action. Together, they create a filter rule. Make sure that there is a check in the Use Add Wizard check box and click Add, as shown in Figure 6.24.
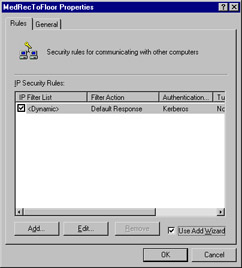
Figure 6.24: The MedRecToFloor IPSec Policy Properties -
The Security Rule Wizard opens. The first dialog box is a welcome box. Click Next.
-
The next dialog box (see Figure 6.25) asks whether the rule applies to a tunnel endpoint. In this case, it does not, so select This rule does not specify a tunnel. Click Next.
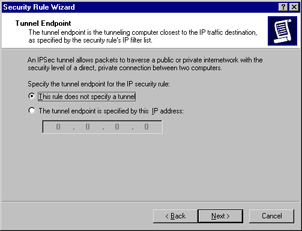
Figure 6.25: Selecting a Tunnel Endpoint -
The wizard now asks what network connections this rule should apply to, as shown in Figure 6.26. Select All network connections, then click Next.
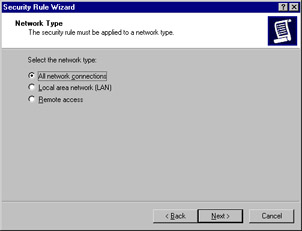
Figure 6.26: Choosing the Network Type -
Now decide what default authentication protocol should be used. Select Windows 2000 default (Kerberos V5 protocol), as shown in Figure 6.27. Then click Next.
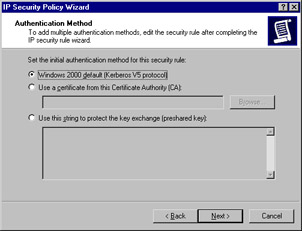
Figure 6.27: Select an Authentication Protocol -
Create the IP filter list by adding a filter for all traffic sent from 192.168.1.0 with the destination of 192.168.2.0. Click Add, as shown in Figure 6.28.
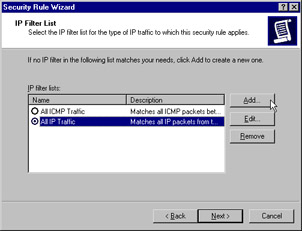
Figure 6.28: Adding a New Filter List -
You now see the IP Filter List dialog box. Type Secure from MedRec to Floor, and make sure the Use Add Wizard check box is filled, as shown in Figure 6.29. Then click Add.
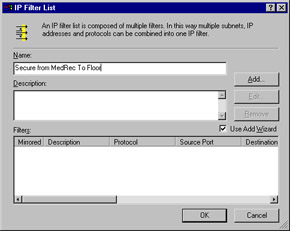
Figure 6.29: The IP Filter List -
The IP Filter Wizard appears. Click Next to move past the Welcome dialog box. Now you are at the IP Traffic Source dialog box shown in Figure 6.30. Click the down arrow under Source address and select A specific IP Subnet. Type 192.168.1.0 and a subnet mask of 255.255.255.0. Then click Next.
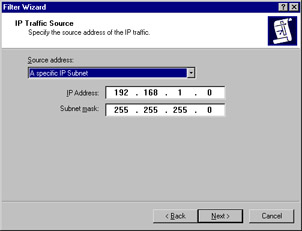
Figure 6.30: Choosing the IP Traffic Source -
Now enter the IP traffic destination shown in Figure 6.31. Under the Destination address, click the down arrow and select A specific IP Subnet. Then type the destination subnet 192.168.2.0 with a subnet mask of 255.255.255.0. Click Next.

Figure 6.31: Choosing the IP Traffic Destination -
You want all the protocols to be included in the filter, so select Any (see Figure 6.32) for the protocol type, click Next, and then click Finish to complete the wizard.

Figure 6.32: Choosing the IP Protocol Type -
This takes you back to the IP Filter List dialog box. Click Edit (see Figure 6.33). Mirrored should be checked. Match packets with the exact opposite source and destination addresses to ensure that machines from the destination subnet are also included in the incoming filter. Click OK to close the dialog box, and then click Close.
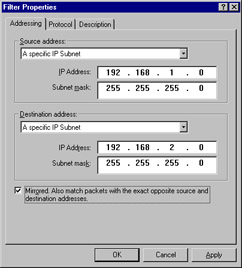
Figure 6.33: The Filter Properties Dialog Box -
You are now back to the IP Filter List dialog box in the Security Rule Wizard. Select the Secure from MedRec to Floor filter list (see Figure 6.34) and click Next.
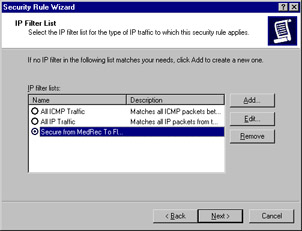
Figure 6.34: Selecting the MedRec to Floor Filter List -
At this point, configure a filter action. Select the Require Security option. Make sure there is a check mark in the Use Add Wizard check box, and then click Add (see Figure 6.35).
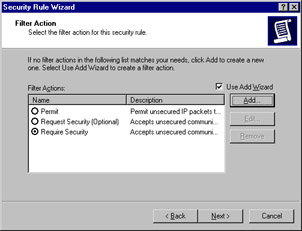
Figure 6.35: The Filter Action Dialog Box of the Security Rule Wizard -
The IP Security Filter Action Wizard starts. Click Next to move past the Welcome dialog box. Here (see Figure 6.36) you are asked for a name; enter SecureMedRec, and click Next.
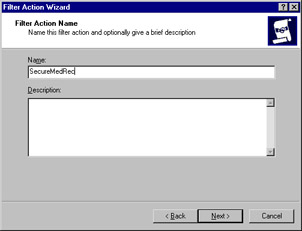
Figure 6.36: Naming the Filter Action -
The Filter Action General Options dialog box shown in Figure 6.37 asks for a filter action behavior. Select Negotiate security and click Next.
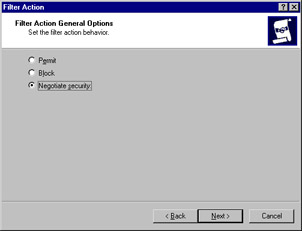
Figure 6.37: Setting the Filter Action Behavior -
You receive a dialog box that asks whether you want to support communications with computers that do not support IPSec. Select the Do not communicate with computers that do not support IPSec option (see Figure 6.38) and click Next.
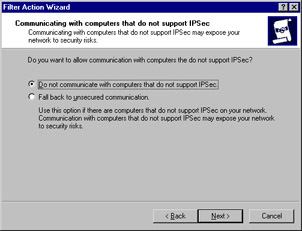
Figure 6.38: Preventing Communication with Non-IPSec Computers -
Now select the security method for IP traffic. To ensure confidentiality, authentication, and integrity, select Custom (see Figure 6.39) and then click Settings (see Figure 6.40).
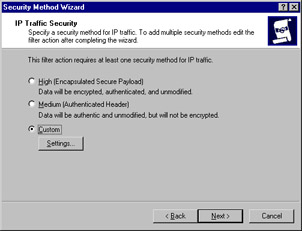
Figure 6.39: Setting IP Traffic Security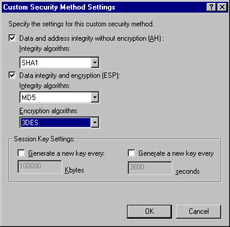
Figure 6.40: The Custom Security Method Settings -
Select the Data and address integrity without encryption (AH) check box and then click the down arrow and select SHA1. Make sure that there is a check mark in the Data integrity and encryption (ESP) check box, and select MD5 and 3DES. Do not set the session key settings; you will select Perfect Forward Secrecy later. Click OK, then click Next.
-
The final dialog box appears. Ensure that a check mark is in the Edit box, and then click Finish.
-
You are brought to the New Filter Action Properties dialog box. Check Session key Perfect Forward Secrecy (see Figure 6.41). Click OK to return to the Security Rule Wizard, then click Next.

Figure 6.41: Enabling Perfect Forward Secrecy -
This is the last dialog box for the Security Rule Wizard. Click Finish | OK to close the New Rule Properties dialog box.
-
You are returned to the MedRecToFloor Properties box. Click the General tab (see Figure 6.42). You can configure how often the Policy Agent checks for policy changes here. Click Advanced to control the IKE process.
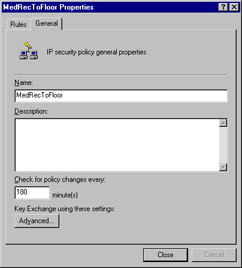
Figure 6.42: The General Tab for the IPSec Policy Properties -
Here, you control the security of the IKE process (see Figure 6.43).
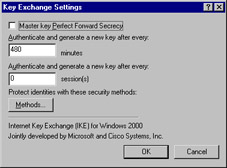
Figure 6.43: The Key Exchange Setting -
Click Methods to configure the security methods that are used to protect identities during the key exchange process (see Figure 6.44).

Figure 6.44: The Key Exchange Methods -
Click OK | OK | Close. Your new security policy appears in the console.
As can be seen, what looks easy on paper can be somewhat daunting when you actually apply the principles! With the rule you created, all traffic leaving 192.168.1.0 to 192.168.2.0 will be secured according to the filter rule you set up. Because it is mirrored, the same rule applies in the other direction.
Compatibility Notes
To fully engage the capabilities of the IPSec security architecture, the entire enterprise must use IPSec-aware devices. The only currently released Microsoft operating systems that are IPSec-aware at this point are Windows 2000 and XP. Windows .NET will also be IPSec-aware. Communications to or from any other version of Windows cannot be secured via IPSec.
| Note | Microsoft released an L2TP/IPSec client for Windows 98, ME, and NT 4, which will allow the use of IPSec encryption in an L2TP virtual private network (VPN), but these operating systems do not support use of IPSec alone to secure network communications. The L2TP/IPSec VPN client can be downloaded from the Microsoft Web site at www.microsoft.com/windows2000/server/ evaluation/news/bulletins/l2tpclient.asp. |
Troubleshooting IP Security
IPSec can be a very complicated mechanism to get configured and working properly on a network. Many problems can occur, but more often than not they are related to simple design and implementation mistakes that can be prevented or easily corrected.
Before getting to deep into troubleshooting some of the more common problems, there are two bits of information that you must keep in mind at all times if IPSec is to be used successfully in your network.
-
IPSec cannot be used with Network Address Translation (NAT) which involves changing the IP and/or TCP/User Datagram Protocol (UDP) headers, which then invalidates the packet integrity. Make sure you do not send client IPSec packets to a NAT server. Consider using Point-to-Point Tunneling Protocol (PPTP) instead, which is NAT friendly but has the disadvantage of only securing data between client and VPN server rather than offering end-to-end security.
-
Routers and or firewalls may need to be configured to properly accommodate IPSec traffic. In particular:
-
Protocol ID 50 and 51 For ESP and AH traffic
-
UDP port 500 For IPSec negotiation traffic
Table 6.3 outlines some of the more common problems and their solutions when dealing with IPSec.
| Problem | Corrective Action |
|---|---|
| I am not able to establish an IPSec or any other connection with a server. | Test for basic network connectivity between the two computers using the PING command. In many cases, basic network connectivity issues will end up being the root cause of a communications failure. Ensure also that all required network services (DNS, DHCP, and so forth) are functioning properly. Additionally, check to ensure that both computers are part of the same domain, that is, check that the client is not in a workgroup and the server is in the domain. Removal of clients from the domain will cause IPSec communication to fail. |
| IPSec communications are not occurring as expected after configuring a new IPSec Policy. | Check to ensure the desired policy is actually in place by using the TCP/IP Advanced Properties window, the IPSec Monitor, or the Group Policy Editor. If the wrong (or no) policy is assigned, assign the correct policy and check for secured communications per the configured and assigned policy. |
| No hard SAs are being created between IPSec computers | Soft SAs may be in place, which will prevent hard SAs from being formed. You will need to stop all traffic between the two computers for a long enough time so that the SA can time out-usually about 5 to 10 minutes. After the soft SA has timed out, you should restart the IPSec Policy Agent on both computers and see that a hard SA is formed. If not, then you should check to ensure that unsecured communications are not allowed. |
| I have configured IPSec to use digital certificates and now SA negotiations are failing. | Either the correct certificates are not installed on the computers attempting to make the SA or an incorrect CA is specified in the policy properties. Ensure that you have the correct certificates installed. Also check to see that you have the correct CA specified in the policy configuration. |
| Some of my computers are unable to establish a communications session with other computers. | Check to ensure that all computers are using the same policy settings. Secure computers that are not configured to allow unsecured communications will not allow connections from unsecured computers. Also check to ensure that if different policies are being used, all settings are configured correctly to allow the traffic between the computers. |
| I am not able to establish an IPSec connection through my firewall or router. | Check to ensure that the required ports are open on all firewalls and routers between the computers to establish IPSec communications. Ensure also that no NAT devices sit between the two computers, as NAT is incompatible with IPSec. Use MPPE if the NAT device cannot be removed. |
Additional troubleshooting tips can be found in the Microsoft Knowledge Base, article Q259335, located at http://support.microsoft.com/default.aspx?scid=kb;en-us;259335.
|
|
EAN: 2147483647
Pages: 162