IP Security Management Tools
|
|
There are a number of utilities you may need when configuring and monitoring IPSec. Although we are only going to examine the tools available on a local machine here, you can apply the same strategies to domain-based configuration via Site, Domain, and Organizational Unit (OU) Group Policy as required. Although local Group Policy is (as its name suggests) local, it is possible to configure and control these settings centrally using security templates (refer back to Chapter 1 for a review of security templates). You can also export and import IP security policies between computers.
If using certificates for IPSec authentication, you will also need the CA Microsoft Management Console (MMC) snap-in covered in Chapter 4 to issue certificates. Otherwise you will predominately use the following tools:
-
IP Security Policies on local machine
-
IP Security Monitor
-
IPSec Policy Agent Service
-
TCP/IP Advanced Options
-
Certificates Snap-in (to confirm valid computer certificates if using these for authentication)
-
Security Log
IP Security Policies on Local Machine
We first saw the computer's Local Security Settings in Chapter 1 when looking at configuring and securing Windows 2000 computers. You can either access the IP Security Policies by loading Local Security Policy under Administrative Tools, or use the Local Group Policy Editor (gpedit.msc) and navigate down the tree.
The IP Security Policies on Local Machine will be the utility you use most to configure what policies you want, how they are configured, and whether they should be in use. By default no IPSec policy is active on a Windows 2000 computer-a policy has to be specifically assigned. As shown in Figure 6.4, you will see three preconfigured built-in policies that will be covered later.
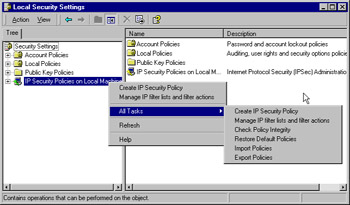
Figure 6.4: IPSec Policies Snap-in and Tasks
Right-clicking on IP Security Policies | All Tasks allows you to create a new policy, manage filter lists and actions (covered later), check a policy's integrity, restore the default policies, and import/export policies. The last two options allow you to both backup and restore known, working policies. But perhaps more usefully, they also provide the means of quickly transferring IPSec policies between computers.
IP Security Monitor
This is a rather strange Windows 2000 utility, somewhat lacking in elegance and cohesion when compared with the standard utilities. There is some important information missing from this utility (which will be covered later), but it does provide a basic graphical display of what is happening on a computer with regard to IPSec traffic.
The IP Security Monitor can be used to monitor IPSec status and test IPSec policies. In Windows 2000, the monitor can be started by typing ipsecmon.exe computer_name at the command line. With no computer name specified, it will default to loading on the local computer. When monitoring a remote computer, the following will be displayed on the title bar, for example: "IP Security Monitor on W2KSRV005." A locally monitored computer will simply have "IP Security Monitor" on the title bar.
The first thing the IPSec Monitor will tell you is whether IPSec is currently enabled on the selected computer (bottom right hand corner). If it is and a computer is currently connected using one of your policies that results in transmitting data from the computer, this will be displayed in the active window with limited details such as the security protocols in use, the source and destination computer, and so on. If it is using one of the built-in policies, the policy name will be displayed in readable form. However, any new policies created will be displayed rather unhelpfully as a hex string identifier. A later section of this chapter shows how to tie this back to the actual policy in use.
The example shown in Figure 6.5 shows the IPSec Monitor, with IPSec enabled on the computer, but no traffic having traversed the network yet. Over time, all of the counters will allow you to track the status of IPSec secured and unsecured communications on your network. You can use the IPSec monitor to view statistics regarding the following:
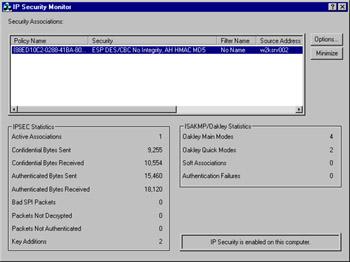
Figure 6.5: The IPSec Monitor
-
Active security associations with other computers (for a log of SAs not currently active, see the Security Log in Event Viewer; SAs are shown as Netlogon events)
-
Number of bytes of data sent using ESP for confidentiality
-
Number of bytes of data received that were sent using ESP
-
Number of bytes sent with authentication
-
Number of packets with invalid security parameters index
-
Number of packets that could not be decrypted
-
Number of packets that could not be authenticated
-
Number of keys sent by ISAKMP to the IPSec driver
-
Number of SAs established during the first phase of ISAKMP
-
Number of SAs established during the second phase of ISAKMP
-
Number of ISAKMP negotiations in which cleartext data transfer was negotiated (known as soft associations)
-
Number of failed authentications
| Test Day Tip | Become familiar with the information that is made available in the IPSec Monitor. It will prove useful in managing and troubleshooting IPSec policies on your network and on this exam. |
For comparison, the IPSec Monitor in Windows XP and .NET has been turned into a modular MMC snap-in. To access it, you will need to create a custom MMC console and add the snap-in as you would any other snap-in. The Windows XP IPSec Monitor is shown in Figure 6.6.

Figure 6.6: The Windows XP IPSec Monitor Console
IPSec Policy Agent Service
A Windows 2000 computer will automatically have installed and started the IPSec Policy Agent, which is responsible for retrieving the assigned IP Security Policy (if one is assigned) from the registry and passing the information within the policy to the IPSec driver.
The policy is retrieved at system boot up and checked at regular intervals for any changes (modifications). By default, the IPSec policy is checked every three hours, but this can be changed under the policy's General tab. This setting is more relevant if you are running within an Active Directory and are centrally changing IP Security policies across the network or if you want to ensure that any locally changed policies cannot stay in place for a prolonged period of time.
When modifying or changing IPSec values locally, it is recommended that you use the Check Policy Integrity option seen in Figure 6.4 to ensure that the new values have been committed to the registry. However, it is often safer to actually stop and restart the IPSec Policy Agent to ensure the "slate is clean." Although this can be done using the Services snap-in, it is much easier to call up a command prompt and type:
Net stop policyagent Net start policyagent
Alternatively, you can disable and then re-enable the network interface in a computer to get IPSec policy changes to take. In some, IPSec does not react well to changes in policy, even after stopping/restarting the policy agent or disabling and re-enabling the network adapter. It can sometimes take a while to renegotiate security options and settle down, but once going it is very stable and quick. When changing and testing different parameters, be prepared to be patient!
TCP/IP Advanced Options
This provides limited access to the IP Security Policies by selecting the Advanced button on your adapter's TCP/IP Properties, and then selecting Options | IP security | Properties.
As shown in Figure 6.7, you can see whether IPSec is currently enabled and toggle between using IPSec and not using it. The dropdown list box ("Use this IP security policy:") displays all of the available policies with their description displayed directly below.
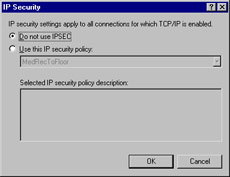
Figure 6.7: Changing IP Security Policies through TCP/IP Properties
| Note | The option to select an IPSec policy from the Advanced TCP/IP Properties page only exists in Windows 2000. In Windows XP and .NET Server, this has been removed in favor of configuration via the Group Policy Editor. |
Certificates Snap-In
This is only used if you are using certificates for authentication. You have to load the Certificates Snap-in into a new MMC or add it to an existing MMC if not already done. When adding the snap-in, you will have the choice of selecting certificates for the local machine, current user, or services. It is important to remember that IP Security uses computer certificates, not user certificates, so be sure to choose the computer account option. Remember that security is in effect even when no one is logged on to the computer and that it is provided at the network layer, which is why the certificate has to be a computer certificate rather than service or user.
When deploying IP Security with certificates there are two different folders of interest within the Certificates Snap-in. The first is the CA certificate, which must be listed under Trusted Root Certification Authorities | Certificates. The second is the computer's certificate which must be listed under Personal | Certificates. If you do not have these certificates and you plan on using certificate-based authentication in IPSec, you should get them as detailed in Chapter 4.
Security Log
To record IPSec-related information in the Security Log, you must first enable Auditing through Security Settings | Local Policies | Audit Policy. We covered group policies in Chapter 1 and will be covering auditing in Chapter 10 if you need more information on how to do this, but essentially you can request auditing for things like account logon events and object access among other things. For IPSec it is a good idea to request both Success and Failure audits so that you are as equally aware of when IPSec is failing as you are confirming that it is working, and with what security parameters.
When auditing is enabled and an IPSec policy is active, this will record various events such as whether a secure connection was established successfully and what security parameters were in place (for example, details on the certificate used for authentication, whether encrypting, and so on). Equally, when negotiations fail, the reason for this will be recorded. For example, "IKE security association negotiation failed" with a Failure Reason such as "No response from peer." To understand fully the recorded information in the audit logs, you need a good understanding of the IPSec security protocols, acronyms, and workings, which were covered previously in this chapter.
Netdiag
NetDiag.exe is one of the Windows 2000 Support Tools that ships with Windows 2000. More information on its many uses can be found within the following MSKB Q article: http://support.microsoft.com/default.aspx?scid=KB;EN-US;321708&.
However, specifically for IPSec, NetDiag.exe can read and display all details of a current IPSec policy-this is where you can match a custom policy name to the long hex string displayed in IP Security Monitor. Unlike IP Security Monitor, it can display a more accurate reading of your IPSec statistics.
Type netdiag /test:ipsec /v for full statistical details of your current IPSec policy, including the name of your custom policy. There is an awful lot of information here, so either scroll through it or redirect the output to a text file. If you type netdiag /test:ipsec /debug you will see configuration information on the policy in use. Be aware that this will include your password in readable format, if using passwords rather than certificates. Fortunately, from a security point of view, it can only be run locally, and users without proper administrative credentials will not be able to see any sensitive information. They will see information that displays "IPSec policy service is active, but test failed to get current policy information" with a later "Access is denied."
|
|
EAN: 2147483647
Pages: 162