| You use the Server Properties dialog box to manage the general configuration of DNS servers. Through it, you can enable and disable IP addresses for the server and control access to DNS servers outside the organization. You can also configure monitoring, logging, and advanced options. Enabling and Disabling IP Addresses for a DNS Server By default, multihomed DNS servers respond to DNS requests on all available network interfaces and the IP addresses they're configured to use. Through the DNS console, you can specify that the server can answer requests only on specific IP addresses. To do this, follow these steps: -
In the DNS console, right-click the server you want to configure and then, from the shortcut menu, choose Properties. -
In the Interfaces tab, select Only The Following IP Addresses, type an IP address that should respond to DNS requests, and then click Add. Repeat this step as necessary. Only these IP addresses will be used for DNS. All other IP addresses on the server will be disabled for DNS. -
Click Add. Repeat Steps 2 and 3 to specify additional IP addresses. Click OK. Controlling Access to DNS Servers Outside the Organization Restricting access to zone information allows you to specify which internal and external servers can access the primary server. For external servers, this controls which servers can get in from the outside world. You can also control which DNS servers within your organization can access servers outside it. To do this, you need to set up DNS forwarding within the domain. With DNS forwarding, you configure DNS servers within the domain as -
Nonforwarders Servers that must pass DNS queries they can't resolve on to designated forwarding servers. These servers essentially act like DNS clients to their forwarding servers. -
Forwarding-only Servers that can only cache responses and pass requests on to forwarders. This is also known as a caching-only DNS server. -
Forwarders Servers that receive requests from nonforwarders and forwarding-only servers. Forwarders use normal DNS communication methods to resolve queries and to send responses back to other DNS servers. -
Conditional forwarders Servers that forward requests based on the DNS domain. Conditional forwarding is useful if your organization has multiple internal domains. Note You can't configure the root server for a domain for forwarding (except for conditional forwarding used with internal name resolution). You can configure all other servers for forwarding.
Creating Nonforwarding DNS Servers To create a nonforwarding DNS server, follow these steps: -
In the DNS console, right-click the server you want to configure and then, from the shortcut menu, choose Properties. -
In the Forwarders tab, select All Other DNS Domains in the DNS Domain list. -
Enter the IP addresses of the network's forwarders. -
Click Add. Repeat this process to specify additional IP addresses. -
Set the Forward Time Out. This value controls how long the nonforwarder tries to query the current forwarder if it gets no response. When the Forward Time Out interval passes , the nonforwarder tries the next forwarder on the list. The default is 5 seconds. Click OK. Creating Forwarding-Only Servers To create a forwarding-only server, follow these steps: -
In the DNS console, right-click the server you want to configure and then, from the shortcut menu, choose Properties. -
In the Forwarders tab, select All Other DNS Domains in the DNS Domain list and then select Do Not Use Recursion For This Domain. -
Enter the IP addresses of the network's forwarders. -
Click Add. Repeat this process to specify additional IP addresses. -
Set the Forward Time Out. This value controls how long the server tries to query the server if it gets no response. When the Forward Time Out interval passes, the server tries the next forwarder on the list. The default is 5 seconds. Click OK. Creating Forwarding Servers Any DNS server that isn't designated as a nonforwarder or a forwarding-only server will act as a forwarder. Thus, on the network's designated forwarders, you should make sure that Do Not Use Recursion For This Domain is not selected and that you haven't configured the server to forward requests to other DNS servers in the domain. Configuring Conditional Forwarding If you have multiple internal domains, you might want to consider configuring conditional forwarding, which allows you to direct requests for specific domains to specific DNS servers for resolution. Conditional forwarding is useful if your organization has multiple internal domains and you need to resolve requests between these domains. To configure conditional forwarding, follow these steps: -
In the DNS console, right-click the server you want to configure and then, from the shortcut menu, choose Properties. -
In the Forwarders tab, click New. In the New Forwarder dialog box enter the name of domain to which queries should be forwarded, such as adatum.com, and then click OK. -
With the domain you previously entered selected in the DNS Domain list, enter the IP address of an authoritative DNS server in the specified domain. Click Add. Repeat this process to specify additional IP addresses. -
Repeat Steps 2 and 3 to configure conditional forwarding for other domains. -
Click OK. Enabling and Disabling Event Logging By default, the DNS service tracks all events for DNS in the DNS event log. This means all informational, warning, and error events are recorded. You can change the logging options by completing the following steps: -
In the DNS console, right-click the server you want to configure and then, from the shortcut menu, choose Properties. -
Use the options in the Event Logging tab to configure DNS logging. To disable logging altogether, choose No Events. -
Click OK. Using Debug Logging to Track DNS Activity You normally use the DNS Server event log to track DNS activity on a server. This log records all applicable DNS events and is accessible through the Event View node in Computer Management. If you're trying to troubleshoot DNS problems, it's sometimes useful to configure a temporary debug log to track certain types of DNS events. To do this, follow these steps: -
In the DNS console, right-click the server you want to configure and then, from the shortcut menu, choose Properties. -
In the Debug Logging tab, shown in Figure 20-14, choose Log Packets For Debugging and then select the events you want to track temporarily. -
In the File Path And Name field, enter the name of the log file, such as dns.log. Logs are stored in the %SystemRoot%\System32\Dns directory by default. -
Click OK. When you're finished debugging, turn off logging by clearing Log Packets For Debugging. Figure 20-14. Use the Debug Logging tab to select the events you want to log and then click OK. Don't forget to clear these events after you've finished debugging. 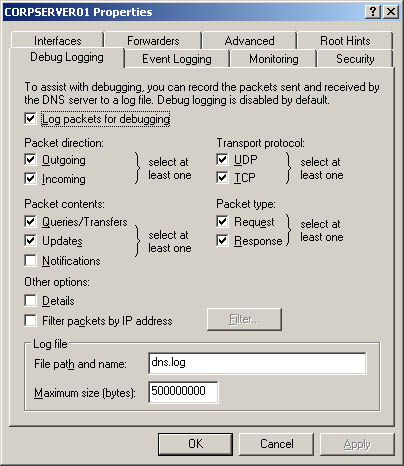 Monitoring DNS Server Windows Server 2003 has built-in functionality for monitoring DNS server. You can configure monitoring to occur manually or automatically by completing the following steps: -
In the DNS console, right-click the server you want to configure and then, from the shortcut menu, choose Properties. -
Select the Monitoring tab, shown in Figure 20-15. You can perform two types of tests. To test DNS resolution on the current server, select A Simple Query Against This DNS Server. To test DNS resolution in the domain, select A Recursive Query To Other DNS Servers. -
You can perform a manual test by clicking Test Now or schedule the server for automatic monitoring by selecting Perform Automatic Testing At The Following Interval and then setting a time interval in seconds, minutes, or hours. -
The results of testing are shown in the Test Results panel. You'll see a date and time stamp indicating when the test was performed and a result, such as Pass or Fail. Although a single failure might be the result of a temporary outage , multiple failures normally indicate a DNS resolution problem. Note If all recursive query tests fail, the advanced server option Disable Recursion might be selected. Select the Advanced tab and check the server options.
Figure 20-15. Use the Monitoring tab to configure a DNS server for manual or automatic monitoring. Monitoring is useful to ensure that DNS resolution is configured properly.  Real World If you're actively troubleshooting a DNS problem, you might want to configure testing to occur every 10 “15 seconds. This will provide a rapid succession of test results. If you're monitoring DNS for problems as part of your daily administrative duties , you'll want a longer time interval, such as two or three hours. | Integrating WINS with DNS You can integrate DNS with WINS. WINS integration allows the server to act as a WINS server or to forward WINS requests to specific WINS servers. When you configure WINS and DNS to work together, you can configure forward lookups using NetBIOS computer names, reverse lookups using NetBIOS computer names , caching and time-out values for WINS resolution, and full integration with NetBIOS scopes. Configuring WINS Lookups in DNS When you configure WINS lookups in DNS, the leftmost portion of the FQDN can be resolved using WINS. The procedure works in the following manner. The DNS server looks for an address record for the FQDN. If a record is found, the server uses the record to resolve the name using only DNS. If a record isn't found, the server extracts the leftmost portion of the name and uses WINS to try to resolve the name (as a NetBIOS computer name). You configure WINS lookups in DNS by doing the following: -
In the DNS console, right-click the domain you want to update and then, from the shortcut menu, choose Properties. -
In the WINS tab, select Use WINS Forward Lookup and then type the IP addresses of the network's WINS servers. You must specify at least one WINS server. -
If you want to ensure that the WINS record on this server isn't replicated to other DNS servers in zone transfers, select Do Not Replicate This Record. Selecting this option is useful to prevent errors and transfer failures to non-Windows DNS servers. Click OK. Configuring Reverse WINS Lookups in DNS When you configure reverse WINS lookups in DNS, the host's IP address can be resolved to a NetBIOS computer name. The procedure works in the following manner. The DNS server looks for a pointer record for the specified IP address. If a record is found, the server uses the record to resolve the FQDN. If a record isn't found, the server sends a request to WINS, and, if possible, WINS returns the NetBIOS computer name for the IP address and the host domain is appended to this computer name. You configure reverse WINS lookups in DNS by doing the following: -
In the DNS console, right-click the subnet you want to update and then, from the shortcut menu, choose Properties. -
In the WINS-R tab, select Use WINS-R Lookup, and then, if you wish, select Do Not Replicate This Record. As with forward lookups, you usually don't want to replicate the WINS-R record to non-Windows DNS servers. -
In the Domain To Append To Returned Name field, type the DNS parent domain information. This domain is appended to the computer name returned by WINS. For example, if you use seattle.adatum.com and WINS returns the NetBIOS computer name gamma, the DNS server will combine the two values and return gamma.seattle.adatum.com. -
Click OK. Setting Caching and Time-Out Values for WINS in DNS When you integrate WINS and DNS, you should also set WINS caching and time-out values. The caching value determines how long records returned from WINS are valid. The time-out value determines how long DNS should wait for a response from WINS before timing out and returning an error. These values are set for both forward and reverse WINS lookups. You set caching and time-out values for WINS in DNS by doing the following: -
In the DNS console, right-click the reverse lookup zone subnet you want to update and then, from the shortcut menu, choose Properties. -
Select the WINS or WINS-R tab, as appropriate, and then click Advanced. This opens the dialog box shown in Figure 20-16. Figure 20-16. In the Advanced dialog box, set caching and time-out values for DNS. 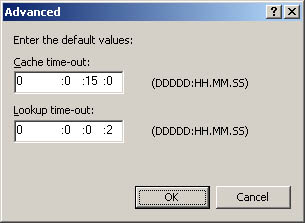 -
Set the caching and time-out values using the Cache Time-Out field and the Lookup Time-Out field. By default, DNS caches WINS records for 15 minutes and times out after 2 seconds. For most networks, you should increase these values. Sixty minutes for caching and three seconds for time-outs might be better choices. -
Click OK. Repeat this process for other domains and subnets, as necessary. Configuring Full Integration with NetBIOS Scopes When you configure full integration, lookups can be resolved using NetBIOS computer names and NetBIOS scopes. Here, a forward lookup works in the following manner. The DNS server looks for an address record for the FQDN. If it finds a record, the server uses the record to resolve the name using only DNS. If it doesn't find a record, the server extracts the leftmost portion of the name as the NetBIOS computer name and the remainder of the name as the NetBIOS scope. These values are then passed to WINS for resolution. You configure full integration of WINS and DNS by doing the following: -
Once you enable WINS lookups for all the appropriate zones, you should enable reverse WINS lookups as well. When you access the Advanced dialog box from the WINS-R tab, you'll see an additional option that allows you to Submit DNS Domain As NetBIOS Scope. Choose this option to enable full integration -
Click OK. Repeat this process for other domains and subnets, as necessary. Before you use this technique, make sure that the NetBIOS scope is properly configured on the network. You should also make sure that a consistent naming scheme is used for all network computers. Because NetBIOS is case-sensitive, queries resolve only if the case matches exactly. Note also that if the domain has subdomains, the subdomains must be delegated the authority for name services in order for WINS and DNS integration to work properly.  |