| Each zone has separate properties that you can configure. These properties set general zone parameters by using the SOA record, change notification, and WINS integration. In the DNS console, you set zone properties by doing the following: -
Right-click the zone you want to update and then, from the shortcut menu, choose Properties. -
Or select the zone and then, from the Action menu, choose Properties. Properties dialog boxes for forward and reverse lookup zones are identical except for the WINS and WINS-R tabs. In forward lookup zones, you use the WINS tab to configure lookups for NetBIOS computer names. In reverse lookup zones, you use the WINS-R tab to configure reverse lookups for NetBIOS computer names . Modifying the SOA Record An SOA record designates the authoritative name server for a zone and sets general zone properties, such as retry and refresh intervals. You can modify this information by doing the following: -
In the DNS console, right-click the zone you want to update and then, from the shortcut menu, choose Properties. -
Select the Start Of Authority (SOA) tab and then update the fields shown in Figure 20-11. Figure 20-11. Use the zone's Properties dialog box to set general properties for the zone and to update the SOA record. 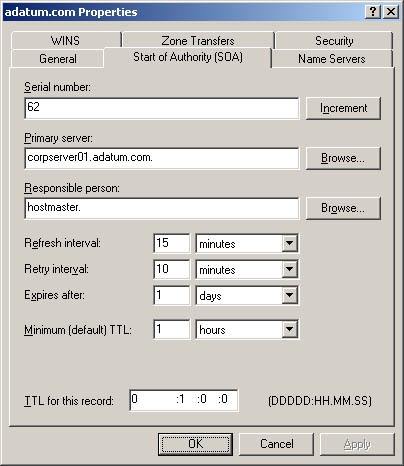 You use the fields in the Start Of Authority (SOA) tab as follows : -
Serial Number A serial number that indicates the version of the DNS database files. The number is updated automatically whenever you make changes to zone files. You can also update the number manually. Secondary servers use this number to determine if the zone's DNS records have changed. If the primary server's serial number is larger than the secondary server's serial number, the records have changed and the secondary server can request the DNS records for the zone. You can also configure DNS to notify secondary servers of changes (which might speed up the update process). -
Primary Server The FQDN for the name server, followed by a period. The period is used to terminate the name and ensure that the domain information isn't appended to the entry. -
Responsible Person The e-mail address of the person in charge of the domain. The default entry is hostmaster followed by a period, meaning hostmaster@your_domain.com. If you change this entry, substitute a period in place of the @ symbol in the e-mail address and terminate the address with a period. -
Refresh Interval The interval at which a secondary server checks for zone updates. If it's set to 60 minutes, NS record changes might not get propagated to a secondary server for up to an hour . You reduce network traffic by increasing this value. -
Retry Interval The time the secondary server waits after a failure to download the zone database. If it's set to 10 minutes and a zone database transfer fails, the secondary server waits 10 minutes before requesting the zone database once more. -
Expires After The period of time for which zone information is valid on the secondary server. If the secondary server can't download data from a primary server within this period, the secondary server lets the data in its cache expire and stops responding to DNS queries. Setting Expires After to seven days allows the data on a secondary server to be valid for seven days. -
Minimum (Default) TTL The minimum TTL value for cached records on a secondary server. The value is set in the format Days : Hours : Minutes : Seconds. When this value is reached, the secondary server causes the associated record to expire and discards it. The next request for the record will need to be sent to the primary server for resolution. Set the minimum TTL to a relatively high value, such as 24 hours, to reduce traffic on the network and increase efficiency. However, keep in mind that a higher value slows down the propagation of updates through the Internet. -
TTL For This Record The TTL value for this particular SOA record. The value is set in the format Days : Hours : Minutes : Seconds and generally should be the same as the minimum TTL for all records. Allowing and Restricting Zone Transfers Zone transfers send a copy of zone information to other DNS servers. These servers can be in the same domain or in other domains. For security reasons, Windows Server 2003 disables zone transfers. To enable zone transfers for secondaries you've configured internally or with ISPs, you'll need to permit zone transfers and then specify the types of server to which zone transfers can be made. Although you can allow zone transfers with any server, this opens the server up to possible security problems. Instead of opening the floodgates, you should restrict access to zone information so that only servers that you've identified can request updates from the zone's primary server. This allows you to funnel requests through a select group of secondary servers, such as your ISP's secondary name servers, and to hide the details of your internal network from the outside world. To allow zone transfers and restrict access to the primary zone database, follow these steps: -
In the DNS console, right-click the domain or subnet you want to update and then, from the shortcut menu, choose Properties. -
Select the Zone Transfers tab as shown in Figure 20-12. -
To restrict transfers to name servers listed in the Name Servers tab, select Allow Zone Transfers and then click Only To Servers Listed On The Name Servers Tab. -
To restrict transfers to designated servers, select Allow Zone Transfers and then click Only To The Following Servers. Afterward, type the IP addresses for the servers that should receive zone transfers. Click OK. Figure 20-12. Use the Zone Transfers tab to allow zone transfers to any server or to designated servers. 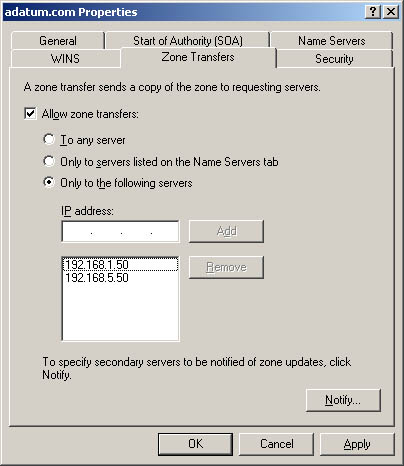 Notifying Secondaries of Changes You set properties for a zone with its SOA record. These properties control how DNS information is propagated on the network. You can also specify that the primary server should notify secondary name servers when changes are made to the zone database. To do this, follow these steps: -
In the DNS console, right-click the domain or subnet you want to update and then, from the shortcut menu, choose Properties. -
In the Zone Transfers tab, click Notify. This displays the dialog box shown in Figure 20-13. Figure 20-13. Use the Notify dialog box to notify all secondaries listed in the Name Servers tab or specific servers that you designate . 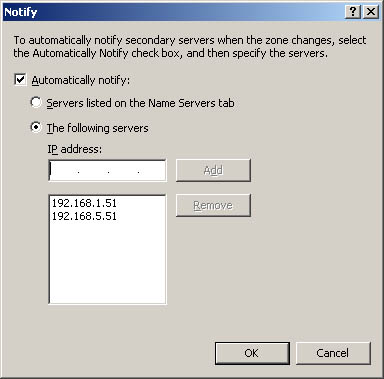 -
To notify secondary servers listed in the Name Servers tab, select Automatically Notify and then choose Servers Listed On The Name Servers Tab. -
If you want to designate specific servers to notify, select Automatically Notify and then choose The Following Servers. Afterward, type the IP addresses of a secondary server to notify and then click Add. You can repeat this process to configure notification for multiple servers. -
Click OK twice. Setting the Zone Type When you create zones, they're designated as having a specific zone type and Active Directory integration mode. You can change the type and integration mode at any time by completing the following steps: -
In the DNS console, right-click the domain or subnet you want to update and then, from the shortcut menu, choose Properties. -
Under Type in the General tab, click Change. In the Change Zone Type dialog box, select the new type for the zone. -
To integrate the zone with Active Directory, select Store The Zone In Active Directory. -
To remove the zone from Active Directory, clear Store The Zone In Active Directory. -
Click OK twice. Enabling and Disabling Dynamic Updates Dynamic updates allow DNS clients to register and maintain their own address and pointer records. This is useful for computers dynamically configured through DHCP. By enabling dynamic updates, you make it easier for dynamically configured computers to locate each other on the network. When a zone is integrated with Active Directory, you have the option of requiring secure updates. With secure updates, you use ACLs to control which computers and users can dynamically update DNS. You can enable and disable dynamic updates by completing the following steps: -
In the DNS console, right-click the domain or subnet you want to update and then, from the shortcut menu, choose Properties. -
Use the following options of the Dynamic Updates drop-down list to enable or disable dynamic updates: -
None Disable dynamic updates. -
Nonsecure And Secure Enable nonsecure and secure dynamic updates. -
Secure Only Enable dynamic updates with Active Directory security. This is available only with Active Directory integration. -
Click OK. Note DNS integration settings must also be configured for DHCP. See the section of Chapter 18 entitled "Integrating DHCP and DNS."
|