| After you create the necessary zone files, you can add records to the zones. Computers that need to be accessed from Active Directory and DNS domains must have DNS records. Although there are many types of DNS records, most of these record types aren't commonly used. So rather than focus on record types you probably won't use, let's focus on the ones you will use: -
A (address) Maps a host name to an IP address. When a computer has multiple adapter cards or IP addresses, or both, it should have multiple address records. -
CNAME (canonical name) Sets an alias for a host name. For example, using this record, zeta.microsoft.com can have an alias as www.microsoft.com. -
MX (mail exchange) Specifies a mail exchange server for the domain, which allows mail to be delivered to the correct mail servers in the domain. -
NS (name server) Specifies a name server for the domain, which allows DNS lookups within various zones. Each primary and secondary name server should be declared through this record. -
PTR (pointer) Creates a pointer that maps an IP address to a host name for reverse lookups. -
SOA (start of authority) Declares the host that's the most authoritative for the zone and, as such, is the best source of DNS information for the zone. Each zone file must have an SOA record (which is created automatically when you add a zone). Adding Address and Pointer Records The A record maps a host name to an IP address, and the PTR record creates a pointer to the host for reverse lookups. You can create address and pointer records at the same time or separately. You create a new host entry with A and PTR records by doing the following: -
In the DNS console, expand the Forward Lookup Zones folder for the server you want to work with. -
Right-click the domain you want to update and then, from the shortcut menu, choose New Host. This opens the dialog box shown in Figure 20-6. Figure 20-6. Create A records and PTR records simultaneously with the New Host dialog box. 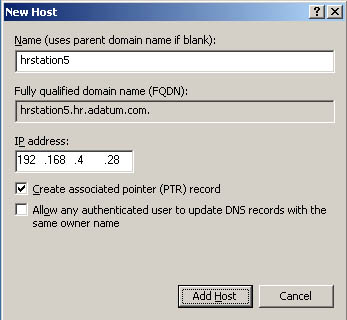 -
Type the single-part computer name, such as corpserver01 , and then the IP address, such as 192.168.1.50 . -
Select the Create Associated Pointer (PTR) Record check box. Note You can create PTR records only if the corresponding reverse lookup zone is available. You can create this file by following the steps listed earlier in this chapter in the section entitled "Configuring Reverse Lookups." The Allow Any Authenticated Users option is only available when a DNS server is configured on a domain controller.
-
Click Add Host. Repeat as necessary to add other hosts . -
Click Done when you're finished. Adding a PTR Record Later If you need to add a PTR record later, you can do so by completing the following steps: -
In the DNS console, expand the Reverse Lookup Zones folder for the server you want to work with. -
Right-click the subnet you want to update and then, from the shortcut menu, choose New Pointer. This opens the dialog box shown in Figure 20-7. Figure 20-7. You can add a PTR record later, if necessary, with the New Resource Record dialog box. 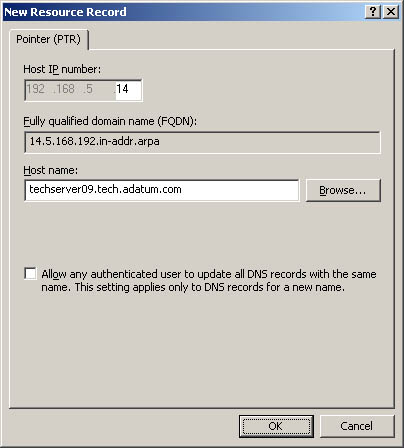 -
Type the Host IP Number, such as 14, and then type the Host Name, such as techserver09.tech.adatum.com . Click OK. Adding DNS Aliases with CNAME You specify host aliases using CNAME records. Aliases allow a single host computer to appear to be multiple host computers. For example, the host gamma.microsoft.com can be made to appear as www.microsoft.com and ftp.microsoft.com. To create a CNAME record, follow these steps: -
In the DNS console, expand the Forward Lookup Zones folder for the server you want to work with. -
Right-click the domain you want to update and then, from the shortcut menu, choose New Alias. This opens the dialog box shown in Figure 20-8. Figure 20-8. When you create the CNAME record, be sure to use the single-part host name and then the fully qualified host name. 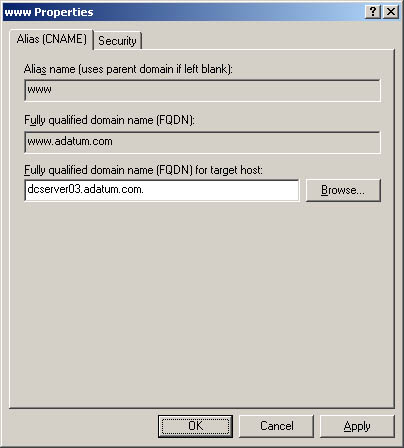 -
Type the alias in the Alias Name field. The alias is a single-part host name, such as www or ftp. -
In the Fully Qualified Domain Name (FQDN) For Target Host Field, type the full host name of the computer for which the alias is to be used. -
Click OK. Adding Mail Exchange Servers MX records identify mail exchange servers for the domain. These servers are responsible for processing or forwarding mail within the domain. When you create an MX record, you must specify a preference number for the mail server. A preference number is a value from 0 to 65,535 that denotes the mail server's priority within the domain. The mail server with the lowest preference number has the highest priority and is the first to receive mail. If mail delivery fails, the mail server with the next lowest preference number is tried. You create an MX record by doing the following: -
In the DNS console, expand the Forward Lookup Zones folder for the server you want to work with. -
Right-click the domain you want to update and then, from the shortcut menu, choose New Mail Exchanger . This opens the dialog box shown in Figure 20-9. Figure 20-9. Mail servers with the lowest preference number have the highest priority. 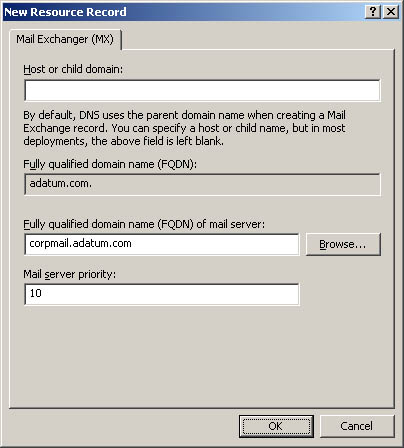 -
You can now create a record for the mail server by filling in these fields: -
Host Or Child Domain Enter the single-part name for the mail exchanger if desired. In most cases you'll want to leave this blank, which specifies that the mail exchanger name is the same as the parent domain name. -
Fully Qualified Domain Name (FQDN) Enter the fully qualified domain name of the domain to which this mail exchanger record should apply, such as tech.adatum.com . -
Fully Qualified Domain Name (FQDN) Of Mail Server Enter the fully qualified domain name of the mail server that should handle mail receipt and delivery, such as corpmail.tech.adatum.com . E-mail for the previously specified domain is routed to this mail server for delivery. -
Mail Server Priority Enter a preference number for the host from 0 to 65,535. Note Assign preference numbers that leave room for growth. For example, use 10 for your highest priority mail server, 20 for the next, and 30 for the one after that.
-
Click OK. Adding Name Servers NS records specify the name servers for the domain. Each primary and secondary name server should be declared through this record. If you obtain secondary name services from an ISP, be sure to insert the appropriate Name Server records. You create an NS record by doing the following: -
In the DNS console, expand the Forward Lookup Zones folder for the server you want to work with. -
Display the DNS records for the domain by selecting the domain folder in the tree view. -
Right-click an existing Name Server record in the view pane and then select Properties. This opens the Properties dialog box for the domain with the Name Servers tab selected, as shown in Figure 20-10. Figure 20-10. Configure name servers for the domain through the domain's Properties dialog box. 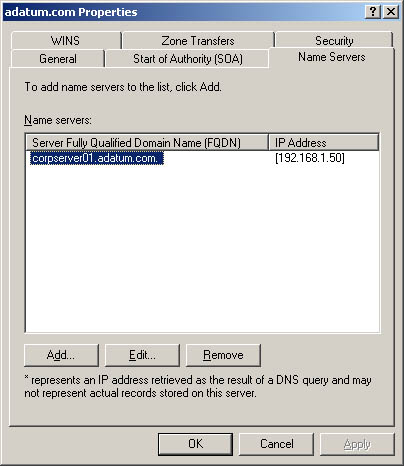 -
Click Add. -
In the Server name field, type the fully qualified host name of the DNS server you're adding, such as corpserver01.adatum.com. -
In the IP Address field, type the primary IP address for the server. Click Add. Repeat this process to specify additional IP addresses for the server. The order of the entries determines which IP address is used first. Change the order as necessary using the Up and Down buttons . -
Click OK. Repeat Steps 5 “7 to specify other DNS servers for the domain. Viewing and Updating DNS Records To view or update DNS records, follow these steps: -
Double-click the zone you want to work with. Records for the zone should be displayed in the right pane. -
Double-click the DNS record you want to view or update. This opens the record's Properties dialog box. Make the necessary changes and click OK. |