Tips for Discussion Web Sites
Want to give your customers or team a place to discuss topics of interest? Well, why not create a discussion Web site? With a discussion Web site, you create a forum where your organization s customers, project team members or others can express their opinions and discuss important issues. Customers may want to learn about upcoming products or learn more about product features. Team members may want a place to discuss project planning, vendor options, or upcoming presentations (such as the nationwide rollout of your new Guava Fizz drink).
Not only does a discussion forum allow users to post articles, it also allows them to search for existing articles on topics of interest. Existing articles can be a gold mine for solving customer problems, answering team member questions, and more. Does this sound like fun? Well, what are you waiting for? Let s create a discussion Web site, and take it for a test drive.
Creating Discussion Web Sites
You can create a discussion Web site as a stand-alone FrontPage Web site, or as part of an existing FrontPage Web site. If you want to have tighter control over access to the discussion, you can also specify that only registered users are allowed, which ensures that all users must register to gain access to the discussion, and that all posted articles have the registered name of the user who submitted them.
A key thing to know up front about discussion Web sites is that they require FrontPage Server Extensions. To create a discussion Web site, follow these steps:
-
Click the down arrow to the right of the New tool, then select Web Site.
-
In the Web Site Templates dialog box, select the Add To Current Web Site check box if you want to add a discussion area to the current FrontPage web.
-
Double-click Discussion Web Site Wizard. Click Next.
-
As shown in Figure 3-5, Discussion Web sites have a submission form, table of contents, search form, threaded replies, and a confirmation page by default. Click Next.
Note If you want all articles posted to the discussion to be in a single list, clear Threaded Replies before clicking Next. Clearing this option specifies that replies to articles should not appear as subtopics.
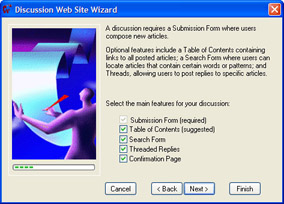
Figure 3-5: You can configure the discussion Web site in several ways, but most of the time you ll want to have a submission form, table of contents, search form, threaded replies and a confirmation page. -
Enter a descriptive title for the discussion, such as Network Project Discussion or New Product Discussion Forum, in the field provided. Note the name of the discussion folder. This is where articles posted to the discussion will be stored. Click Next.
-
You ll post articles to the discussion using a submission form. As you can see from Figure 3-6 on the following page, you can now set the input fields for this form. The Category and Product fields provide drop-down lists that can be used to sort discussion topics by category name or by product type. Click Next.
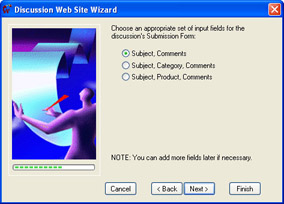
Figure 3-6: You can select several different field combinations for the submission form. Choose the one that makes the most sense, based on how you think the discussion will be used.Note If you use the Category or Product field, you ll need to define the categories or products for the discussion later. For more information on working with drop down lists, see Chapter 14, Working with Forms.
-
Click Next to accept the default access setting, and make the discussion group open , meaning anyone with access to the discussion can post articles. Or click Yes, Only Registered Users Are Allowed, to make the discussion closed , meaning only registered users can post articles to the discussion. Then click Next.
Note If you chose to restrict access to the discussion, you ll also need to create a registration page, or create the accounts users will need to access the discussion manually.
-
If you choose to add a table of contents to the discussion:
-
You ll be able to specify the sort order for articles posted to the discussion. Choose Oldest To Newest or Newest To Oldest, and then click Next.
-
You ll then be able to specify whether you want the table of contents to be the home page for the Web site. Choose Yes or No, and then click Next.
-
-
If you choose to add a search form, select the search options you want to include in the form, including: subject, size , date, and score. The score is a measure of the relevancy of the query term to a particular article. Click Next.
-
Now, you can specify the layout of the discussion. Choose No Frames if you want each discussion area to have its own page, or choose Dual Interface (the default) if you want to allow the use of frames (if the user s browser supports them). With dual interface frames , a table of contents is displayed in the top frame, and articles and other pages are displayed in the bottom frame.
-
Click Finish so that the Discussion Web Site Wizard can create the new discussion Web site.
-
Edit the discussion pages as necessary. When you re finished, publish the discussion Web site to a server with FrontPage Server Extensions.
How to Use and Manage Discussion Web Sites
The discussion Web site gets going when a customer, team member or other user posts an article to it. Users can then reply to posts, or create new articles with new subjects to start new discussions. Articles are stored in a discussion folder ”a hidden folder that only administrators can access.
Once the discussion gets going, you may need to monitor what is being posted. Sometimes an inappropriate article or reply may be posted to the discussion, and if so, you may want to modify or remove the message. You may also want to periodically modify or remove old articles from the discussion, so that it is easier to keep track of the current discussion.
Articles posted to the discussion Web site are saved as individual Web pages. To modify articles, follow these steps:
-
Open the discussion Web site in FrontPage 2003. If necessary, press Alt+F1 to display the Folder List.
-
Double-click the Hidden Discussion Folder to access its contents.
-
Articles posted to the discussions are named sequentially. To find the article you want to remove, increase the width of the Title column so that you can read the article subjects.
-
Double-click the article you want to modify.
-
Edit the article and then press Ctrl+S to save the changes.
To remove articles, follow these steps:
-
Open the discussion Web site in FrontPage 2003, then select Tools, and then Options to open the Options dialog box.
-
In the General tab, select Warn When Text Index Is Out of Date, and click OK.
-
If the index is out of date, you should get a warning telling you that FrontPage needs to re-index the Web site. Click Yes ”you want the index to be up to date before you delete any messages. By updating the index, you ensure the article you are removing isn't listed in search results.
-
If necessary press Alt+F1 to display the Folder List.
-
Double-click the hidden discussion folder to access its contents.
-
Articles posted to the discussion are named sequentially. To find the article you want to remove, increase the width of the Title column so that you can read the article subjects.
-
Right-click the article you want to delete and then select Delete.
EAN: 2147483647
Pages: 179