The Intelligent Message Filter
|
| < Day Day Up > |
|
Server-Side Filtering
When Microsoft developed Exchange 2003, the company knew it had to improve the server’s ability to combat spam, Exchange 2003 therefore introduces several new antispam features such as connection filtering, recipient filters, and sender filters. This is much more than its predecessor Exchange 2000 offered, but we still miss some important features such as Bayesian filtering and heuristics-based analysis. Some of these missing features will be introduced with the new SmartScreen-based Exchange 2003 add-on, Intelligent Message Filter (IMF), which Microsoft will release later this year, but unfortunately IMF will only be available to SA customers. (We will talk more about IMF later in this Appendix.)
| Note | One of the most interesting new antispam features of Exchange 2003 is the connection filtering feature, which, among other things, includes support for real-time blacklists (RBLs), which means that Exchange 2003 uses external services that list known sources of spam and other unsolicited e-mail sources, dialup user accounts, and servers with open relays. The RBL feature allows you to check a given incoming IP address against a RBL provider’s list for the specific categories you would like to filter. With the recipient filtering feature, you can block mail that is send to invalid recipients. You can also block mail to any recipients who are specified in a recipient filter list, whether they are valid or not. The recipient filter feature blocks mail to invalid recipients by filtering inbound mail based on Active Directory lookups. The sender filtering feature is used to block messages that were sent by particular users. |
Let’s take a step-by-step look at how to configure each of the new Exchange 2003 antispam features. We start with configuring the Connection Filtering feature. To get to the Connection Filtering tab, we need to perform the following steps:
-
Logon on to the Exchange 2003 server.
-
Start the Exchange System Manager.
-
Expand Global Settings (see Figure A.9).
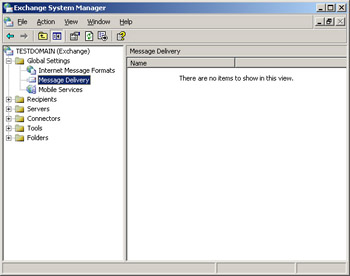
Figure A.9: The Exchange System Manager -
Right-click Message Delivery and select Properties.
-
Click the Connection Filtering tab (see Figure A.10).
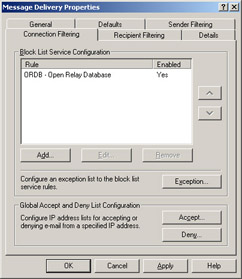
Figure A.10: The Connection Filtering Tab
Connection Filtering
A new feature in Exchange 2003 is the possibility of specifying one or more block list service providers (also known as real-time blacklists, or RBLs. The two terms will be used interchangeably throughout this Appendix). For readers who don’t know what blacklists are all about, here comes an explanation. A blacklist is a list containing entries of known spammers and servers that acts as open relays, which spammers can hijack when they want to use innocent servers to sent spam messages. By checking all inbound messages against one or more blacklists, you can get rid of a rather big percentage of the spam your organization receives. Note that you always should test a blacklist before introducing it to your production environment, because some blacklists might be too effective, meaning that they will filter e-mails your users actually want to receive. Also keep in mind that connection-filtering rules apply only to anonymous connections and not users and computers.
Let’s take a closer look at the different options available, when specifying a new list to block. Click the Add button shown in Figure A.10. You’ll see a screen like the one shown in Figure A.11.
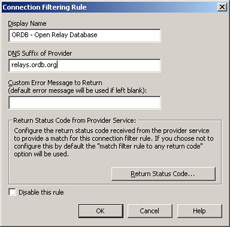
Figure A.11: Connection Filtering Rule
As you can see in Figure A.11, we now need to enter the necessary block list information.
Display Name
In the Display Name field, you should type the connection-filtering rule name that you want displayed on the list on the Connection Filtering tab. This name could be anything, but a good rule of thumb is to use the name of the Black List provider.
DNS Suffix of Provider
In the DNS Suffix of Provider field, you should enter the DNS suffix of the blacklist provider.
In Table A.1 we have created a list of some of the well known and effective blacklist providers. You can add multiple blacklists to your Exchange server. If you look back at Figure A.10, you can see that you can use the arrow buttons to the right to put the lists in the order you want them queried. It’s not recommended that you add more than four to five blacklists to your server, especially not on servers with a lot of traffic. The reason is that each inbound mail message, whether it’s spam or not, needs to be queried against each blacklist, which, as you might guess, puts a performance burden on a possibly already overloaded Exchange server.
| Provider Name | DNS Suffix | Blacklist Web Site | Description |
|---|---|---|---|
| Open Relay Database (ORDB) | relays.ordb.org | www.ordb.org | Lists verified open relays. One of the largest databases, used widely for open relay filtering. |
| SPAMCOP | bl.spamcop.net | www.spamcop.net | Lists spam carriers, sources, or open relays. Has complex rules to decide whether a host is a spam carrier or not. |
| Blacklists China | cn-kr. | www.blackholes.us | This zone lists and Korea US blackholes.us (BLCKUS-CNKR) China and Korea network ranges. China: DNS result 127.0.0.2. Korea: DNS result 127.0.0.3. 127.0.0.2 and 127.0.0.3 tests are supported. |
| Domain Name System Real- Time Black Lists (DNSRBL- | spam.dnsrbl.net | www.dnsrbl.com | List of confirmed “honey pot” spammers. These are SPAM) addresses created for the sole purpose of placing them in “harvesting” contexts. Anyone sending mail to one of these addresses is a spammer. |
| Domain Name System Real-Time Blacklists Dialup Net-working(DNSRBL-DUN) | dun.dnsrbl.net | www.dnsrbl.com | Lists dialup net working pools that are never a legitimate source to directly contact a remote mail server. |
| DEVNULL | dev.null.dk | dev.null.dk | Lists open relays. |
Custom Error Message to Return
When adding a block list, we also have the option of creating a custom error message that will be returned to the sender. Usually you should leave this field blank to use the default error message. The default message is:
<IP address> has been blocked by <Connection Filter Rule Name>
If you create your own custom error message, you can use the variables shown in Table A.2.
| Variables | Description |
|---|---|
| %0 | Connecting IP address. |
| %1 | Name of connection filter rule. |
| %2 | The block list provider. |
Return Status Code
This option is used to configure the return status code against which you want to filter. Let’s click the Return Status Code button so we can see the three Return Status Codes options it’s possible to choose between (see Figure A.12).
Here are the options presented on the Return Status Code screen:
-
Match Filter Rule to Any Return Code This is the default setting. You should select this option to match all return codes with the filter rule. If an IP address is found on any list, the blacklist provider service sends a positive return code, and the filter rule will block the IP address.
-
Match Filter Rule to the Following Mask Enter the mask that you want to use to interpret the return status codes from the blacklist provider service. Contact your blacklist provider service to determine the conventions used in the provider’s masks.
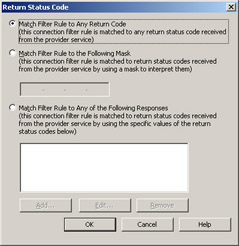
Figure A.12: Return Status Code -
Match Filter Rule to Any of the Following Responses If you want the filter rule to match one of multiple return status codes, then enter the return status codes you want the rule to match. For example, you can use this option if you want to check the status codes returned when an IP address is on the list of known sources of unsolicited commercial e-mail or on the dialup user list.
Disable This Rule
The last option under Connection Filtering rules (refer back to Figure A.11) is quite easy to explain. This check box is simply used to disable a created rule.
| Notes from the Underground ... | Information About Block List Service Providers and Status Codes When we specify a Block List (aka Real-time Black List) provider, each time an e-mail message arrives at the Exchange server, the server performs a lookup of the source IP address of sending mail server in the specified blacklist. If the IP address isn’t present on the blacklist, the list returns a “Host not found” error message. If the IP address is present, the blacklist service returns a status code, with an indication of the reason that the IP address is listed. The following is a list of the most common RLB status codes. |
127.0.0.2 Verified open relay
127.0.0.3 Dialup spam source
127.0.0.4 Confirmed spam source
127.0.0.5 Smart host
127.0.0.6 A spamware software developer or spamvertized site (spamsites.org)
127.0.0.7 List server that automatically opts users in without confirmation
127.0.0.8 Insecure formmail.cgi script
127.0.0.9 Open proxy servers
Exception Lists
Now that you’ve seen the steps necessary for adding a blacklist, we can move on to have a look at the Exception list. Click the Exception button shown in Figure A.10. We are now presented with the screen shown in Figure A.13. As you can see, it’s possible to add SMTP addresses to an exception list. All SMTP addresses on this list will not be filtered by the blacklist rules. The purpose of the Exception list is to give us an option of specifying important SMTP addresses (such as company partners and the like) so that mail messages from these senders don’t get filtered by one of our configured block lists.
Please note that you’re not limited to adding individual SMTP addresses to this list. You can also use wildcard addresses (for example, *@testdomain.com), as shown in Figure A.13.
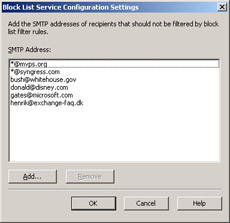
Figure A.13: An SMTP Address Exception List
Global Accept and Deny List
We have now reached the last feature available under the Connection Filtering tab. Actually, it’s two features: the global Accept and Deny lists (refer back to Figure A.10).
-
Accept list The Accept list (see Figure A.14) is used to add a single IP address or a group of IP addresses from which you want to accept messages on a global level. Exchange checks the global Accept and Deny lists before checking the connection filter rules. If an IP address is found on the global Accept list, the Exchange server automatically accepts the message without checking the connection filter rules.
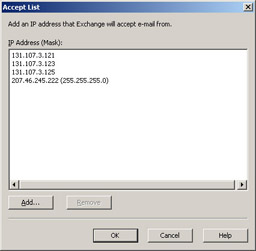
Figure A.14: The Global Accept List -
Deny list The Deny list (see Figure A.15) is also used to add a single IP address or a group of IP addresses, but opposite the Accept list, these addresses are denied access, before checking the connection filter rules. Exchange simply drops the SMTP connection right after the mail (MAIL FROM) command is issued.
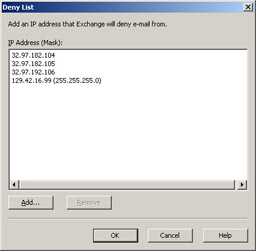
Figure A.15: The Global Deny List
Let’s finish the Connection Filtering tab with an important note that also relates to the Recipient and Sender filtering tabs. When creating a Connection, Recipient, and Sender filtering rule and then clicking Apply, we receive the warning box shown in Figure A.16.
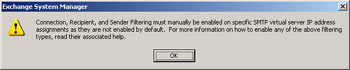
Figure A.16: Filtering Rule Warning
To apply the filtering rule to a SMTP virtual server, we need to do the following:
-
In the Exchange System Manager, drill down to Servers | Server | Protocols | SMTP (see Figure A.17).
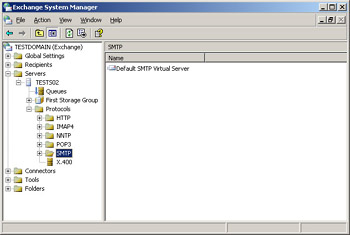
Figure A.17: Default SMTP Virtual Server in System Manager -
Right-click Default SMTP Virtual Server in the right pane, then select Properties (see Figure A.18).
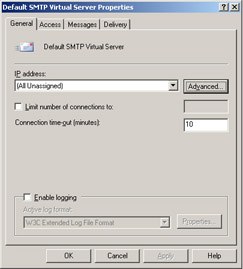
Figure A.18: Properties of Default SMTP Virtual Server -
Under General, click the Advanced button. You’ll see the screen shown in Figure A.19.
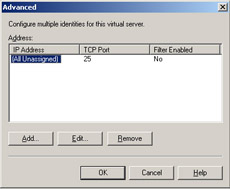
Figure A.19: Advanced Properties -
Now click Edit, and you’ll see the Identification screen shown in Figure A.20.
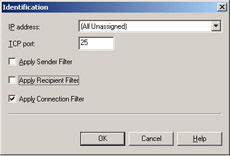
Figure A.20: Identification
As you can see in Figure A.20, this is where we apply the Connection, Recipient, and Sender filtering rules to our default SMTP virtual server.
We can now move on to the Recipient Filtering tab.
Recipient Filtering
The Recipient Filtering feature allows us to block incoming e-mail messages that are addressed to specific recipients. We can filter recipients using several formats. We can specify individual e-mail addresses, or we can filter a complete group of e-mail addresses using wildcards such as *@syngress.com (or even subdomains such as *@*.syngress.com), as shown in Figure A.21.
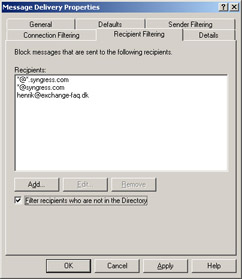
Figure A.21: The Recipient Filtering Tab
Filtering Recipients Not in the Directory
When the Filter recipients who are not in the Directory option is enabled, the system will filter all incoming e-mail messages sent to e-mail addresses not present in Active Directory. Spammers often use automatically generated e-mail addresses in an attempt to send messages to as many users as possible, so in many cases it might be a good idea to enable the Directory lookup feature. Another benefit of enabling this feature is that all e-mail sent to former employees (and that has been deleted and therefore no longer carries an e-mail address) will be filtered automatically. But the feature also has its drawbacks: Enabling it could potentially allow spammers to discover valid e-mail addresses in your organization because during the SMTP session, the SMTP virtual server sends different responses for valid and invalid recipients. As is the case with connection filtering, this feature doesn’t apply to authenticated users and computers.
There’s really not that many nitty-gritty parts under the Recipient Filtering tab, so let’s move right on to the Sender Filtering tab.
Sender Filtering
There will always be some e-mail addresses or e-mail domains from which you don’t want to receive messages. This is what the Sender Filtering tab is for; it’s used to filter e-mail messages that claim to be sent by particular users. We can filter senders using several formats: We can specify individual e-mail addresses, we can filter a complete group of e-mail addresses using wildcards such as *@syngress.com (or even subdomains such as *@*.syngress.com), and we can use display names enclosed by quotes, such as “Henrik Walther”(see Figure A.22).
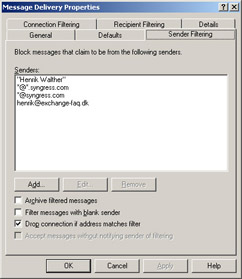
Figure A.22: The Sender Filtering Tab
Through this tab, we can control the following options:
-
Archive filtered messages When this box is checked, all filtered e-mail messages are archived. Depending on the amount of filtered e-mail, the archive can become very large. For that reason, you should be sure to check the archive files on a regular basis. Note that the filtered message archive is created in the C:\Program Files\Exchsrvr\Mailroot\vsi folder.
-
Filter messages with blank sender Spammers often use e-mail scripts to send spam messages, which often results in e-mail messages with blank From lines. If you enable this check box, all received e-mail messages with a blank From line will be filtered.
-
Drop connection if address matches filter If this check box is enabled, an SMTP session to a sender’s address that matches an address on the filter will be terminated immediately. This is quite a nice feature because, to deliver even more spam, the spammer needs to reconnect to your SMTP server.
-
Accept messages without notifying sender of filtering Enabling this check box will prevent any nondelivery report (NDR) from being returned to the sender of filtered e-mail messages. Use this option if you don’t want potential spammers to know that their junk mail didn’t reach its destination. If your organization receives a large amount of filtered e-mail, enabling this check box can drastically improve server and network performance.
| Note | The frequency with which users receive spam has increased significantly over the past couple of years. The best way to defend against spam nowadays is to use a so-called defense-in-depth system to block as much spam as possible, before it finally reaches the recipients’ mailboxes. This basically means you have a multiple defense layer system, which includes firewalls, content-filtering servers, SMTP relay servers (also known as SMTP gateways), and the like. Unfortunately, such systems are only suitable for big organizations; most small and midsize organizations have neither the budget nor the IT staff to support them. |
|
| < Day Day Up > |
|
EAN: 2147483647
Pages: 79
- Chapter IV How Consumers Think About Interactive Aspects of Web Advertising
- Chapter VII Objective and Perceived Complexity and Their Impacts on Internet Communication
- Chapter VIII Personalization Systems and Their Deployment as Web Site Interface Design Decisions
- Chapter XV Customer Trust in Online Commerce
- Chapter XVI Turning Web Surfers into Loyal Customers: Cognitive Lock-In Through Interface Design and Web Site Usability