Microsoft Software Update Services
Microsoft Software Update Services
Microsoft Software Update Services (SUS) leverages the Windows Update and Automatic Updates technology to allow a company to choose which updates to apply. Rather than connecting to the Windows Update site for the download of security patches and Windows updates, clients connect to an internal SUS server that issues only approved updates.
How SUS Works
Microsoft SUS depends on the interaction of the Microsoft SUS server and Microsoft SUS clients. The following process is used to deploy security updates via SUS:
-
The SUS server is configured to synchronize its available updates with either the Windows Update site or with another SUS server on the corporate network. The synchronization can be scheduled or initiated manually by the SUS administrator.
-
The SUS administrator reviews the list of available updates at the SUS server and approves the updates for distribution. Updates should be approved only after being tested on network computers.
-
SUS clients connect to the SUS server and download any approved updates but do not download installed updates. Depending on the SUS client configuration, updates either are installed automatically or require a member of the local Administrators group to initiate installation.
-
SUS clients send information to a configured SUS statistics server. This information details whether the updates were successfully applied to the client computer.
SUS can be used only for the application of updates to the Windows OS and supported applications. You cannot deploy service packs by using SUS.
Configuring the SUS Server
To configure the computer designated as the SUS server, you must first install the SUS server software. The SUS server software is a free download available at http://www.microsoft.com/Windows2000/downloads/recommended/susserver/.
Installing the SUS Server Software
Once you download the SUSSetup.msi file, you must ensure that the SUS server has the minimally required software. The SUS server application is a Web-based application and requires Internet Explorer 5.5 or later, in addition to the following Microsoft Internet Information Services (IIS) components for installation:
-
Common Files
-
Internet Information Services Snap-In
-
World Wide Web Service
The SUS server cannot be installed on a domain controller. This requirement prevents the installation of an SUS server in a Microsoft Small Business Server (SBS) environment.
Once the SUS server has the required IIS components as well as the latest service packs and updates, you can install the software there by using the following process:
-
At the SUS server, double-click the SUSSetup.msi file.
-
On the Welcome screen, click Next.
-
Read and accept the End User License Agreement (EULA) and click Next.
-
In the Installation Type page, click Typical and then click Next.
-
Record the URL that SUS clients must connect to when interacting with the SUS server and click Install.
-
The SUS server setup then executes the IIS Lockdown tool. The IIS Lockdown tool removes the IIS Administration Web site and templates from the SUS server, disables all scripting mappings except for Microsoft Active Server Pages (ASP), disables Web-Based Distributed Authoring and Versioning (WebDAV), and prevents the anonymous Web user account from executing system utilities and writing Web content. The scripting mappings are enforced by the URLScan Internet Server Application Programming Interface (ISAPI) filter.
-
The installation completes and provides a URL for the SUS Administration Web pages.
Defining SUS Server Options
Once you install the SUS server, the best practice is to configure its options. You can define the server s options by connecting to the SUS Administration Web page at http://SUSServerFQDN/susadmin (where SUSServerFQDN is the fully qualified domain name of the SUS server) and then clicking the Set Options link. The Set Options Web page allows you to define the following options for the SUS server:
- Proxy server configuration
If the SUS server is on a network protected by a Microsoft Internet Security and Acceleration (ISA) Server or another vendor s proxy server, you must designate the proxy server configuration information. This can include the name, the listening port, and any required credential information for the proxy server.
- SUS server name
This is the name that SUS clients use when connecting to the SUS server. We recommend you use a Domain Name System (DNS) name rather than a NetBIOS name so that DNS is used to resolve the SUS server name rather than Windows Internet Name Service (WINS).
- Master server
You can designate whether the SUS server synchronizes its content with the Microsoft Windows Update server or connects to another SUS server on your network.
- Approval settings
You can choose to approve all updates automatically or manually.
- Storage and locale information
You can choose to store updates on the SUS server s local file system or to connect to the Windows Update server for the download of all updates. In addition, you can choose which locales to download updates for, such as English, Arabic, or Japanese.
Synchronizing the SUS Server
Installing SUS server software adds the Software Update Services Synchronization Service. This service allows the SUS server to synchronize update content with either the Microsoft Windows Update Web site or with another SUS server in your company.
To modify synchronization settings for an SUS server, you must perform the following procedure:
-
Connect to the SUS Administration Web page at http://SUSServerFQDN/susadmin (where SUSServerFQDN is the fully qualified domain name of the SUS server).
-
Click the Synchronize Server link.
-
If you want to perform a manual synchronization of the SUS server, click Synchronize Now. If you want to schedule standard synchronization times for the SUS server, click Synchronization Schedule.
-
In the Schedule Synchronization dialog box (see Figure 23-3), specify the time for the scheduled update, whether you want to synchronize daily or weekly, and how to many times to retry a synchronization in the event of a failure. Once you configure your required settings, click OK.
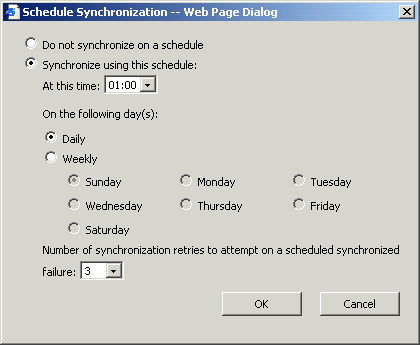
Figure 23-3. Defining the synchronization schedule for the SUS server
Approving Updates
Once you synchronize the SUS server, you must define which updates are approved for distribution to SUS clients. When you click the Approve Updates link in the SUS Administration Web site, you are presented with all the available updates.
After testing the updates on your network either by testing the update distribution on a pilot network or performing a test on your computer you must select all updates you want to distribute to SUS clients in the listing and click the Approve button.
You cannot select which SUS clients will receive a security update. All SUS clients that connect to your SUS server will receive the security update if they are running software that requires it. If you want to apply a security update to a subset of clients, you must use an alternate solution such as Microsoft Systems Management Server (SMS), as described later in this chapter.
Configuring the SUS Clients
SUS requires that client computers have the Automatic Updates client loaded. As mentioned earlier in this chapter, the Automatic Updates client is automatically installed on Windows 2000 based computers with Service Pack 3 and on Windows XP based computers. If you are running Windows 2000 based computers that do not have Service Pack 3 or a later version, you can download the SUS client software from http://www.microsoft.com/windows2000/downloads/recommended/susclient/.
Configuration in an Active Directory Environment
Once you deploy the Automatic Update client, you can configure it by using Group Policy. The Automatic Update client settings are included in the Wuau.adm policy template, which is automatically added to the %systemroot%\inf folder when you apply Service Pack 3 to a computer running the Windows 2000 operating system. The inclusion of the policy template adds Administrative Templates settings for Windows Update, as shown in Figure 23-4.
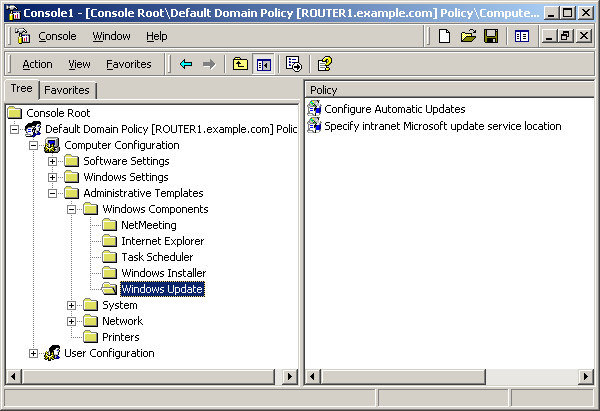
Figure 23-4. Configuring Windows Update settings in Group Policy
Once you have added the Wuau.adm policy template, you can configure two settings to assist with your SUS deployment:
- Configure Automatic Updates
Allows you to specify the Automatic Update client settings. As mentioned earlier, we recommend you automatically download updates from the SUS server and schedule the install.
- Specify Intranet Microsoft Update Service Location
Allows you to designate an SUS server as the update service for detecting updates, rather than using the default Microsoft Windows Update servers. In addition, you can designate an internal server to which statistics for Windows Update are sent. The statistics server must be running IIS. The statistics sent to the server will be stored in the IIS logs.
Configuration in a Non Active Directory Environment
In a non Active Directory environment, you can designate SUS client settings by editing the registry. Registry updates can be applied by manually editing the registry or deploying registry keys.
To define Automatic Update settings, you must add the following registry values to the HKLM\Software\Policies\Microsoft\Windows\WindowsUpdate\AU registry key:
- NoAutoUpdate (Reg_DWORD)
Allows you to enable (0) or disable (1) Automatic Updates. If not specified, the default value is Enable (0).
- AUOptions (Reg_DWORD)
Defines how updates are downloaded and installed. You can choose to be notified for both downloads and installations (2), automatically perform downloads and be notified for installations (3), or automatically perform downloads and installations using a predefined schedule (4).
- ScheduledInstallDay (Reg_DWORD)
Defines the days on which the scheduled installation of Automatic Updates takes place. You can specify that the installation occur every day (0) or on a specific day between Sunday (1) and Saturday (7).
- ScheduledInstallTime (Reg_DWORD)
Defines the hour the scheduled installation of Automatic Updates takes place. Values ranging from 0 to 23 are based on the 24-hour day.
- UseWUServer (Reg_DWORD)
Indicates whether the Automatic Update client will contact an SUS server, rather than contacting the Windows Update site. A value of 1 indicates that updates will be determined by connecting to an SUS server.
If you enable the SUS client to contact an SUS server, you must designate a server to act as the SUS server, and you must designate where statistics information will be sent. These statistics are stored in the HKLM\Software\ Policies\Microsoft\Windows\WindowsUpdate registry key:
- WUServer (Reg_SZ)
This defines the URL of the SUS server. To designate the SUS server in the example.com domain as the SUS server, you would enter a value of http://sus.example.com, for example.
- WUStatusServer (Reg_SZ)
This defines the URL for the SUS statistics server. As with WUServer, you must enter the value in a URL format.
EAN: 2147483647
Pages: 189
- Assessing Business-IT Alignment Maturity
- Linking the IT Balanced Scorecard to the Business Objectives at a Major Canadian Financial Group
- A View on Knowledge Management: Utilizing a Balanced Scorecard Methodology for Analyzing Knowledge Metrics
- Technical Issues Related to IT Governance Tactics: Product Metrics, Measurements and Process Control
- Governance Structures for IT in the Health Care Industry