| Many filters in Photoshop are organized into categories to help you find what you need faster. The following sections list the categories of filters. The Artistic Filters The Artistic filters simulate some artistic styles you may already be familiar with. As with applying any other filter, applying these re-renders the image or layer with the artistic look you choose: Artistic, Film Grain: Film Grain makes your image look like it is a frame from an old movie. Adding grain can be a way to quickly age your picture or make it look more gritty. You can control the look of the film grain with the sliders for Grain, Highlight Area, and Intensity. Grain enlarges the size of the simulated film grains. Highlight Area brightens the lighter portions of the grained image overall. Lowering the Intensity setting of the grain gives you more grain in the image area. Artistic, Palette Knife: Applying the Palette Knife filter takes away the photographic realism and makes the image appear scraped on with a palette knife. Make adjustments to the Stroke Size, Stroke Detail, and Softness, and your image also changes considerably. Altering the size can really change the detail level to an abstract geometric appearance (see Figure 9.10). Figure 9.10. When the Palette Knife filter is applied to an image of a street sign, notice how the painted version still looks "digital." 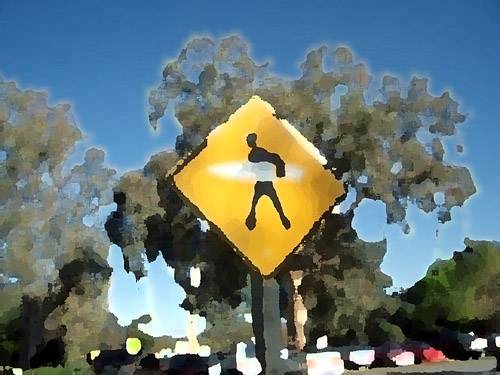
Artistic, Sponge: Applying the Sponge filter waters down your detail and gives the image layer a water droplet effect. Move the sliders for Brush Size, Definition, and Smoothness. A higher Smoothness number overlays your sponged image with an almost camouflage pattern. If you have ever done any sponge painting on walls, you will see a similarity with this filter. The pattern is usually obvious in the areas of solid color and washes out the detail in the image underneath.
The Blur Filters The Blur filters attempt to simulate every type of blur you have ever experienced through your weary eyes, camera lens, photograph, video, or car window. Often you need to blur part or all of an image layer to produce a special effect or to force focus on another part of the image. Sometimes you want a subtle blur applied to an image to simulate a soft focus or a glow on the subject. Other times, your goal may be to make the image unrecognizable. Although we can't cover all the different blurs in this section, the most popular ones are listed here: Blur, Gaussian Blur: The Gaussian Blur filter is an all-purpose blur filter that gives you some degree of control over the blur effect, going from a slight softening to a glaucoma-vision effect (see Figure 9.11). Figure 9.11. A Gaussian blur takes off all the hard edges. Move the Radius slider to the right to increase the blur intensity. 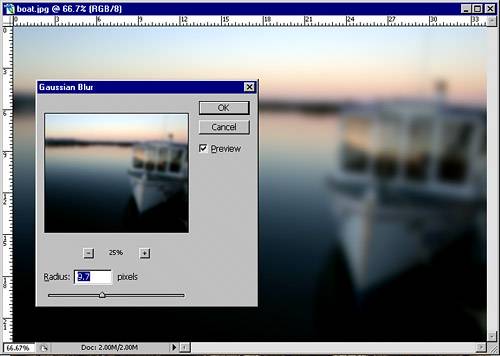
Blur, Motion Blur: Applying the Motion Blur filter blurs the image as if the subject in the image or the camera taking the photo is traveling quickly through space. Blur, Lens Blur: The Lens Blur filter is a photography-centric filter that can be used to simulate all kinds of camera lens effects. This blur filter contains more options than any of the others. If you need the absolute tightest control over your blur, use the Lens Blur filter. Blur, Radial Blur: This filter realistically simulates a shaky or spinning camera lens in your image even more than the Lens Blur filter does.
The Brush Strokes Filters Although many of the Brush Strokes filters could fall under the Artistic category, they don't fall in that category in Photoshop: Brush Strokes, Angled Strokes: Angled Strokes changes the image so that the lighter and darker strokes are painted in opposite directions (see Figure 9.12). Figure 9.12. Angled Strokes is a filter that produces a painted look. Adjust the Direction Balance, Stroke Length, and Sharpness sliders to control the effect of the brush stroke. 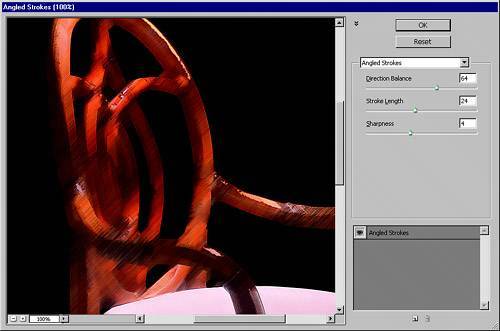
Brush Strokes, Dark Strokes: Dark Strokes renders dark areas as short, tight, dark strokes, and it renders lighter areas with long, white strokes.
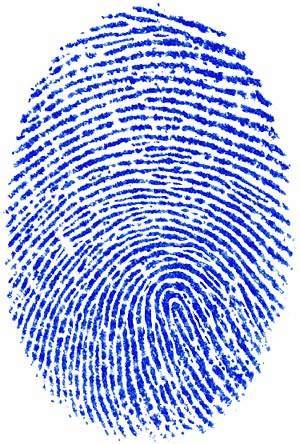
The Distort Filters The Distort filters alter an image geometrically, creating 3D or other reshaping effects. Some of the many Distort Filters are listed here: Distort, Displace: A displace is often referred to as a displacement map or bump map. By using the contrast of one image, you displace or shift the pixels of another (see Figure 9.13). The result looks like a three-dimensional imprint displacing your source image. For example, if you have an image of a coin, you can use it as a displacement for a picture of a flag. So your final image of the flag has the texture of the coin. The flag's colors are retained. In any image used to displace, the darkest and lightest colors produce the most displacement. In order to displace, the displacement image must be saved in Photoshop document format (.psd). You can change the horizontal and vertical scaling of the displacement image to enlarge or reduce the effect. You can also tile the displacement image across the canvas in case you want to create a repeating subtle watermark across the canvas. Figure 9.13. Displacing the image of the city by using the image of the fingerprint. 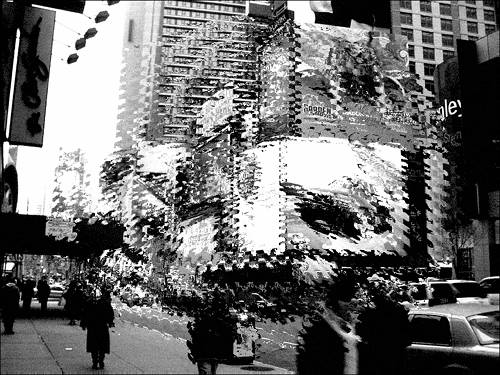
Distort, Shear: The Shear filter lets you bend your image horizontally in many ways by adjusting the vertical band. Easily apply some flexibility to your image by making new points along the band and bending it in opposing directions. Click the Wrap Around radio button or the Repeat Edge Pixels radio button to allow or prevent your image from overlapping on the opposite side of the image. Distort, Wave: The Wave filter gives you an interface of sliders to create a wavy mess of your picture (see Figure 9.14). Actually, mess isn't really a good word for it as the Wave effect is quite cool looking. Moving the sliders too far can render the image unrecognizable. Figure 9.14. The Wave filter controls affect all images differently. Wave is based on calculations that are random. If you like the wave settings, but the wave is not quite right, click the Randomize button to see a different version of the same wave effect. 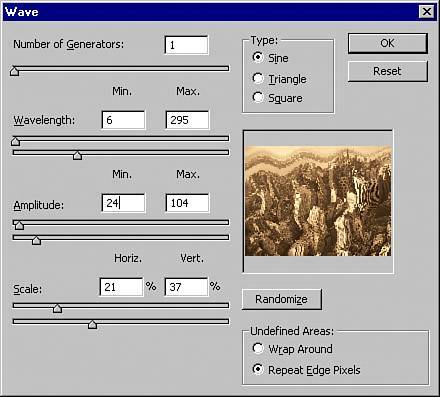
The Noise Filters Noise is a random disturbance that reduces the clarity of a signal. The Noise filters in Photoshop create and remove noise. You can add noise like that from a broken television set, or remove the dust and scratches from an image that Photoshop may be detecting from a scanned or older photograph. The following are the Noise filters: Noise, Despeckle: If you have an image that has a dirty appearance from scanning or having some nasty stuff on the lens, it may benefit from a despeckle. Despeckle removes the tiny highlights that are most likely bits of dirt in your image. It does more than a decent job on images and may save you quite a bit of cleanup time. Be aware that despeckling sometimes inadvertently removes specular highlights that belong in the image. Noise, Dust and Scratches: This filter reduces noise by changing dissimilar pixels. It works best when the dust or particles are in high contrast to their background.
The Pixelate Filters Imaging in computers involves pixels. The words you are reading right now were originally created as pixels. The Pixelate filters break up your selection or layer by using stiff geometric pixel effects. These are the Pixelate filters: Pixelate, Crystallize: The Crystallize filter breaks up the image into a crystal pattern. It limits image color depth to fewer colors. Adjust the size of the individual crystal cells to make the polygon shapes larger or smaller (see Figure 9.15). Figure 9.15. Crystallize uses the colors of the image but limits the number of colors for the solid-color shapes. This effect is similar to stained glass, without the dark edges in between cells. 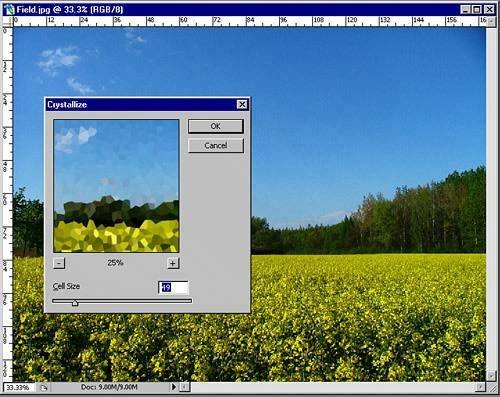
Pixelate, Mosaic: The Mosaic filter produces an effect of enlarging pixels and taking out the detail in the selected area. Because of the wide use of this effect to obscure the identifying features of crime suspects on police television shows, many people are familiar with the mosaic pixelated look.
The Render Filters The Render filters are a hodgepodge of different effects that add clouds, textures, backgrounds, and lighting effects: Render, Clouds: Whereas most filters require that an image already exist that can be manipulated, Clouds is one of the few filters that actually creates an image. The cloud color generated uses your background and foreground colors to create the pixel effect. Because the Clouds filter creates random shadows and highlights from whole cloth, many Photoshop tutorials for creating "natural" textures begin with creating a cloud layer. Render, Lighting Effects: The Lighting Effects filter gives you the most for your money. An interface is provided where you can create and move virtual lights on your image to alter its overall light quality. You can wash out your image in light, or you can darken the image to make it more mysterious or dramatic (see Figure 9.16). You can even choose the type of light and its intensity. You can also choose how the image "material" reacts to the light, with glossy or dull finish. If you like your lighting arrangement, you can save it to use in other images. Figure 9.16. Practice with the Lighting Effects filter to get used to how you expand the light source by using the handles on each light. Each light type has different handles. 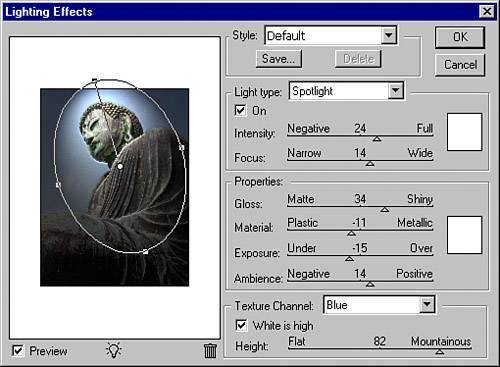
The Sharpen Filters You know how it is. You take a bunch of digital pictures, and when you start downloading them, you find that the one you really want to use is blurry. Now, when it comes to images, there is blurry and then there is blurry. In the former case, we're talking about images that are a little soft or slightly out of focus. In the latter case, we're talking about images that are little more than indistinguishable blurs. Photoshop's Sharpen filters can fix the slight softness, but they're not going to resurrect a hideously out-of-focus image: Sharpen, Sharpen Edges: Blurriness or softness is caused, in part, by decreased contrast between the "edges" in an image. An edge in an image is where adjacent pixels demonstrate major color changes. Major color changes provide detail in an image, and when these edges are softened, a loss of detail results. Sharpen Edges improves on the detail in the selection by increasing the contrast between colors or shades. Sharpen, Smart Sharpen: The Smart Sharpen filter, which is new in Photoshop CS2, outperforms the other sharpening filters. The Smart Sharpen dialog gives you a lot of control over the sharpening, contrast, and the shadow and highlight areas (see Figure 9.17). You can click the Advanced radio button to access all this control over sharpening. Whenever possible, you should zoom in to the image in the dialog by using the zoom buttons so you can see the subtle changes of the effect in the preview. Smart Sharpen can use an algorithm to remove a Gaussian or Lens Motion blur from an image. Figure 9.17. The Smart Sharpen dialog gives you control never before available for sharpening your images in Photoshop. 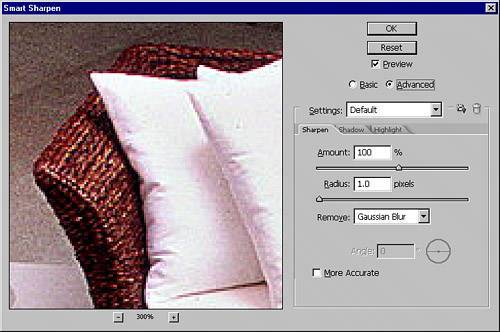
The Sketch Filters The Sketch filters attempt to simulate a sketch by using different drawing media. Applying a Sketch filter to an image alters it considerably, forcing its color and contrast to fit within the range of the filter you choose. These are the Sketch filters: Sketch, Chalk and Charcoal: This filter converts an image into a chalk-and-charcoal sketch. The background is rendered in coarse chalk, and foreground objects are rendered in charcoal. You can vary the amount of charcoal used versus the amount of chalk used. Charcoal strokes are applied in the foreground color you have selected, whereas chalk strokes are applied in the background color you have defined. Black (or dark gray) and white are the traditional choices for this filter, but you can choose whatever combination of colors you'd like. Sketch, Conté Crayon: A Conté crayon is a type of crayon made of graphite and clay, usually available in black, brown, and red. The Conté Crayon filter draws images in this style, giving images a rough-textured illustration effect. The filter uses the selected foreground color for dark areas of the image and the background color for light areas. Sketch, Halftone Pattern: The Halftone Pattern filter simulates an exaggerated halftone dot pattern. You can adjust the size of the dots, the contrast, and the shape of the dot pattern. This filter is useful for simulating the look of old newspaper photos or Roy Lichtenstein paintings (see Figure 9.18). Figure 9.18. The halftone pattern simulates an offset printed image viewed under a loop or magnifying glass. 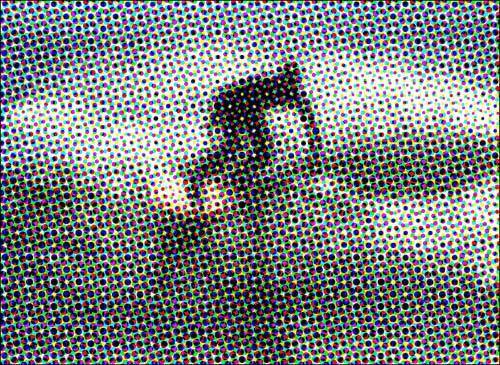
The Stylize Filters Stylize filters create an impressionistic effect on a layer or selection. These are the Stylize filters: Stylize, Extrude: Extrude applies to your image a 3D effect where blocks or pyramids radiate out from the surface of the image or selection. Glowing Edges: This filter identifies the edges in the image and creates a glow as if beaming from a neon light. Stylize, Wind: The Wind filter streaks the brighter areas of your image to make it look as though it is being affected by winds (see Figure 9.19). Depending on the subject in your image, it may look like dust is being blown off in a wind or as if your image's color is starting to bleed. You can choose the direction of the wind, whether left or right. You can also choose the method. For a more realistic effect, choose Wind for the method. Unfortunately, the Blast and Stagger methods tend to look computerized. Figure 9.19. The Wind filter used on an image smears the brighter portions of the image more. If you find that the Wind filter isn't intense enough for your needs, reapply it under the Filter menu. The most recent filter used is always available for reapplication as the first filter item in the menu. 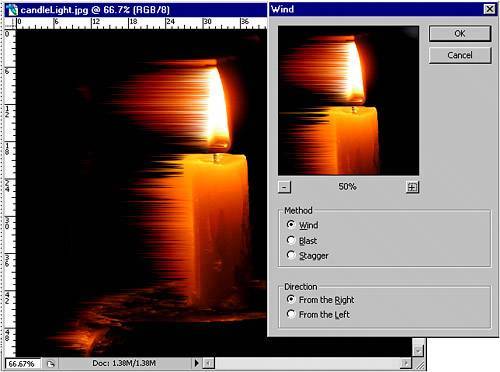
The Texture Filters These are the Texture filters, which let you add surface effects to images: Texture, Patchwork: Patchwork breaks up your image into smaller squares. It has a textured appearance, with a more limited color distribution in the image. The pattern created looks a lot like it was sewn in with colored yarn. Texture, Texturizer: The Texturizer filter provides four types of textures with different options for each: Brick, Burlap, Canvas, and Sandstone. When you use one of these options, your image looks like it is painted onto the texture. The scaling and relief options affect the perceived depth of the texture.
The Video Filters The Video filters help you correct an image for use in a frame of video: Video, De-Interlace: Video is interlaced frames, and you see only every other line of resolution. De-Interlace smoothes out your image by interpolating or duplicating the even or odd fields. Video, NTSC: The gamut of color used by television is more restricted, and this filter prevents some of the oversaturated colors from bleeding inside the scan lines of the television.
The Other Filters The filters under the Other category have been around for some time, certainly long enough to call Photoshop their home. For whatever reason, they have never fallen into a more descriptive category than Other: Other, High Pass: The High Pass filter reveals the edge details of your image, using your specified radius (see Figure 9.20). Figure 9.20. The High Pass filter grays out most of the image, revealing only the edge details. 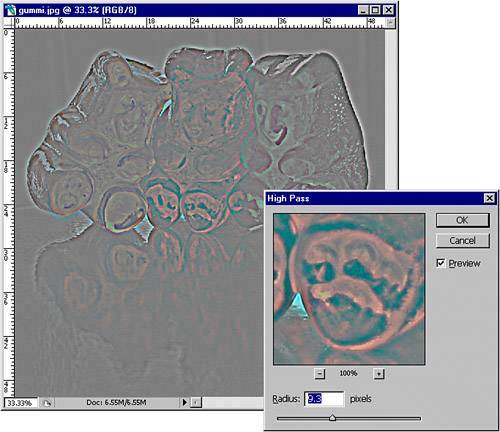
Other, Offset: Offset takes your image within the view of the canvas and shifts it. One use for Offset is to prepare an image for a pattern by shifting it evenly and allowing the image to wrap around. This makes the outer edges capable of meeting smoothly on all sides.
|