WORKING WITH THE VANISHING POINT FEATURE
| New in Photoshop CS2, Vanishing Point is perhaps one of the tools that will encourage users of previous versions of Photoshop to upgrade. You have already been introduced to the Clone Stamp tool, which you use to clone part of an image in order to fill in an area or cover up a blemish. Cloning gets difficult when you have to account for the change in visual perspective in the image. One aspect of perspective is that the eye perceives objects in a scene that are further away as appearing smaller. The Vanishing Point feature lets you identify the angle of perspective in an image so that the Clone Stamp tool will follow that perspective when cloning your image.
To use the Vanishing Point tool, your image must be in RGB color mode. Other color modes currently do not support editing with this filter. If you are working in another color mode, try converting your image to RGB and then using the Vanishing Point tool. After applying the filter, change your mode back to where you need it. Be aware that converting color modes can affect the look of the image significantly. Choose Filter, Vanishing Point. The Vanishing Point window opens. Several steps are required to use this tool successfully. Most importantly, you need to be able to identify the angles of perspective in your image. If you have a picture of a hilly landscape with some rocks but nothing geometric to help you with perspective, don't bother using Vanishing Point. Use Vanishing Point for images with homes and buildings or other objects with obvious straight lines. Fences, railroad tracks, and wooden planks come to mind. In the Vanishing Point window, you choose the Create Plane tool and locate the area you wish to clone. Click in four places with the Grid tool to create the grid. You should be using the perspective of the image to create the grid, so follow the lines and angles with the Grid tool. Using the perspective from your grid, Photoshop interpolates the pixels as you clone. This means that as a portion of your subject gets smaller in the distance, the cloned area is smaller at that distance. In the example in Figure 9.8, we have created a plane for cloning the building into a much larger skyscraper. Figure 9.8. A plane has been created for the skyscraper located in the center of this image and extended upward. Although you can draw anywhere outside the plane, use the plane to help you with perspective where you will clone by using the Clone Stamp tool.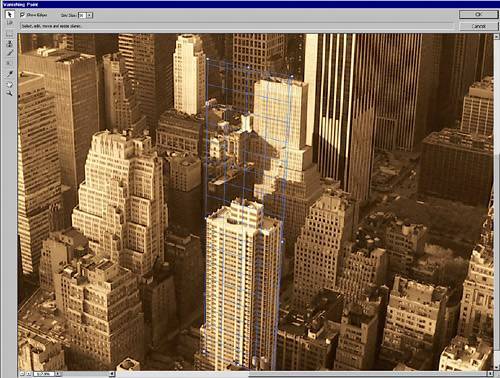 To clone an area, select the Clone Stamp tool. Alt-click (Windows users) or Option-click (Mac users) in the area you want to clone. Let go of the Alt or Option key and find a location to start stamping the cloned area. Click, and you begin cloning.
Don't expect your first attempt with the Vanishing Point feature to be successful. Also don't expect every one of your images to be a good candidate for using Vanishing Point. When you are satisfied with your image, click OK. Your resulting image appears back in the canvas (see Figure 9.9). Figure 9.9. A moderately successful use of the Vanishing Point tool.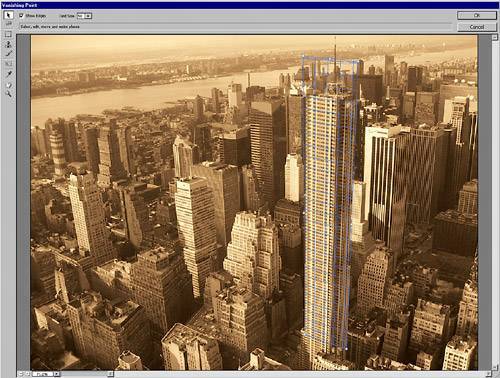 For more detailed information on the Vanishing Point tool, search for Vanishing Point in the Adobe Help Center. You will find tutorials covering all aspects of uses of the Grid tool and other Vanishing Point options. |
EAN: 2147483647
Pages: 426
- Step 2.1 Use the OpenSSH Tool Suite to Replace Clear-Text Programs
- Step 3.1 Use PuTTY as a Graphical Replacement for telnet and rlogin
- Step 3.4 Use PuTTYs Tools to Transfer Files from the Windows Command Line
- Step 4.2 Passphrase Considerations
- Step 4.7 Using Public Key Authentication for Automated File Transfers