USING MARKUP TOOLS
| In addition to Commenting tools, Acrobat also provides you with an assortment of Markup tools. If you're familiar with editorial work, you see that these tools, available from the Comments, Drawing Markup Tools menu, work in a manner similar to editorial markups. CalloutsCallouts are similar to notes but they are a bit simpler. No cute icons and no minimizing. They are meant to be visible and accomplish that goal by remaining open on the page (see Figure 42.15). To add a callout select the Callout tool from the Drawing Markups toolbar or from the Comments, Drawing Markup Tools menu and then click the page. A yellow callout box appears, ready for you to type in. After you finish typing, use your mouse to click anywhere outside the box. Now you can click the box to drag it, resize it, or move its pointing arrow around. Right-clicking the box gives you access to its Properties dialog, where you can change its color and outline color. Figure 42.15. Callouts are meant to be visible.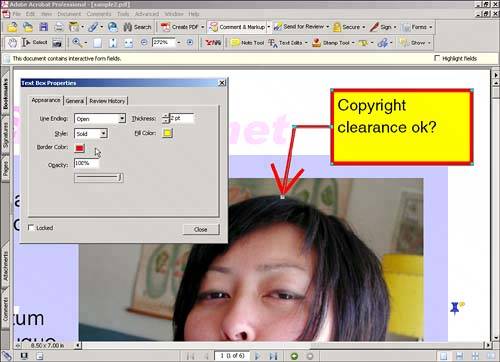 CloudsClouds are markup items to help you draw attention to page items when required. To draw a cloud, select the Cloud tool from the Drawing Markups Toolbar or from the Comments, Drawing Markup Tools menu and click on the page to place points forming an irregular polygon around the item you want the cloud to surround. After you close the line the cloud appears. You can customize its looks by right-clicking on it and selecting its Properties dialog (see Figure 42.16). Figure 42.16. Use clouds to draw attention to an area of a page.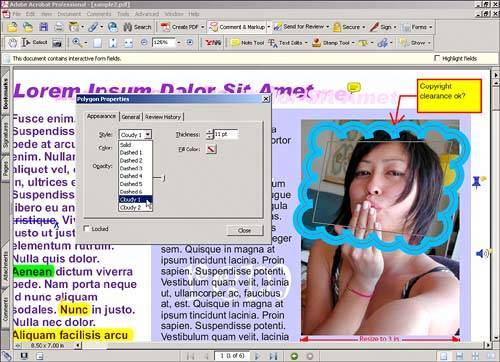 Text Box ToolText boxes are similar to callouts but have no arrows attached to them. To place a text box, select the Text Box tool from the Drawing Markups Toolbar or choose Comments, Drawing Markup Tools, Text Box and click your page. As you can with callouts, right-clicking a text box gives you access to its Properties dialog from which you can change its fill color, and border color, thickness, and style. DimensioningUse the Dimensioning tool when you need to add dimensions or measurements markups to an image or an area of a document. This tool is available from the Drawing Markups toolbar or from the Comments, Drawing Markup Tools menu. After selecting it, use it to drag a line where you want your dimension marks to show. After releasing the mouse button, you are prompted to type whatever text you want displayed along the line. When you finish typing, click anywhere on the page. Right-clicking the line gives you access to its Properties dialog, from which you can change the line color, thickness, style, arrowheads style, opacity, and more (see Figure 42.17). Figure 42.17. You can add text to your dimension markups.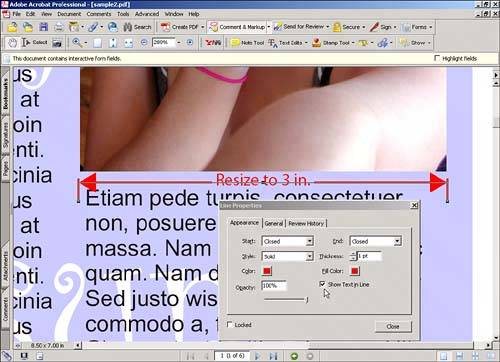 Geometric Drawing ToolsIn addition to the previous markup tools, Acrobat also has some more freehand-style drawing tools for markup. Arrows, rectangles, ovals, lines, and open and closed polygons are available to meet your markup needs (see Figure 42.18). These tools are all grouped under the Comments, Drawing Markup Tools, Drawing menu and also under the third button in the Drawing Markups toolbar. To use them, select the tool you want to use and drag with the mouse over the page. Right-clicking enables you to access the drawing's Properties dialog, from which you can change color, line thickness, style, and more. Figure 42.18. Acrobat gives you a wide assortment of geometric markup tools. Pencil and Eraser ToolsIf all the previous markup tools are still not enough to satisfy your creative doodling needs, Acrobat also has the Pencil and Eraser tools. You can find these tools under the same third button in the Drawing Markups toolbar or in the Comments, Drawing Markup Tools, Drawing menu. Use the Pencil tool just as you use a colored pencil; access its Properties dialog by right-clicking the line you've drawn to change color, thickness, and more. If you realize that you've gone a bit too far, you can always use the Eraser tool to remove the evidence (see Figure 42.19). Figure 42.19. The Pencil and Eraser are the ultimate doodling tools.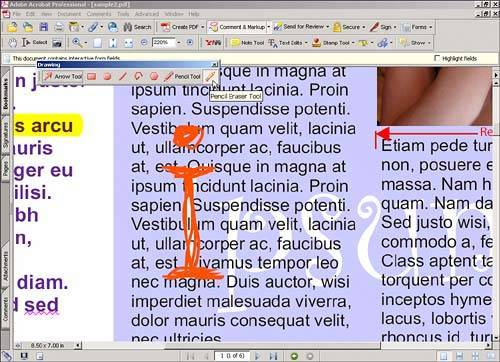 Text Edits and HighlighterText edits are a very easy way for you or your peers to edit the contents of text in a document without changing the original text. The easiest way to use text edits is by selecting the text to be edited with the Select tool. Access the context menu by right-clicking (in Windows) or Control-clicking (on the Mac) and select from it the kind of editing you want to do. Selecting Replace Text strikes out the selected word(s) and adds a typographic replacement symbol with a note attached where you can type the replacement word(s) to be used instead. Selecting Add Note to Text adds a small comment similar to a callout but with a smaller icon where you can type a note. The other options are self-explanatory: Highlight Text, Underline Text, and Cross Out Text. Right-clicking on the edited area gives you access to the Properties dialog where you can change color and transparency (see Figure 42.20). These options work only on text that is part of the PDF page and not on text that is typed inside other comment or markup elements. Figure 42.20. Text edits enable you to add editorial markings to a PDF without altering the actual content.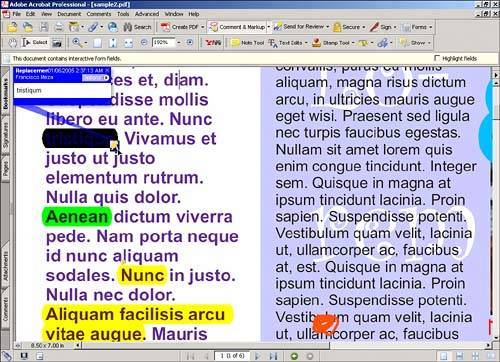 |
EAN: 2147483647
Pages: 426