WORKING WITH COMPOUND PATHS
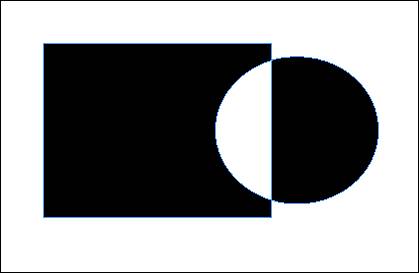
| A compound path is the shape created when two or more objects are selected to create one continuous object. The most common reason to create a compound path is when you want to punch one shape out of another shape it is overlapping (see Figure 30.4). To create a compound path, select the objects with which you want to create the path and then choose Object, Compound Paths, Make. Figure 30.4. An example of a compound path.
In this example, a circle overlaps a rectangle. When you select the two shapes and choose Object, Compound Paths, Make, the resulting shape (the path) is the circle punched out of the rectangle shape. The areas where the objects overlapped create a hole. You can now place text or an image or apply a stroke and fill to the two overlapping shapes (the compound path).
Don't be confused by the use of the word path. Although compound paths can be created by lines, which we normally think of as paths, they are also created by overlapping shapes. The resulting shape, which combines the selected objects into a single shape that takes on the fill and stroke characteristics of the object that is furthest back, is a compound path. If we want to alter the compound path, we can select it with the Direct Selection tool and move anchor points to create whatever shape we want. To fill in the hole that was left in the overlapping area, select the subpath with the Direct Selection tool and choose Object, Paths, Reverse Path. In the case of this example, you click with the Direct Selection tool on the circle. This selects the shape as well as the hole that is created when you combine these objects into a compound path. When you choose Object, Paths, Reverse Path, the hole fills in with black, but the rectangle and circle are still combined into one shape. Even though compound paths are most often created with overlapping paths, you can create a compound path with multiple non-overlapping shapes. Again, you can place text or an image, or apply a stroke and fill to the compound path. To release a compound path (that is, to turn the elements used to create the compound path back into separate, editable objects), select the item and choose Object, Compound Paths, Release. A few notes about releasing compound paths:
|
EAN: 2147483647
Pages: 426
- ERP Systems Impact on Organizations
- Challenging the Unpredictable: Changeable Order Management Systems
- ERP System Acquisition: A Process Model and Results From an Austrian Survey
- The Effects of an Enterprise Resource Planning System (ERP) Implementation on Job Characteristics – A Study using the Hackman and Oldham Job Characteristics Model
- Intrinsic and Contextual Data Quality: The Effect of Media and Personal Involvement