Section 4.2. The Command Line Tools
4.2. The Command Line ToolsAll DB2 operations are invoked by DB2 commands or SQL statements. For example, to back up a database, you use the BACKUP DATABASE command. To create a table, you use the CREATE TABLE SQL statement. All of these commands and SQL statements can be entered using the command line tools. The command line tools consist of the Command Line Processor (CLP), the Command Window (Windows platform only), and the Command Editor. Since they are command driven, you must have some knowledge of DB2 commands and SQL statements to use them. NOTE In this chapter we use DB2 commands to refer to both types of commands: DB2 system commands and DB2 CLP commands. When a section is only applicable to a given type of command, it will be explicitly indicated. Refer to section 2.1, SQL Statements and DB2 Commands, for an explanation about the differences between these two types of commands. 4.2.1. The Command Line Processor and the Command WindowThe DB2 CLP and the DB2 Command Window are text-based tools used to interact with the DB2 engine. Figure 4.2 shows the relationship between the CLP and the Command Window. Figure 4.2. The Command Line Processor versus the Command Window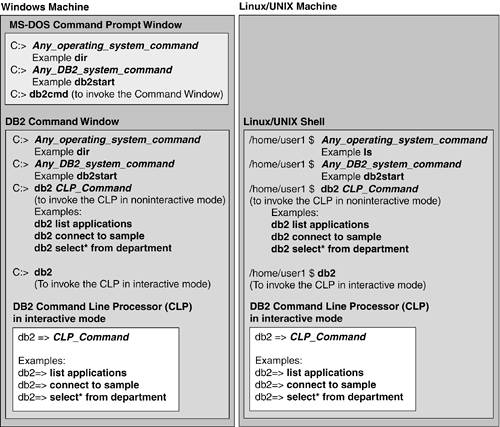 Compare each line in the Windows machine versus the Linux/UNIX machine. The equivalent line in each machine has been aligned in the figure. The Command Window is only available on Windows; this is due to some architecture differences in Windows versus Linux and UNIX. If you are familiar with the Linux and UNIX platforms, you can think of the Command Window on Windows as the Linux/UNIX shell. Figure 4.2 illustrates this: the commands and statements inside the DB2 Command Window box on the left side of the figure are equivalent to the ones inside the Linux/UNIX shell box on the right side of the figure. To start the Command Window, click on Start > Programs > IBM DB2 > Command Line Tools > Command Window (see Figure 4.1). Alternatively, to invoke the Command Window from an MS-DOS window, issue the command db2cmd. This command spawns another window which displays DB2 CLP in the title bar. Note that the Command Window looks like any MS-DOS window except for this title bar. From a MS-DOS window, you can perform operating system commands and DB2 system commands but not DB2 CLP commands or SQL statements. However, you can perform all of these from a Command Window. For example, as shown in Figure 4.2, from the MS-DOS window you can execute:
You can also perform these from the Command Window, and in addition you can perform DB2 CLP commands and SQL statements:
If you try to execute a CLP command or SQL statement from a MS-DOS window, you will receive the error: DB21061E Command line environment not initialized as illustrated in Figure 4.3. The figure also shows how the same statement works from the Command Window after it is invoked with the db2cmd command. Figure 4.3. Invoking the Command Window from a MS-DOS command prompt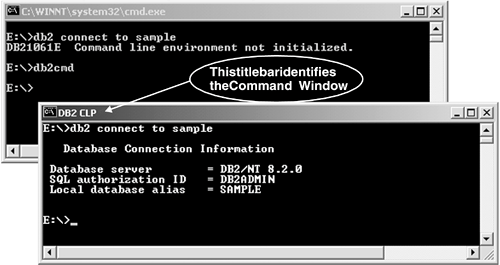 The Command Line Processor is an application written in the C language containing embedded SQL. It provides you with a text-based interface to the DB2 engine that lets you issue CLP commands and SQL statements. The CLP executable is called db2 and it is stored under the ...sqllib/bin directory. NOTE We recommend that you learn how to use the Command Line Processor, as it is the common tool available with all DB2 versions and clients. 4.2.1.1 Methods to Work with the CLPThere are three ways to issue a DB2 command or SQL statement with the CLP: interactive mode, non-interactive mode, and non-interactive mode using a file as input. These methods are discussed in the following sections. Method 1: Interactive ModeYou start the CLP in interactive mode by clicking on Start > Programs > IBM DB2 > Command Line Tools > Command Line Processor (see Figure 4.1). Alternatively, from the Command Window or Linux/UNIX shell, you start the CLP in interactive mode by entering db2 and pressing Enter as shown in Figure 4.4. Figure 4.4. Figure 4.4 The Command Line Processor in interactive mode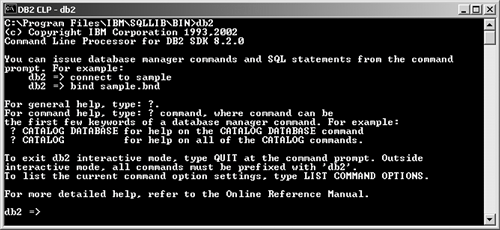 After you invoke the CLP in interactive mode, a few messages will appear on the screen, and then your command prompt will change to db2 =>. This prompt indicates that you are in interactive mode and that you can type any DB2 CLP command or SQL statement. Table 4.1 lists some common CLP interactive mode commands. The underlined letter in the command shows the shortcut that you can use to invoke the command.
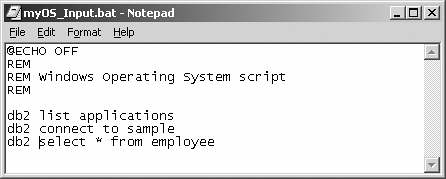
Figure 4.5 shows a few examples of the commands in Table 4.1 in action. Figure 4.5. Examples of CLP commands in interactive mode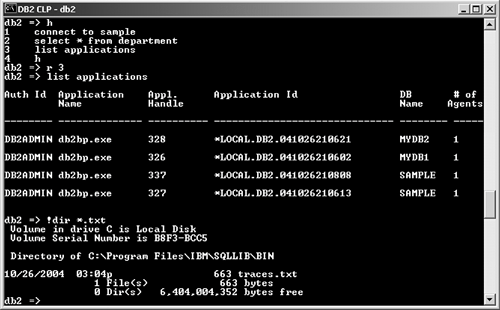 Method 2: Non-interactive ModeTo work with the CLP in non-interactive mode is equivalent to working with the DB2 Command Window (on Windows) or the Linux/UNIX shell. If you start the CLP in interactive mode, entering the quit command takes you to the CLP in non-interactive mode. In this mode you need to prefix the CLP command or SQL statement with the db2 executable. For example: db2 connect to sample db2 list applications all db2 select * from employee Using this method you can execute operating system commands in addition to DB2 commands and SQL statements from the same window or session. NOTE References to the Command Window and the CLP on Windows platforms are sometimes used interchangeably in DB2 books to indicate the use of a command line interface as opposed to a GUI tool. Many DB2 users prefer to work in this environment because they can use some shortcut key strokes, such as pressing the up arrow key to repeat the last commands on Windows, or to take advantage of operating system mechanisms like piping the output of the CLP to the more command on Linux and UNIX to display the output in portions. Every time you issue the db2 executable, a "CLP session" is created where a front-end process is invoked. This takes the rest of the statement as input and then closes the process. For example, when you issue: db2 list db directory db2 invokes a CLP front-end process that takes list db directory as input. Once the CLP digests this command, it implicitly issues the quit command to end the CLP front-end process. The front-end and back-end processes are discussed in more detail later in this chapter. Figure 4.6 shows the CLP in non-interactive mode. Figure 4.6. The Command Line Processor in non-interactive mode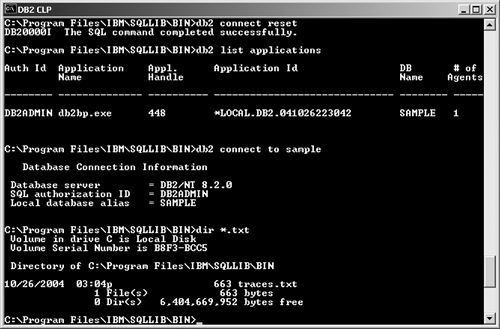 When invoking the CLP in non-interactive mode, double quotes (") enclosing the CLP command or SQL statement may be required if these contain special characters that the operating system may interpret as wildcard characters. This is especially important on Linux and UNIX platforms. If double quotes are not used, the error message DB2 reports will vary depending on where the wildcard character is used in the statement. For example, if you issue this statement: db2 select * from employee you may receive the following error message, since the asterisk (*) is a wildcard character: SQL0104N An unexpected token "*" was found following "select " Use double quotes to avoid parsing errors: db2 "select * from employee" A more deceiving example occurs when you use the greater than (>) character. For example, the statement: db2 select lastname from employee where salary > 10000 will be first parsed by the operating system, which will interpret > 10000 as the redirection of the output to the file 10000. After executing the above statement, your current directory will have a new file with the name 10000 containing a DB2 syntax error message because only select lastname from employee where salary was passed to DB2. Again, to resolve this problem, make sure to enclose the statement in double quotes: db2 "select lastname from employee where salary > 10000" Method 3: Non-interactive Mode Using a File as InputThe CLP can use a file containing one or more CLP commands or SQL statements and process them one after the other. This is ideal to develop DB2 database scripts. For example, Figure 4.7 shows the contents of the file myInput.txt, which we will use as input to the CLP. Figure 4.7. Input file to be used by the CLP
To execute this DB2 script file, the -f command option (for file) followed by the file name is required to indicate to the CLP that this file contains the input. (CLP command options are described in detail in the next section.) If the input file contains a statement terminator character, the -t command option (for terminator) is required to indicate a terminator character is present. By default, the statement terminator is a semicolon (;). If you want to use a different terminator, the dcharacter option (for delimiter) indicates which delimiter character is being used as the terminator. Use the -v option (for verbose) to echo the command you are executing. Figure 4.8 provides an example of invoking the CLP using these command options. Figure 4.8. Invoking the CLP in non-interactive mode using a file as input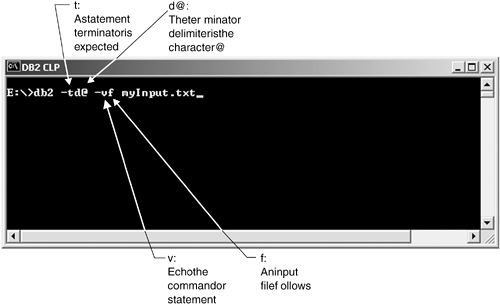 NOTE The input file must be a text file. Be aware that invisible characters may cause the DB2 CLP to fail processing the file. If using the Notepad application on Windows, for example, saving the text file with Unicode encoding rather than ANSI encoding will cause this error: DB21007E End of file reached while reading the command. If you prefix each of the CLP commands with db2 (the CLP executable) in a file and remove the terminator characters, you are effectively converting this file into an operating system script rather than a DB2 script. Depending on the operating system, you may have to make additional modifications. For example, on Windows, you need to use rem for comments. You may also need to change the file name so that the .bat extension is used. Figure 4.9 shows this for the file myOS_Input.bat. Figure 4.9. Invoking DB2 CLP commands and SQL statements in a Windows script file
On Linux and UNIX platforms, use the pound sign (#) for comments. You may also need to change the permissions of the file so that it is executable. Typically you can use this command to change the file permissions: chmod +x myOS_Input.txt Figure 4.10 shows the same script for a Linux or UNIX platform. Figure 4.10. Invoking DB2 CLP commands and SQL statements in a Linux/UNIX script file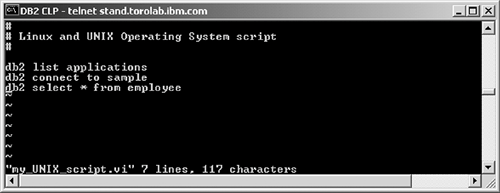 NOTE DB2 scripts do not accept parameters, but operating system scripts do. In other words, if you need to invoke your scripts with parameters, you need to use operating system scripts. 4.2.1.2 CLP Command OptionsThe CLP is just another program designed to interact with DB2. Like many other programs, the CLP has been designed to accept several parameter options. The CLP command list command options displays the available CLP command option parameters (see Figure 4.11). Figure 4.11. CLP command options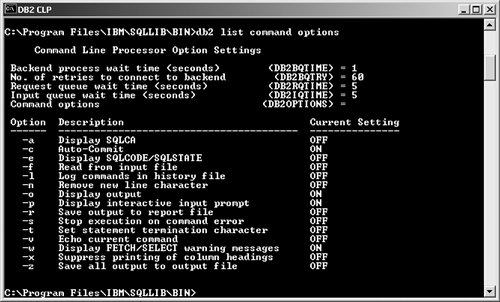 To turn on an option, use a dash (-) in the command line. To turn off an option, use a plus symbol (+). Some options are on (or off) by default. For example, to enable autocommit, invoke the CLP as follows: db2 -c insert into employee (firstnme) values ('Raul') After you execute this command, a COMMIT statement is automatically issued because autocommit is enabled. (As you can see in Figure 4.11, the Auto-Commit option was already on by default, so including -c in the above example is not necessary.) To disable autocommit, invoke the CLP as follows: db2 +c insert into employee (firstnme) values ('Raul') Note that specifying a command option in the db2 command applies only to that session of the CLP. Issuing the db2 command without an option will use the default command option values, or the ones contained in the DB2OPTIONS registry variable, which we discuss later in this section. You can also change a command option when working with the CLP in interactive mode using the following command: update command options using option value option value... Figure 4.12 shows an example where the v option (verbose) is used. This option causes the command or statement to be repeated or echoed when executed as discussed earlier. In Figure 4.12, note that the SELECT * FROM department statement is echoed. Figure 4.12. The CLP in interactive mode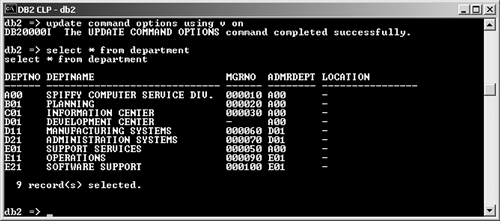 If you would like the changes to your CLP options effective across all your CLP sessions, you can set the DB2OPTIONS registry variable with the desired options. In the command: db2set db2options="-v -z myfile.log" the DB2OPTIONS registry variable is set so that any command executed will be echoed (-v option), and the output will be spooled in the file myfile.log (-z myfile.log option). The changes take effect immediately for the current session and any other new CLP sessions that you start. To reset the values to the default, issue this command: db2set db2options= DB2 registry variables are explained in detail in Chapter 5, Understanding the DB2 Environment, DB2 Instances, and Databases. 4.2.1.3 Obtaining Help Information from the CLPOne of the most useful CLP commands is the help command represented by a question mark (?). This command provides help on SQL error codes (SQLCODE), DB2 messages, and CLP command syntax. For example: db2 ? SQL0104N db2 ? DB21004E db2 ? list applications In addition, using the help command by itself displays the entire list of CLP commands, as shown in Figure 4.13. Figure 4.13. Output of the command db2 ?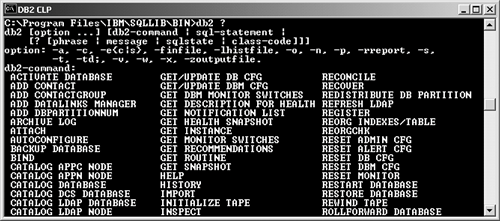 NOTE The help (?) command can display CLP command syntax, but not SQL statement syntax. Refer to the DB2 UDB SQL Reference manual for SQL statement syntax. Figure 4.14 shows other examples of the help (?) command. Figure 4.14. The CLP help (?) command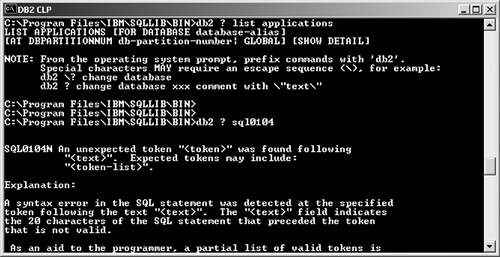 4.2.1.4 Line ContinuationThere are two ways to use line continuation from the CLP: with the backslash character and with the delimiter terminator character. Method 1: Using the Backslash (\) CharacterYou can use the backslash (\) character in either interactive or non-interactive mode. Figure 4.15 shows an example using interactive mode first, followed by a non-interactive mode example. Figure 4.15. Line continuation in the CLP using the backslash continuation character Notice that after entering \ and pressing Enter, the prompt changes to: db2 (cont.) => Method 2: Using a Delimiter Terminator Character with the CLP in Interactive ModeUsing this method, the CLP is invoked in interactive mode using the terminator delimiter option. For example: db2 -td! After entering this command and pressing Enter, the CLP is invoked in interactive mode. You can wrap commands onto multiple lines until you type the terminator character, which is the exclamation mark (!) in the example shown in Figure 4.16. Figure 4.16. Line continuation in the CLP using a delimiter termination character in interactive mode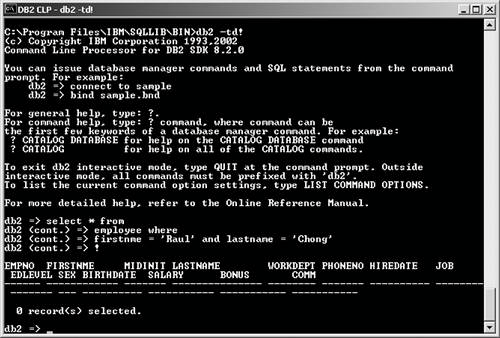 Use this method when you have statements that include carriage returns. If you copy and paste one of these statements into the CLP, the carriage returns will cause the statement to continue in another line, which is acceptable, because the CLP processes the command after the terminator character is entered. The following statement has one carriage return character after staff and one after Edwards; therefore, use method 2 to start the DB2 CLP in interactive mode: select * from staff where name = 'Edwards' and job = 'Sales' After you copy and paste the statement into the CLP, enter the terminator character and press Enter to execute it. 4.2.1.5 The CLP Front-end and Back-end ProcessesThe CLP has both front-end and a back-end processes. The front-end allows you to perform actions without connecting to a database. For example, issuing the command: db2 list db directory does not require a connection to a database. Depending on the operation, the instance need not be started either. The back-end process is needed when you perform actions against a database. The back-end process is created when you connect to the database in a CLP session and can be identified by the application name db2bp. Figure 4.17 shows the output of the list applications command, which shows this process (or thread in Windows) indicating a connection to the sample database. Figure 4.17. The CLP back-end process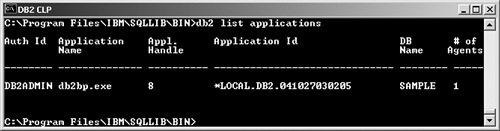 To remove the connection to a database, issue the connect reset statement, the terminate command, or the disconnect statement. Connect reset and terminate will work even if the process is in the middle of a unit of work. Disconnect only works when there is no active unit of work. Closing a window or session without previously issuing a terminate command will close the CLP application and front-end process and remove the connection to the database, but does not guarantee that the back-end process will be terminated. NOTE The terminate command is the only one that guarantees the back-end process is indeed terminated. Even if the list applications command does not display the db2bp back-end process running, use the terminate command to be certain. It is important to make sure that the back-end process is terminated because in some circumstances a change to a parameter, environment variable, or DB2 registry variable will not take effect until this is performed. For example, in a multi-partition environment, the DB2NODE environment variable is used to indicate which partition is the coordinator. After changing the value of this variable, you must issue a terminate command for it to take effect. NOTE We recommend issuing a terminate command before a db2stop command. This prevents the back-end process from maintaining an attachment to an instance that is no longer active.
The Command Editor is the graphical user interface (GUI) version of the Command Line Processor. The Command Editor offers several other functions in addition to those provided by the CLP and the Command Window.
NOTE The Command Editor in Version 8.2 replaces the Command Center used in previous DB2 versions. The Command Editor provides the same functionality as the Command Center but has a simplified interface. You can start the Command Editor either from the IBM DB2 menu or from the Control Center. (We will talk about the Control Center in section 4.4, General Administration Tools.) Alternatively, the command db2ce starts it from a command line prompt. Figure 4.18 shows the start screen of the Command Editor. The Target field is empty until you click on the Add button, which displays the Specify Target window. Select a Target type from the pull-down menu, and the database you want to work with in the Available targets pull-down menu. Figure 4.18. The Command Editor lets you choose the database you want to work with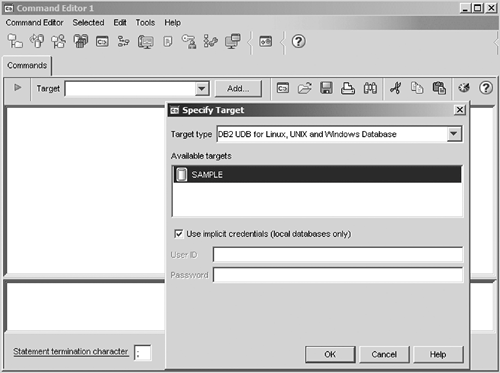 The Command Editor makes an implicit connection to the database you have chosen, and you can then start entering your commands from the command input window (see Figure 4.19). Figure 4.19. The Commands view in the Command Editor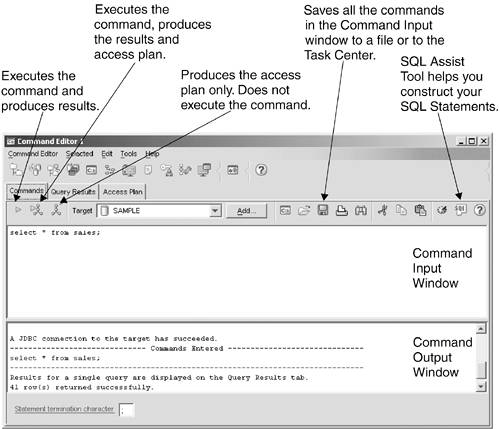 Figure 4.19 shows the three tabs associated with views in the Command Editor. The tab selected in Figure 4.19 is for the Commands view. This view displays all the commands you have entered. If you want to execute several commands or statements at once, make sure to delimit them with the character specified in the Statement terminator character field (at the bottom of the window). If you entered several commands or statements in the Command Input window, but would like to execute only a particular one, highlight it. Then you have the following options.
If you chose to execute the command, the results are nicely displayed in a table in the Query Results view, as shown in Figure 4.20. Figure 4.20. The Query Results view in the Command Editor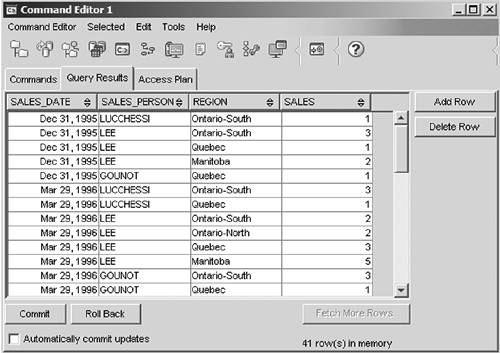 You can directly perform updates by clicking on the corresponding value and making the desired change in the Query Results view. To add or delete an entire row, click the Add Row or Delete Row button respectively. All of these changes are not permanent unless you click on the Commit button. If you want to cancel your changes, click on the Roll Back button. If you chose either of the other two options that produce the access plan, a tool called Visual Explain is invoked. The next section explains this tool in more detail. 4.2.2.1 Visual ExplainDB2 provides an SQL facility that stores in "explain" tables detailed information about how DB2 will access the data to satisfy a query request. For example, the information in these explain tables may show that DB2 will scan the table sequentially, or it may show that the data will be accessed through the indexes associated to the table. The method to access the data that DB2 chooses is called the access plan, and the particular component of DB2 that makes this decision is called the DB2 optimizer, which can be considered the "brain" of DB2. To analyze the access plan, you can use text-based tools like the db2exfmt and the db2expln command line tools; however, it is often useful to display this information in a graph. Use Visual Explain to graphically display an access plan for a query. You can invoke Visual Explain from the Command Editor. Simply enter an SQL statement in the Command Editor's Command Input window, and then press either the Execute and Access Plan button or the Access Plan button. Figure 4.21 shows the Visual Explain output of the query select * from sales. In this particular example, the DB2ADMIN.SALES table is accessed using a table scan (TBSCAN) with a cost of 13.07 timerons. Visual Explain can also be invoked from the Control Center; see Chapter 16, Database Performance Considerations, for more details. Figure 4.21. The Access Plan view in the Command Editor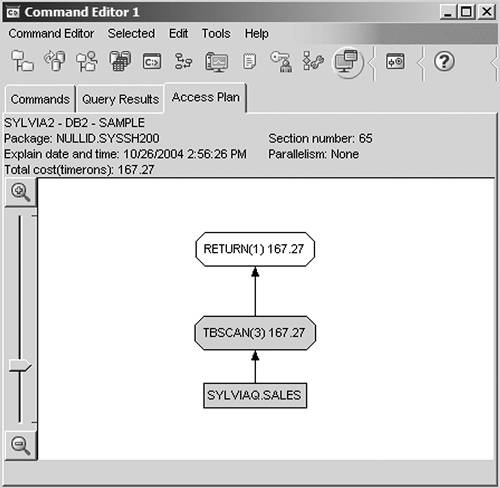 |

EAN: 2147483647
Pages: 313