Working with Digital Source Material
| The next few sections describe the process of working in Premiere with digital video (DV) source material. If you shot your footage using a DV camera and you have an IEEE 1394 (FireWire/i.Link) card in your computer, you can take advantage of the many benefits of working with DV source material. Capturing from DV SourceNonlinear video editing can't get much simpler than this. Premiere has built-in DV support, allowing you to easily hook up your DV source camcorder or deck directly to your computer, transfer digital source footage into Premiere, and then transfer your edited timeline back to the same camcorder or deck. In order to do this, your computer must have an IEEE 1394 connection. If your computer did not come with one, you can purchase one and easily add it to your system. After it is installed, simply plug one end of an IEEE 1394 connection into your camcorder and the other end into the card in your computer, and you're ready to go. note Premiere includes support for DV codecs. It can read digital source video so that you can digitally transfer the information from your source tapes. For this process to work efficiently, you need a hard disk that can sustain a 3.6 MBps data rate in order to play back your digital video. To transfer footage, do the following:
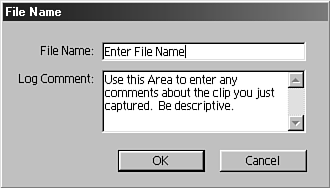
After you capture each clip, the File Name window appears, as shown in Figure 2.4. Here you can enter a name for the clip you just digitized and a brief description of the footage. Adding comments is a good idea when you're working on large projects with similar takes or shots. Here is where you can add descriptions and editor's notes about the clip you just captured. It's that easy. Figure 2.4. Be sure to name and add comments to every file you acquire in Premiere to help identify them.
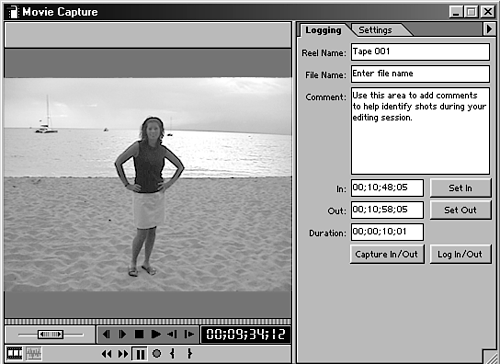
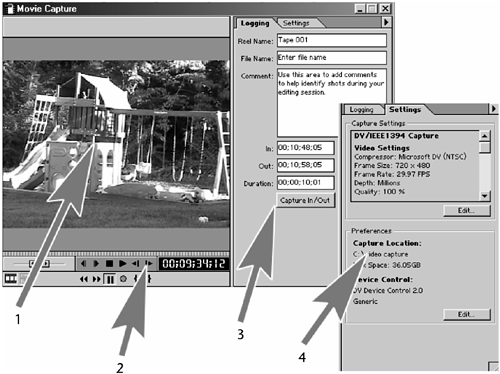
Setting Up DV for Optimal UseYou should be aware of a few additional settings and options when working with DV source footage to optimize your system's performance and get the best results for your project. The Movie Capture window has four main areas, as shown in Figure 2.5:
Figure 2.5. The Movie Capture window contains four distinct areas: the video monitoring area (1), the source control panel (2), the logging footage area (3), and the settings control area (4).
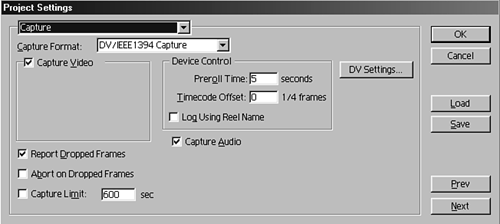
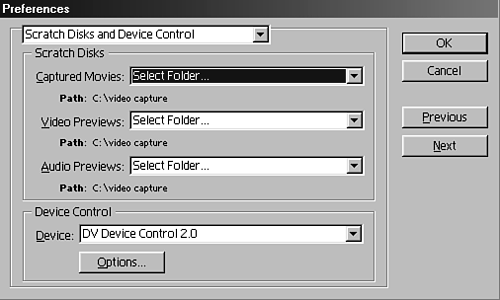
The video monitoring area is fairly self-explanatory. Assuming that your source deck is hooked up properly to your computer, you should be able to view your source material in the window as you play and capture it. The source controls allow you to manipulate the source deck remotely. From Premiere, you can shuttle your tape to the desired position on the tape or move through the material one frame at a time. Use these controls the same way you work your VCR at home. Right next to the controls is the timecode window. Its benefits are numerous. For one, users can accurately find a shot every time, because the timecode assigned to that shot remains the same and never changes (until someone records over that tape). Using the timecode when you're logging and batch-capturing source footage is critical. When timecode numbers are assigned to a clip, it is easy for Premiere to find the exact frame of the shot you are looking for. It also lets the computer do more of the work. note Each source tape must contain a continuous, uninterrupted timecode. The timecode is useful only if the source material does not contain duplicate timecodes. The next two areas are defined by tabs on the right side of the Movie Capture window. (Logging your footage is discussed in the next section.) The Settings tab allows you to change any capture settings or preferences. The Capture Settings area displays vital information about how footage will be captured for your project. Click the Edit button if you need to change any of the capture settings. This opens the Project Settings window, shown in Figure 2.6. Below the Capture Settings area is the Preferences area. This tells you where the clips that you capture will be stored, show much disk space is available, and the type of device control being used to control the source deck. Click the Edit button to open the Preferences window, shown in Figure 2.7. Here you can set where on your system you want to save the clips you capture and the audio and video previews (rendered files) by selecting the path to the partition or hard drive you want to use. Figure 2.6. The Project Settings window.
Figure 2.7. The Capture Preferences window.
note When you use DV editing mode, Premiere sends captured and rendered video out through the IEEE 1394 connection to the source deck or camcorder's viewfinder. Here you can watch the playback of your clips and output them at full quality. Logging Footage Using DV ControlThe main advantage of using DV source material and IEEE 1394 connections is that you can transfer digital footage easily while preserving the quality. This is one of the other advantages of Premiere's capability to utilize DV control and transfer. Along with the audio and video signal, other crucial pieces of information are transferred through the IEEE 1394 connection. The timecode is very valuable information. It references a unique time for every frame of video. This allows for frame-accurate searching and editing. note Prosumer DV camcorders typically stripe timecodes on a per-tape basis. In other words, you cannot change or reassign the timecode. In order to best maintain timecode consistency on Prosumer camcorders, you should make sure your raw tape is rewound all the way and eject/reinsert your tape to "reset" the timecode to 0:00:00:00. You may choose to log all your clips before you capture or transfer the media to the hard drives. One common way people choose their selected shots is by making a timecoded window dub. You do this by making a copy of your source tape with the timecode numbers displayed onscreen. This is typically done onto a VHS tape so that you can watch the footage on a VCR (at home or in the office) without the risk of damaging or losing your original source tapes. As you watch the footage, you mark down the timecode numbers of where you want the shot to start and end. After you have compiled your timecode list, it's time to start logging your footage. Others prefer to preview the source material in the Movie Capture window and log their clips as they watch the footage. note You can use the same logging process for analog source material if you have timecoded source material in device-controlled decks hooked up to Premiere. note It is important that the timecode be continuous with no jumps. It becomes impossible for Premiere to accurately find the proper frames needed if there are many timecode breaks and shifts in numbers. Keep it clean. Premiere offers two ways to log your clips. You can build a batch capture list or log and preview directly in the Movie Capture window. In either case, you are essentially building a batch capture list. One way just allows you to view your source footage live while logging your material. To log your footage one clip at a time while previewing it in the Movie Capture window, do the following:
Or you can click the Capture In/Out button to capture and record the source material to your hard drive. With the IEEE 1394 connection made, Premiere automatically controls the source deck, searching for the appropriate timecode. After Premiere finds the timecode, it prerolls a few seconds and then begins playing the source deck while transferring the digital information to the hard drive for use within Premiere. note For more information on using batch capture lists, see the later section "Batch Capture: Letting the Computer Work for You." tip Always capture more footage than you think you need (a few seconds ought to do). This allows you to trim your shots or add transitions without running out of source material. |
