The Basics of Video Levels
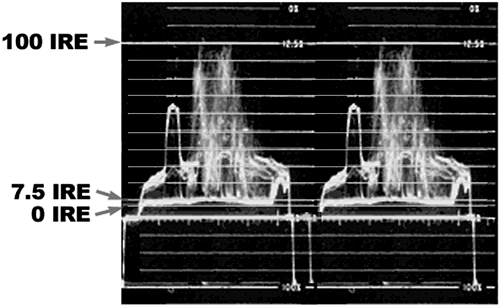
| Working with video levels, such as brightness, contrast, and hue, can be done by eye only to a close approximation. Not even a professionally trained eye can be certain. This topic might be a bit too technical for novice video editors, but this concept is extremely important to understand, especially if you ever plan on having your work broadcast. To be sure that you are working with the proper video levels, you need to have a waveform monitor and vectorscope hooked up. note Many of the properties you can adjust can be controlled independently, yet the overall image can be affected by adjusting one or more of the other settings. Even if you do not have a waveform monitor and vectorscope, you will still probably benefit from reading this section. Video has certain basic properties that make it appear the way it does. These standards help keep the images you see (especially the ones being broadcast) looking consistent and of the highest quality. A number of test patterns are available to use as a reference point to make sure your equipment is properly calibrated. These signals are used to "line up" all the various components and keep the signal quality and image consistent throughout the production process. note Chapter 6, "Image Manipulation Within Timeline Segments," discusses image-correction filters you can use to help correct existing footage inside Premiere that needs to have its levels adjusted. You should pay attention to two main components: video level (white level) and black level. The video level is the signal's brightness. For NTSC signals (the video standard used in the U.S.), using your waveform monitor, you should make sure that your signal does not surpass the 100 IRE level (see Figure 2.2). With the PAL format, I believe the equivalent is 1 volt. If your image appears to be blown out or over-exposed, you can bet that your video level is probably set too high. The other aspect to check is your black level. Perhaps your image appears faded it looks washed out, and the darkest parts do not appear dark or very rich (black objects appear gray). If so, try adjusting the signal's Setup or Contrast levels to lower the image's black level prior to digitizing. On a waveform monitor, proper black levels should appear as 7.5 IRE. Figure 2.2. Reading a waveform monitor. The brightest video level should not exceed 100 IRE, and the darkest areas should not drop below 7.5 IRE.
Going any further at this point, other than to make you aware that you might need to inquire more about working with video levels, would be beyond the scope of this book. Many resources, from videotapes to books, go into great detail about working with video levels and, most importantly, how to control them. The more time you spend getting the image to be correct when it is input into Premiere, the less time you have to spend futzing with it after it is in your system. Then you can concentrate on the creative part of telling your story. |
