Working with Analog Source Material
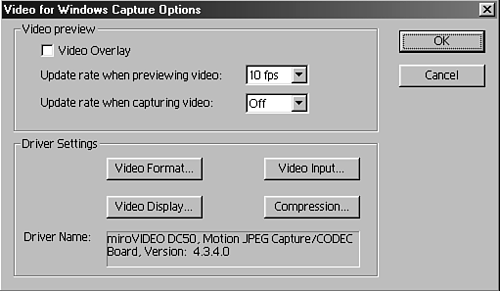
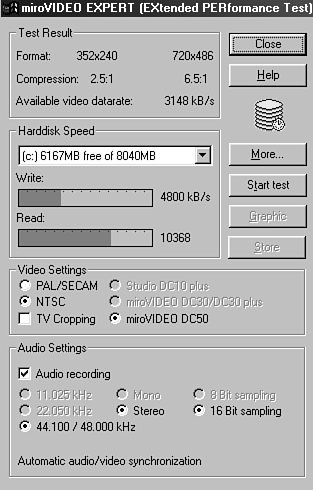
| The last few sections described the process of working with DV source material. But Premiere does not work with only DV sources. It can work with any type of video source. Depending on the analog format you shot your footage in and the type of decks you have, you have several options to choose from as to how to get your source material into Premiere and the quality of your images as to how they will be digitized. Choosing Resolution, Compression, and Quality Settings for Analog SourcesDepending on the type of source footage and your equipment, DV might not be ideal for you. The difference between digital sources and analog sources is that analog material must be digitized (converted) into a format that the computer system can utilize. Most systems cannot handle the file size associated with uncompressed digitized video footage. Therefore, when you add analog video capture cards, several compression formats might be available, depending on the type of card installed in your system. Your video capture card might offer some of the following control features found on my Pinnacle miroVIDEO DC50 board (or others not listed here):
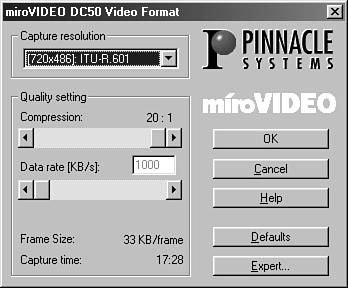
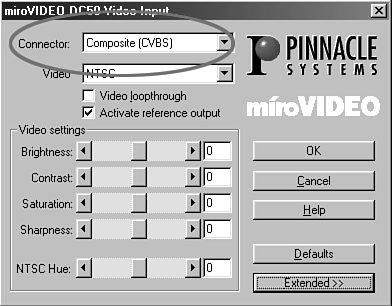
tip If you do not see a signal coming into your Capture Monitor, check the video input selection to make sure you are reading from the right connection. Think of this as a mini-patch bay so that you can minimize the number of times you have to physically switch wires and connectors. The greater the amount of compression, the lower the image's quality after it is digitized. Therefore, an image compressed at 50:1 produces a very pixelated, low-quality image, as shown in Figure 2.13. The file size, however, is relatively small due to the amount of compression. You would use this amount of compression if you were trying to edit a rough cut, focusing on conserving hard drive space. If you are working with timecoded material and you have control over your source decks through Premiere, you can go back and redigitize the portions of the clips used in your timeline at a lower compression ratio (for a higher-quality image). Using a compression ratio of 2:1 produces a very clean, high-quality image, as shown in Figure 2.14. Because the computer barely compresses the footage and records the image's fine details, the file size increases astronomically. These high-quality, low-compression images are usually used as your finishing resolutions for online quality. Figure 2.13. A highly compressed, low-resolution image.
Figure 2.14. A minimally compressed, high-quality image.
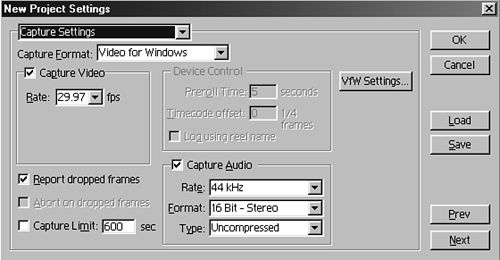
Think of it this way: When you start editing, you typically have a lot more footage than what your edited piece will eventually contain. For a 5-minute video, for instance, you might have shot 20 or 30 minutes or even an hour of footage. Digitizing at high compression allows you to have all the footage available, letting you make selections and whittling shots down to what you want. As soon as you've got a rough cut, you've generally decided which one out of ten shots you will use in the edit. At this point, you can delete all the low-resolution clips and redigitize the master video at the final online resolution. note Uncompressed video files (1:1) have absolutely no compression applied. The image quality is superb, but a high-end computer system is required to store and play back files of that caliber. Capturing Analog Source Material Without Deck ControlAfter you have set the general properties of your project (as discussed in Chapter 1, "Starting and Maintaining a Project,"), it's time to start bringing your source material into Premiere. If your system is not equipped with remote capture and playback controls from your source decks, you must manually control them, pressing Play, Stop, Fast-forward and Rewind to cue up the desired shots. You still can watch the incoming video source footage in the Movie Capture window to verify that the video signal is coming through your system properly. The following procedure is a basic overview of the process of setting up your system for digitizing media without source deck control:
tip Always allow extra time for your tape sources and hard drives to get up to speed when you're capturing footage. If you start playing your source material right from the portion you want to capture, you might wind up missing the first few seconds of the clip while the system changes to capture mode. note Depending on your capture hardware, settings might appear under various windows. Capturing Analog Source Material with Deck ControlThere are many advantages to working on a system when you can control your source deck from your computer within Premiere. Several different software and hardware applications are available to control your decks that work with Premiere. Many even come with the capture card you purchase. My capture card came with a software-based plug-in application that allows you to control professional remote-controlled decks from Premiere. note Premiere works with third-party plug-ins and hardware that allow you to control most professional tape decks that have remote-control capability. To digitize audio and video from a remote-controlled source deck, do the following:
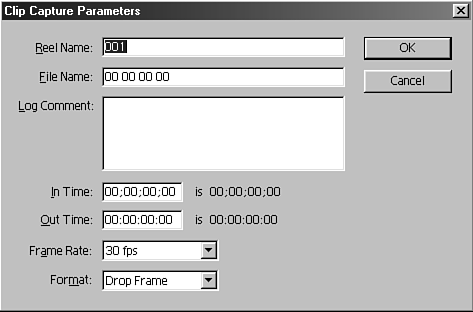
Premiere can control the deck, find the desired starting position, and record the exact duration of the clip you marked. You will see your deck rewind to a spot a few seconds before your clip's marked in point. This function, known as preroll, gives the deck enough time to get up to speed for Premiere to frame-accurately capture your clip. note It is important to save each clip after Premiere completes the capture process. Digitized clips exist as unsaved temporary files in the capture disk you selected in your Preferences > Scratch Disk/Device Control window. Batch Capture: Letting the Computer Work for YouThe last section covered digitizing media from device-controlled decks. There are a few advantages to using decks that can be controlled via timecode from Premiere. The most commonly used situation is for a process called batch capture the ability to have the computer control the deck based on your timecode numbers and digitize all the clips at once. You would choose to use batch capture in one of two situations:
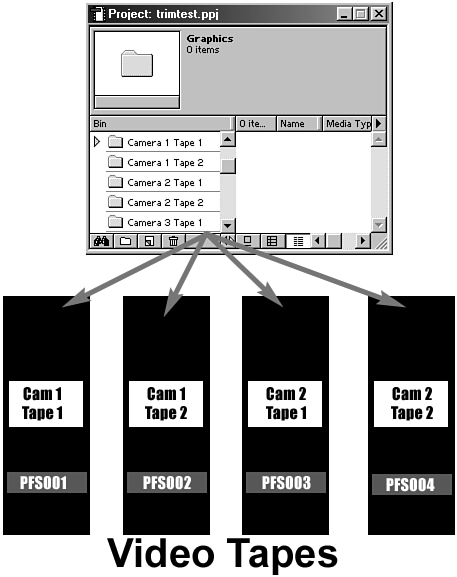
All you have to do is put in the correct tape when Premiere prompts you to insert it. Depending on your editing style and where you are in the process, see either of the following two sections. tip Batch capture digitizes media from the source tape names via device-controlled decks. Premiere prompts you to insert one tape at a time. This is why I stressed the importance of properly naming and labeling your source footage tapes. Digitizing from a Batch ListYou can use the device control to view and mark your clips, or you can enter the information manually. This is referred to as logging your clips or creating a batch list (or timecode list). To log your shots and create a batch list, do the following:
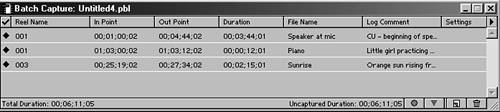
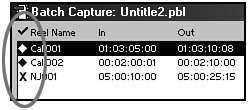
After you've logged all your clips into the Batch Capture window, you can still independently select which clips will get digitized. The far-left column has a check mark. This column indicates each clip's capture status (see Figure 2.19). If the column is empty, it means that the clip has not been captured. A check mark indicates that the clip has been digitized. A diamond indicates that the clip is marked to be digitized when you click the Capture button in the lower-right portion of the window. Finally, an X indicates that there was an error during capture mode and the clip was not digitized properly. Figure 2.19. Various symbols indicate the status of clips, whether they have been digitized or not.
Redigitizing the Chosen FewIf you have timecoded source material coming from a device-controlled deck, you might want to consider rough-cutting your video in a low (offline) resolution first (see the earlier section "Online Versus Offline"). A typical project usually entails digitizing in your timeline more source material than what is used in your edited sequence. Therefore, there is little reason to redigitize any footage at a higher (online) resolution other than the selected footage used in the timeline. This maximizes the amount of hard drive space that is available for other projects. note When redigitizing only the portions used in the timeline, Premiere creates a new project with the redigitized higher-resolution footage. It does not replace what currently exists on your system. To automatically redigitize clips from your edited batch list, do the following:
tip For best results, make sure that you have the source deck and tapes properly set up and connected before clicking the Capture button. |