Mixing with the Audio Console
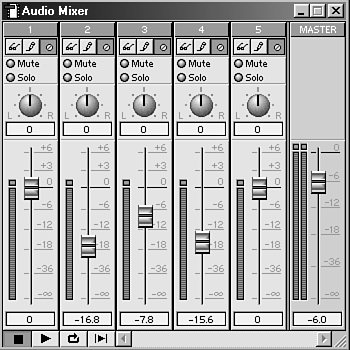
| Although Premiere is known primarily for its video-editing capabilities, it can be used to mix audio projects as well. Premiere incorporates not only the look and feel of a professional recording studio but also the power and ease of working with a professional audio console. This high-end console is called the Audio Mixer window. Here you can independently control each audio track by setting the volume and pan (also called balance) of clips that have been edited into your timeline (see Figure 8.10). Figure 8.10. The Audio Mixer window offers the power to adjust audio levels and balance with the feel of a professional mixing console.
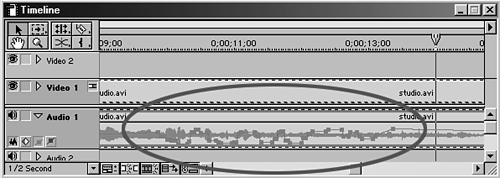
The true power of the Audio Mixer window comes in the fact that you can adjust the audio's volume or pan while monitoring or playing the clip in real time. Premiere records the movements and adjustments you make using the volume sliders and pan knobs and automatically creates keyframe handles in the timeline, as many as required based on how dramatic your movements are while the clip plays. This feature is called Automation. The more you manipulate the controls in a short amount of time, the more keyframes Premiere adds (see Figure 8.11). After you "record" these movements, they play back according to how you altered your clips. If you need to make further adjustments, repeat the process. Simply play the clip while adjusting the controls, and let Premiere memorize your movements and automatically add new keyframe handles. Figure 8.11. Premiere adds as many or as few keyframe handles as necessary to play back your audio based on the adjustments you have made to the clip.
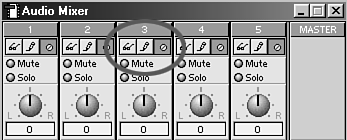
note Even if you adjust levels or balance using the Audio Mixer window's Automation features, you can still manually enter the timeline to individually adjust any keyframes. note If you do not have pan/balance control (indicated by the line in the pan/balance knob) in the Audio Mixer window, open your Project Settings for Audio and check to make sure you have the format set for stereo. A Mono setting deactivates any pan controls in the Audio Mixer window. To use the Automation feature, you must first activate it in the Audio Mixer window. To do this, click the pencil icon located above each track/slider, as shown in Figure 8.12. This is the Automation Write feature. When you select this feature, Premiere can record the movements of the audio slider or pan control knob. When you are ready to mix your audio in real time, do the following:
Figure 8.12. The Automation Read, Write, and Off buttons.
If you need to readjust levels, simply repeat the process. Premiere automatically updates the new levels by adjusting or creating new keyframe handles. Click the Automation Read icon (the eyeglasses) and click Play in the Audio Mixer window. You can watch the sliders move in real time according to how you adjusted the levels while you play back your edited sequence. When you are satisfied with the levels of a particular track, you might want to click the Automation Off icon (the circle with a diagonal line through it) before you move on to adjust other tracks. This helps avoid confusion and distraction as to which track you are working on. It also saves system resources. I've worked on projects with more than 25 audio tracks (and numerous video tracks). Using the Automation feature uses up system RAM and can cause your system to run more sluggishly. note The Automation features and attributes also hold true for pan/balance controls. |


