Inserting a Horizontal Line
3 4
In some situations, you'll want only a divider line, not a complete border, to set off sections or special elements in your document. For example, if you're creating a Web page, you might want to add a line to mark the end of one section and the beginning of the next. Word provides a feature that gives you a library of graphical lines—special design effects you can place in your document as needed.
Adding a Line
To add a horizontal line to your document, follow these steps:
- Place the insertion point where you want to add the line.
- Choose Format, Borders And Shading. The Borders And Shading dialog box appears.
- Click the Horizontal Line button. This action displays the Horizontal Line dialog box, as Figure 24-8 shows.
- Scroll through the selections until you find the one you want. Click your choice, and click OK to add the line.
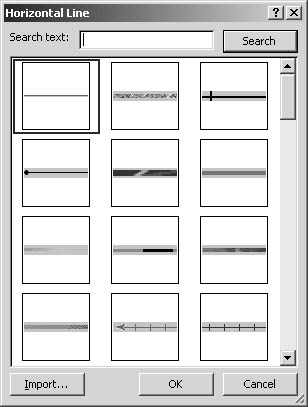
Figure 24-8. The Horizontal Line dialog box displays the predesigned graphical lines you can insert in your document.
Tip
Once you place a horizontal line in your document, you can select, copy and paste, and move it as you would any graphical item.
Importing a Custom Line
If you create your own graphical lines in another program (which could be Windows Paint, Microsoft PowerPoint, or even Word), you can add those files to your Horizontal Line gallery. Word can import files in the following formats:
- BMP, RLE, DIB (Microsoft Windows Bitmap)
- EMF (Enhanced Metafile)
- EPS (Encapsulated Postscript)
- GIF (Graphics Interchange Format)
- JPG (Joint Photographic Experts Group)
- PNG (Portable Network Graphics)
- TIFF (Tagged Image File Format)
- WMF (Windows Metafile)
For more information on importing objects and files into your Word documents, see Chapter 15, "Inserting Objects for Multimedia and More."
To add a custom line to your Horizontal Line gallery so that it's available in the Horizontal Line dialog box, follow these steps:
- In the graphics program you're using, save the file in one of the supported file formats.
- In Word, choose Format, Borders And Shading to display the Borders And Shading dialog box.
- Click the Horizontal Line button. The Horizontal Line dialog box appears.
- Click the Import button. The Add Clips To Organizer dialog box is displayed.
- Navigate to the file you want to use; click it and click Add. The line is added to the gallery and remains selected.
- Add the clip to your document by clicking OK. The Horizontal Line dialog box closes and the line is placed at the insertion point in your document.
Troubleshooting
My Border Isn't Printing Correctly
If your page border doesn't print along one edge of the page or is positioned too close to one edge or another, check the margin options you've set for the border. To do this, choose Format, Borders And Shading, click the Page Border tab, and click Options. In the Margin section, increase the margin values to make sure the border is not placed in your printer's nonprinting range.
If you've set up your border to be measured from Text, the space between the text and the border might be pushing the border into the nonprintable range. (Most printers will not print in the 0.5-inch area around the perimeter of the page.)
EAN: 2147483647
Pages: 337