Mastering Document Content Fundamentals
3 4
After you open a new document—whether it's blank or based on an existing document or template—the next order of business is to insert information into the document and format it. Granted, that's a fairly obvious observation, but it's well worth discussing. Working with document information is what this book's all about, so just to be sure we cover all our bases, we'll address content fundamentals here. First we'll look at inputting information, and then we'll look at ways to navigate through documents and perform standard editing tasks. These topics might sound basic, but you should be able to pick up a few pointers here and there throughout the upcoming sections. If nothing else, scan the tables included on the next few pages to learn a new trick or two to help streamline your working style.
Inputting Information
You have a few options when it comes to inserting information into Word 2002 documents:
- Click in the document and begin typing in the editing window. Typed text appears to the left of the insertion point. You can reposition the insertion point by clicking elsewhere within the editing window.
Tip - Change from Insert Mode to Overtype Mode
By default, new text you type in the middle of a line will be inserted between existing text. To change from Insert mode to Overtype mode, you can choose Tools, Options and then clear the Overtype Mode check box on the Edit tab. For quicker results, double-click OVR on the status bar or press Insert to toggle between Insert and Overtype modes.
- Copy and paste information. Using the Office Clipboard (as described in the section "Using the Office Clipboard," and in Chapter 6, "Putting Text Tools to Work"), you can easily copy information from within the current document, from other Word documents, and from other applications, including online information displayed within your browser, data from other Office applications, and information from almost any other application that allows you to copy selected data. After you copy existing data, you can paste the information directly into Word documents.
- Insert the contents of another Word document or text file. You can insert the contents of another document within the current document without copying and pasting by choosing Insert, File, navigating to the file that contains the information you want to insert into the current document, and then double-clicking the document. The document's contents are inserted into the currently displayed document (and the existing document remains unchanged).
- newfeature! Use the new Speech Recognition features. You can speak your piece by configuring and working with the new Speech Recognition features. Using speech recognition, you can dictate content and use voice commands by talking into a high-quality headset.
- newfeature! Handwrite content using the mouse or a stylus. Word can recognize handwritten marks you make with your mouse or a stylus, which is a pencil-like tool used on an electronic writing or drawing pad. When you use the Handwriting Recognition feature, you can retain your written marks or you can configure Word to interpret your handwriting and display the information as typed text.
For more information about Speech and Handwriting Recognition features, see Chapter 39, "Putting Speech and Handwriting Recognition Features to Work."
Moving Within Documents Using Keyboard Shortcuts and Function Keys
After you enter information in documents, you'll frequently need to move around within your documents so that you can add, edit, and format your documents' contents. As you most likely know, you can move around within a document using the scroll bars located along the right and bottom edges of the editing window, and you can reposition the insertion point by clicking anywhere within your document. By learning a few keyboard shortcuts, you can speed up your text navigation tasks considerably. Table 2-1 lists common keyboard shortcuts that you might find handy as you work your way through Word documents.
Tip - Use Shift to select text
By pressing Shift in combination with a keyboard shortcut, you can generally select all the text from the insertion point's current location to the location to which the shortcut takes you. For example, if you press End, the insertion point moves to the end of the line, but if you press Shift+End, you'll select all the text from the insertion point to the end of the line.
In addition to the common keyboard shortcuts listed in Table 2-1, you can take advantage of the function keys to perform a variety of other tasks. An easy way to view the commands associated with function keys is to display the Function Key Display toolbar on your desktop. To do so, choose Tools, Customize, select Function Key Display on the Toolbars tab, and then click Close.
Table 2-1. Keyboard Shortcuts for Navigating Within Documents
| Keyboard shortcut | Action |
|---|---|
Alt+F1 (or F11) | Moves to the next field |
Alt+F4 | Quits Word |
Alt+F7 | Moves to the next misspelled word if the Check Spelling As You Type feature is turned on (the default) |
Alt+Page Down | Moves to the bottom of the current column |
Alt+Page Up | Moves to the top of the current column |
Arrow keys | Move the insertion point left, right, up, or down |
Ctrl+Alt+Home | Opens the Select Browse Object menu |
Ctrl+Alt+Page Down | Moves the insertion point to the bottom of the window |
Ctrl+Alt+Page Up | Moves the cursor to the top of the window |
Ctrl+Alt+Y (or Shift+F4) | Finds the next instance of a search term |
Ctrl+Alt+Z (or Shift+F5) | Moves to the previous insertion point location |
Ctrl+Down Arrow | Moves to the next paragraph |
Ctrl+End | Moves to the end of the document |
Ctrl+F | Displays the Find tab in the Find And Replace dialog box |
Ctrl+F6 | Displays the next window |
Ctrl+G (or F5) | Displays the Go To tab in the Find And Replace dialog box |
Ctrl+Home | Moves to the beginning of the document |
Ctrl+Left Arrow | Moves one word to the left |
Ctrl+O (or Ctrl+Alt+F2) | Displays the Open dialog box |
Ctrl+Page Down | Moves to the top of the next page |
Ctrl+Page Up | Moves to the top of the preceding page |
Ctrl+Right Arrow | Moves one word to the right |
Ctrl+S (or Alt+Shift+F2) | Saves the current document |
Ctrl+Shift+F6 | Displays the previous window |
Ctrl+Up Arrow | Moves to the previous arrow location |
End | Moves to the end of the current line |
Esc | Closes an open menu |
F6 | Moves to the next pane or frame |
Home | Moves to the beginning of the current line |
PageDown | Displays the next screen |
PageUp | Displays the previous screen |
Shift+F6 | Moves to the previous pane or frame |
Shift+Tab | Moves to the previous cell in a table |
Tab | Moves to the next cell in a table |
By default, the Function Key Display toolbar shows the basic function key commands. You can press Shift, Ctrl, Alt, or any combination of those three buttons to display other available commands on the Function Key Display toolbar. To help illustrate this little toolbar trick, Figure 2-6 shows the Function Key Display toolbar in normal, Shift, Ctrl, and Alt mode. Table 2-2 lists a few common navigation-related function key commands.
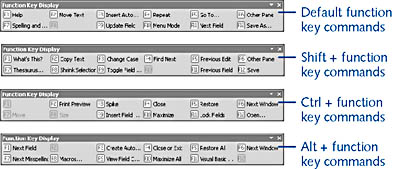
Figure 2-6. The Function Key Display toolbar adjusts to show various options when you press Shift, Ctrl, and Alt alone or in any combination.
Note
You can also browse through documents using the Go To tab in the Find And Replace dialog box. To access the Go To tab, press F5, press Ctrl+G, or choose Edit, Go To. For more information about using the Find And Replace dialog box, see Chapter 12, "Honing Document Navigation Skills."
Table 2-2. Function Keys for Navigating Within Documents
| Command | Action |
|---|---|
Alt+F1 (or Alt+F11) | Moves to the next field |
Alt+F4 | Quits Word |
Alt+F7 | Moves to the next misspelled word |
Alt+Shift+F2 (or Ctrl+S) | Saves the current document |
Ctrl+Alt+F2 (or Ctrl+O) | Displays the Open dialog box |
Ctrl+F6 | Displays the next window |
Ctrl+Shift+F6 | Displays the previous window |
F5 (or Ctrl+G) | Displays the Go To tab in the Find And Replace dialog box |
F6 | Moves to the next pane or frame |
Shift+F4 (or Ctrl+Alt+Y) | Finds the next instance of a search term |
Shift+F5 (or Ctrl+Alt+Z) | Moves to previous insertion point location (even if the insertion point was in a different Word document) |
Shift+F6 | Moves to the previous pane or frame |
Performing Basic Editing Tasks
As you know, merely entering information into a Word document doesn't usually create a finished product. Instead, your documents are the result of entering information, and editing and formatting the entered text. Now that we've covered entering text and navigating within documents, it's time to work with text by performing basic editing tasks. This section provides information about selecting, copying, cutting, and pasting text; using the Clipboard; and undoing, redoing, and repeating changes—in other words, some of the common tasks you'll perform every time you work on a document in Word.
For more information about formatting text, see Chapter 5, "Adding Panache with Text Formatting and Special Characters."
Using the Browse Object Feature
Another way to browse through documents is to use the Select Browse Object menu and its associated buttons. You can find the three browse buttons—Previous, Select Browse Object, and Next—in the lower-right corner of the editing window, as shown here:

To use the Browse Object feature, follow these steps:
- Open the Select Browse Object menu by pressing Ctrl+Alt+Home or by clicking the Select Browse Object button on the vertical scroll bar.
- Select the type of document element you want to browse for (such as browsing from heading to heading).
- Click the Previous and Next buttons to navigate from one browse object to the next.
The Select Browse Object menu, shown below, displays the types of objects you can use to browse through a document. Table 2-3 describes the available options.
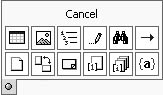
Table 2-3. Select Browse Object Menu Options
| Button | Description |
|---|---|
| Browses by moving from table to table |
| Browses by moving from graphic to graphic |
| Browses by moving from heading to heading |
| Browses by moving from edit to edit (if the Track Changes feature has been used) |
| Browses by using the Find tab in the Find And Replace dialog box |
| Browses by using the Go To tab in the Find And Replace dialog box |
| Browses by moving from page to page |
| Browses by moving from section to section |
| Browses by moving from comment to comment |
| Browses by moving from footnote to footnote |
| Browses by moving from endnote to endnote |
| Browses by moving from field to field |


Selecting Text
Generally speaking, you can streamline many editing tasks by first selecting the text you want to edit. In fact, you can speed up most text modification tasks by mastering precise selection techniques. You can select text in a variety of ways. Usually (and not too surprisingly), you will select text using the mouse or keyboard commands. (You can also select text that contains similar formatting by using the Styles And Formatting task pane, but because that topic is slightly more advanced and is related to creating and using styles, that technique is addressed in Chapter 10, "Using Styles to Increase Your Formatting Power.") Regardless of how you select text, you can deselect it by clicking any area outside of the selected text.
Note
You can access text selection options by choosing Tools, Options, and then clicking the Edit tab in the dialog box. On the Edit tab, you can specify whether to automatically select paragraph marks when you select paragraphs (the Use Smart Paragraph Selection check box) and whether to automatically select entire words when you're selecting text (the When Selecting, Automatically Select Entire Word check box). Both text selection settings are activated by default.
Selecting information using the mouse Selecting information using the mouse is the most common way to select text and other elements (such as graphics, tables, and so forth) in Word documents. To select information using the mouse, you can use any of the options described in Table 2-4.
Table 2-4. Methods of Selecting Text Using the Mouse
| Selection | Method |
|---|---|
Contiguous text or elements | Position the insertion point at the beginning of the text to be selected, click and drag to select the desired text, and then release the mouse button. |
Word or single element | Double-click the word or element. |
Paragraph | Triple-click within the paragraph, or double- click in the left margin next to the paragraph. |
Entire line | Click in the left margin. |
Multiple lines | Click and drag in the left margin. |
newfeature! Multiple noncontiguous instances of text or elements | Select the first item (as described above), press Ctrl, and then select additional text or elements elsewhere within your document. |
Entire section | Display your document in Outline view, and double-click a heading. |
Large block of text | Click at the start of the selection, scroll to the end of the selection, and then hold down Shift as you click. |
Blocks of text using Extend mode | Click at the beginning of the text you want to select, double-click EXT on the status bar, and then click at the end of the text you want to select. To deactivate Extend mode, press Esc or double-click EXT again so that it appears dimmed on the status bar. |
Vertical block of text | Press Alt, and then drag over the text. |
Entire document | Triple-click in the left margin or press Ctrl+A. |
Note
In Word 2002, you can select noncontiguous blocks of text as well as contiguous blocks of text. When you want to select large areas of contiguous text, consider using Extend mode, which enables you to select contiguous blocks of text without holding down the mouse button.
Tip - newfeature!
Select all instances of an element
You can select all instances of a word, a symbol, or a phrase. To do so, select the Find tab in the Find And Replace text box (press Ctrl+F), type the text you want to select in the Find What box, select the Highlight All Items Found In check box, select Main Document in the drop-down list if necessary, and click the Find All button.
Chapter 10, "Using Styles to Increase Your Formatting Power," discusses how to select text based on formatting attributes.
Selecting text using keyboard commands As most people's Word proficiency increases, so does their desire to take advantage of Word's numerous keyboard commands. Keyboard commands increase productivity by limiting how frequently you move your hand away from your keyboard to your mouse and back again. For the most part, selecting text using keyboard commands requires you to press Shift along with the keyboard combination that moves the insertion point in the direction of the text you want to select. If you know the keyboard combinations used to move the insertion point (shown in Table 2-1), you can generally select text by using the same keyboard combination while holding down Shift. For example, Ctrl+Right Arrow moves the insertion point to the next word, and Shift+Ctrl+Right Arrow selects the text from the insertion point to the beginning of the next word. Table 2-5 identifies the text selection keyboard commands that might be most useful for you.
Tip
Remember to combine cursor movement keyboard commands with text-selection commands to keep selection practices precise (for example, press Home to move to the beginning of a line before you select the line; see Tables 2-1 and 2-2).
Tip
To select multiple noncontiguous areas, make your first selection, hold down Ctrl, and then select other items.
Table 2-5. Keyboard Commands for Selecting Text
| Keyboard Command | Selection |
|---|---|
Ctrl+A | Entire document. |
Ctrl+Alt+Shift+Page Down | To the end of the current window |
Ctrl+Shift+Down Arrow | To the end of the current paragraph |
Ctrl+Shift+End | To the end of the current document |
Ctrl+Shift+F8 + arrow keys or mouse | Vertical or horizontal blocks of text beginning at the insertion point (Press Esc to cancel the selection mode.) |
Ctrl+Shift+Home | To the beginning of the current document |
Ctrl+Shift+Left Arrow | To the beginning of a word (To select preceding words, press Left Arrow repeatedly as you hold down Ctrl+Shift.) |
Ctrl+Shift+Right Arrow | To the end of a word (To select subsequent words, press Right Arrow repeatedly as you hold down Ctrl+Shift.) |
Ctrl+Shift+Up Arrow | To the beginning of the current paragraph |
Esc (or double-click EXT | To turn off Extend mode on the status bar) |
F8 | To turn Extend mode on and increase the size of a selection. (Press F8 twice to select a word, three times to select a sentence, and so forth.) |
F8+F8 | Current word |
F8+F8+F8 | Current sentence |
F8+arrow key | To a specific location in a document. (Press Esc to cancel selection mode.) |
F8+Left Arrow or Right Arrow | To select the nearest character |
Shift+Down Arrow (or Shift+Up Arrow) | Entire line, beginning at the insertion point |
Shift+Down Arrow+ Down Arrow | Current line and following lines, beginning at the insertion point (To select multiple lines, press Down Arrow repeatedly as you hold down Shift.) |
Shift+End | To the end of the current line |
Shift+F8 | To reduce the size of a selection |
Shift+Home | To the beginning of the current line |
Shift+Left Arrow | One character to the left |
Shift+Page Down | One screen down |
Shift+Page Up | One screen up |
Shift+Right Arrow | One character to the right |
Shift+Up Arrow+Up Arrow | Current line and preceding lines, beginning at the insertion point (To select multiple lines, press Up Arrow repeatedly as you hold down Shift.) |
Tip - Use F8 to select text
You can use the F8 key to progressively select the current word, sentence, paragraph, and so forth. For example, to select the current word, press F8 twice. To select the current sentence, press F8 three times. To select the current paragraph, press F8 four times.
Copying, Cutting, and Pasting
Copying, cutting, and pasting are probably among the top word processing features responsible for saving countless trees. Thousands of sheets of paper have been conserved as people copy, cut, and paste text instantaneously instead of painstakingly retyping documents on fresh paper each time a sentence or paragraph needs to be moved or revised. Using Word, you can easily copy, cut, and paste selected text without retyping or wasting a single sheet of paper.
Word provides a number of ways to go about your copying, cutting, and pasting business, as shown in Table 2-6. To use the Copy and Cut features, select the text you want to manipulate and then choose one of the listed commands. To paste information, position the insertion point where you want to insert the information, and then choose one of the Paste commands. Alternatively, you can right-click selected text and choose Cut, Copy, or Paste from the shortcut menu.
Table 2-6. Copy, Cut, and Paste Features
| Action | Menu Command | Keyboard Shortcut | Toolbar Button |
|---|---|---|---|
Copy | Edit, Copy | Ctrl+C | |
Cut | Edit, Cut | Ctrl+X | |
Paste | Edit, Paste | Ctrl+V | |


Tip
You can configure your Insert key to serve as a Paste key. To do so, click Tools, Options, Edit tab, and then select the Use The INS Key For Paste check box.
You can also reposition text by using Word's drag-and-drop feature, which essentially enables you to use the mouse to cut and paste text without using the Cut and Paste commands.
newfeature! In Word 2002, when you paste an item, Word displays the Paste Options smart tag, as shown in Figure 2-7. This smart tag provides paste-specific formatting options. To apply any of the options, position the mouse pointer over the Paste Options smart tag to open the drop-down menu, and then choose a command. To ignore a smart tag after pasting, simply continue to work within your document—the smart tag will quietly disappear until the next time you paste an object.
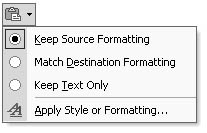
Figure 2-7. By default, the Paste Options smart tag appears whenever you paste an element into your Word document.
Using the Office Clipboard
You can copy, cut, and paste within the same document, between multiple documents, and even between different applications, thanks to the Office Clipboard. The Office Clipboard has been upgraded in Word 2002—it now allows you to store up to 24 items, including text and graphics, which means you can copy or cut 24 elements from various applications without losing data in the digital abyss. (Of course, as soon as you copy item 25, the first item you copied to your Clipboard is removed.) In addition, the newly revised Clipboard provides a much easier means of seeing which Clipboard item contains the information you want to access. As shown in Figure 2-8, the Clipboard contents are displayed in the task pane. In this example, five items are stored on the Clipboard (notice the 5 of 24 in the task pane's title bar), including a Microsoft Excel spreadsheet, a Jasc Paint Shop Pro image, some text copied from Word documents, and a clip art image. Each Clipboard item's parent application is identified by an accompanying icon.
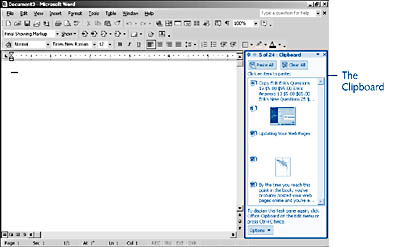
Figure 2-8. The Clipboard now holds up to 24 items and displays some of the copied and cut items' contents to help you more easily identify the item you want to paste into a document.
Opening the Clipboard To open the Clipboard manually, choose Edit, Office Clipboard, or select Clipboard in the task pane's drop-down menu. Otherwise, the Clipboard opens automatically when you perform any of the following actions:
- Copy or cut two items consecutively in the same program.
- Copy and paste an item and then copy another item in the same program.
- Copy one item twice either by double-clicking the Copy button on the Standard toolbar or by pressing Ctrl+C twice. (You can hold down the Ctrl key while you press the C key twice.)
You can also open the Clipboard using the Clipboard icon, shown in Figure 2-9, which appears on the taskbar by default whenever the Clipboard is displayed in any Office program. You double-click the icon to open the Clipboard in the current window. For example, if the Clipboard is open in Word, you can open Excel and then double-click the Clipboard icon on the taskbar to open the Clipboard in Excel.
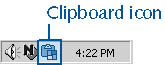
Figure 2-9. Whenever the Clipboard is open in an Office application, the Clipboard icon appears in the status area of the Windows taskbar.
Tip
To opt out of displaying the Office Clipboard icon on the taskbar, click the Options button in the Clipboard task pane, and clear the Show Office Clipboard Icon On Taskbar check box.
Pasting Clipboard information After information is stored on the Clipboard, you can paste the information into a document by positioning the insertion point where you want to insert the information, displaying the Clipboard, and then clicking the item you want to paste. If you want to paste everything stored on the Clipboard into your document, click the Paste All button in the task pane.
Deleting Clipboard information To delete items from the Clipboard, you can either click the down arrow that appears when you position your mouse pointer over the Clipboard item or right-click an item to open the drop-down menu, as shown in Figure 2-10, and then choose Delete. If you want to clear the entire Clipboard, click the Clear All button in the task pane.
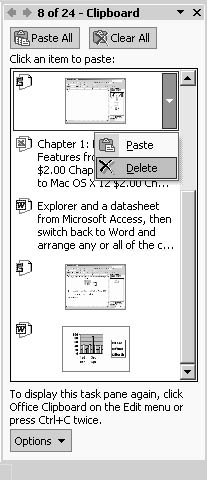
Figure 2-10. You can delete Clipboard items one at a time, or you can clear the entire Clipboard by clicking the Clear All button.
The Office Clipboard and the System Clipboard
You might be wondering how the Office Clipboard relates to the system Clipboard. Here's a quick rundown of how the two Clipboards interrelate:
- The last item you copy to the Office Clipboard is stored on the system Clipboard.
- Clearing the Office Clipboard also clears the system Clipboard.
- When you click the Paste toolbar button, choose Edit, Paste, or click Ctrl+V to paste information, you paste the contents of the system Clipboard (which by default is the last item you added to the Office Clipboard).
For more information about the ins and outs of the Clipboard feature, see Chapter 6, "Putting Text Tools to Work."
Undoing, Redoing, and Repeating
Fortunately, changes you make to documents are not immediately set in stone. You have ample opportunity to change your mind when it comes to editing text—not only can you undo edits you've recently made but you can also redo undone edits and even repeat an action if you need to. Most likely, you'll use the Undo command more frequently than the Redo and Repeat commands, so let's look at that feature first.
Using the Undo feature The Undo feature enables you to undo one or many changes to a document made during the current session. In fact, the Undo feature can store over 100 actions, so you have plenty of time during the current session to discard your edits. Keep in mind that some actions are too large to store, such as reformatting large tables. When Word encounters a change that the Undo command can't handle, you'll receive a warning message indicating that you won't be able to undo a particular action. In addition to not being able to undo the current action, you'll also lose the ability to undo prior actions. If you're sure that's OK, you simply proceed, and Word will begin a new Undo list.
Inside Out
If you receive a message that you won't be able to undo a current action and you're a little leery about moving ahead without the Undo safety net, you can take precautionary action. One easy approach is to simply perform the "risky" action last so that you won't lose your current Undo list until you're sure you'll no longer need it. Another workaround is to copy the element you want to perform the action on, paste the information into a blank document, perform the desired action on the copied version of your information, and then copy and paste the modified information into the original document. Using this method, you can ensure that if the action doesn't go as planned, your original document remains intact.
To Undo an action or numerous actions, use any of the following procedures:
- Choose Edit, Undo to undo the last action.
- On the Standard toolbar, click the Undo button to undo the last change (or click it multiple times to undo a series of changes).
- On the Standard toolbar, click the Undo down arrow and click the action you want to undo. (If you don't see the action you're looking for, scroll through the list.) When you undo an action on the drop-down list, you also undo all the actions that appear above it in the list.
- Press Ctrl+Z to undo the last action.
- Press Alt+Backspace to undo the last action.
Using the Redo feature As soon as you undo an action, you automatically activate the Redo command. The main role of the Redo command is to enable you to redo an undone action before you make any further changes. If you want to redo an undone action, use any of the following techniques:
- Choose Edit, Redo immediately after you've undone an action (before you've made any other changes).
- On the Standard toolbar, click the Redo button to redo the last undone change (or click it multiple times to undo a series of changes).
- On the Standard toolbar, click the Redo down arrow, and click the action you want to redo. (If you don't see the action you're looking for, scroll through the list.) When you redo an action on the drop-down list, you also redo all the actions that appear above it in the list.
- Press Ctrl+Y to redo the last undone change.
- Press Alt+Shift+Backspace to redo the last undone change.
- Press F4 to redo the last undone change.
- Press Alt+Enter to redo the last undone change.
Caution
If you type or perform any other action after you undo a change, you lose the ability to redo the undone action.
Using the Repeat feature The Repeat command is related to the Undo and Redo commands. When the Redo feature isn't activated (Redo is activated only after you undo an edit), the Edit menu displays a Repeat command. The Repeat feature is fairly self-explanatory—choosing this command repeats the last action you performed. For example, if you typed your name in a form, you could use the Repeat command to insert your name elsewhere on the form. To do so, simply click to reposition the insertion point, and then choose the Repeat command. To execute the Repeat command after you have added content to your document, you can perform any of the following actions:
- Choose Edit, Repeat. (If you clicked the Undo command immediately before opening the Edit menu, the Redo command is displayed in place of the Repeat command.)
- Press Ctrl+Y.
- Press F4.
- Press Alt+Enter.
The Repeat command comes in handy when you use it as a cut-and-paste shortcut.
Positioning Content Effectively
Whenever you create documents (reports, brochures Web pages, and so forth)—regardless of their purpose—you'll need to position (and reposition) text, graphics, and other elements within the documents. You can easily align and move contents within a Word document by using the Formatting toolbar buttons and the Click And Type and drag-and-drop features.
For a full discussion on aligning information in Word documents, see Chapter 7, "Aligning Information and Styling Paragraphs."
Aligning Text Using the Toolbar
Word offers four quick-and-dirty paragraph and element alignment options:
- Left aligns text and other elements (such as graphics, tables, and so on) along the left margin, leaving a ragged right edge. Left alignment is the default setting in most versions of Word.
- Center aligns the midpoint of the selected element with the centerpoint between the page's margins.
- Right aligns text and other elements along the document's right margin, leaving the left margin ragged.
- Justified creates straight (or flush) left and right edges by adding white space between text to force the text to align with the left and right margins.
To apply an alignment setting, click anywhere within the paragraph or element you want to align, highlight the text or element you want to align, or select multiple elements within the document and then use one of the command options shown in Table 2-7.
Table 2-7. Text Alignment Options
| Setting | Toolbar Button | Keyboard Shortcut |
|---|---|---|
Left | | Ctrl+L |
Center | | Ctrl+E |
Right | | Ctrl+R |
Justified | | Ctrl+J |


Tip - Activate the automatic hyphenation feature
To steer clear of having too much white space inserted within justified text, you might want to activate the automatic hyphenation feature. To do so, choose Tools, Language, and then choose Hyphenation to open the Hyphenation dialog box. Select the Automatically Hyphenate Document check box, and then click OK. To learn more about character spacing issues, see Chapter 5, "Adding Panache with Text Formatting and Special Characters," and to learn more about hyphenation, see Chapter 7, "Aligning Information and Styling Paragraphs."
Using the Click And Type Feature
The Click And Type feature, which was introduced in Word 2000, is still available in Word 2002. This feature enables you to click anywhere on a page to position the insertion point and add text, graphics, tables, or other items in a blank area of a document. Before Click And Type came along, you had to insert carriage returns, tabs, and spaces before you could properly position your insertion point away from existing page elements.
By default, the Click And Type feature is enabled in Word 2002. You can verify whether the feature is currently activated by choosing Tools, Options, Edit tab, and making sure that the Enable Click And Type check box is selected.
To use Click And Type, you must be working in Print Layout or Web Layout view (choose View, Print Layout, or View, Web Layout). From Layout view, double-click on the page to position the insertion point (Watch the insertion point, it'll indicate the default alignment of the text you enter.)
Keep in mind that you can't use the Click And Type feature to position text in the following situations:
- With multiple columns.
- With bulleted and numbered lists.
- With floating objects. (You can't position text next to them.)
- To the left or right of pictures that have top and bottom text wrapping.
- To the left or right of indents.
- While recording macros.
Using the Drag-and-Drop Feature
The drag-and-drop feature is a favorite with most people because it seems to come naturally. It reflects how we arrange our lives—we pick up items and put them down elsewhere, without issuing a complex series of cut and paste commands.
To use the drag-and-drop feature, select the text (or other element, such as a graphic or table) that you want to move, click and hold down the mouse button within the selected area, and then drag the selected element to another area within your document or in another document. When you release the mouse button, the element will be repositioned in your document and the Paste Options smart tag will be displayed (because when you use the drag-and-drop feature, you are essentially cutting and pasting). If you right-click when you perform this action, a shortcut menu opens when you release the mouse button, which provides Move Here, Copy Here, Link Here, and Cancel commands.
EAN: 2147483647
Pages: 337
- Using SQL Data Manipulation Language (DML) to Insert and Manipulate Data Within SQL Tables
- Using Keys and Constraints to Maintain Database Integrity
- Working with Comparison Predicates and Grouped Queries
- Understanding Transaction Isolation Levels and Concurrent Processing
- Working with Ms-sql Server Information Schema View
- Article 328 Medium-Voltage Cable Type MV
- Article 336 Power and Control Tray Cable Type TC
- Article 427: Fixed Electric Heating Equipment for Pipelines and Vessels
- Article 502 Class II Locations
- Example No. D10 Feeder Ampacity Determination for Adjustable-Speed Drive Control [See 215.2, 430.24, 620.13, 620.14, 620.61, Tables 430.22(E), and 620.14]