Saving Documents
3 4
Whenever you create and edit documents, you need to save your work—an obvious statement, but one well worth emphasizing. You should save your work as frequently as possible, not just when you're closing a document. In this section, we'll take a quick look at techniques you can use when saving documents to help make saving as seamless as possible.
Saving Changes in Existing Documents
Saving your document in the same location with the same name is easy. Simply follow any of these procedures:
- Choose File, Save.
- Click the Save button on the Standard toolbar.
- Press Ctrl+S.
- Press Shift+F12.
- Press Alt+Shift+F2.
Tip - Save, save, save
Take advantage of the simplicity of the save procedure. Whenever you're about to take a break, press Ctrl+S as you start to roll your chair away from your desk. When your phone rings, click the Save button as you reach for the receiver. Saving your work periodically helps you avoid major data-loss headaches when you least expect them (because, as everyone knows, system crashes or disasters usually strike at the most inopportune times).
Saving Files Using the Save As Dialog Box
The Save As dialog box appears every time you save a new document or opt to save an existing document as a new file or in a new location by choosing File, Save As (or by pressing F12). Figure 2-11 shows the latest incarnation of the Save As dialog box in Word 2002, which looks very similar to the Save As dialog box in Word 2000.
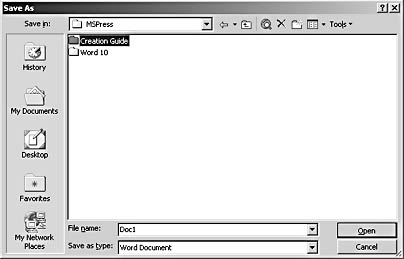
Figure 2-11. The Save As dialog box provides all the options you need to specify how and where to save new and existing documents.
To save a new document using the Save As dialog box or to save an existing document with new parameters (including a new location, a new file type, or a new file name), follow these steps:
- Choose File, Save As, or press F12. (Or, if you're saving a newly created document for the first time, click the Save button on the Standard toolbar.)
- Navigate to the folder in which you want to save the current document, type a file name in the File Name box, and select the file type in the Save As Type list. Most of the time, you'll probably use the Word Document file type (which is displayed by default and saves documents with the .doc extension). You can, however, save Word documents using a variety of file types, which can come in especially handy if you're saving a file for someone who is using an application other than Word. (Table 2-8, in the following section, lists the file formats available in the Save As dialog box.)
- Click Save.
Note
Keep in mind that the Save feature replaces an existing file with an updated version of the file and the Save As feature creates a new file. When you use the Save As feature while working on an existing file, you create a new version of the file, and the original copy of the file remains intact in its original location.
Reviewing Available File Formats in the Save As Dialog Box
The file format types available in the Save As dialog box's Save As Type list are described in Table 2-8.
Table 2-8. File Formats Available in the Save As Type List
| Format type | Description |
|---|---|
Word Document | Saves the file as a Word 2002 document. |
Web Page | Saves the file as a Web page with full Word editing capabilities. |
newfeature! Web Archive | Saves all the elements of a Web site, including text and graphics, as a single file. |
Document Template | Saves the file as a template that you can use to build similar documents. |
Rich Text Format | Saves the file using a standard text format that's widely recognized among word processing applications and used to exchange word processing information. |
Plain Text | Eliminates all formatting; converts lines, section breaks, and page breaks to paragraph marks; and uses the ANSI character set. A useful option for cross-platform availability when formatting isn't a major consideration. |
newfeature! Web Page, Filtered | Saves a document as a Web page without including extraneous HTML source code that enables many Word editing features. Using this option creates smaller HTML files than saving with the Web Page option. |
MS-DOS Text | Emulates formatting somewhat by using additional spaces to indicate indents, tabs, tables, and other formatting and uses the MS-DOS extended ASCII character set. This option is useful when you're saving documents that will be accessed in non-Windows applications. |
Text With Layout | Similar to the MS-DOS Text With Layout format except that Text With Layout doesn't support the extended ASCII character set. |
Word 2.x For Windows | Saves the file in the Word 2.x for Windows format. |
Word 4.0 For Macintosh | Saves the file in the Word 4 for Macintosh format. |
Word 5.0 For Macintosh | Saves the file in the Word 5 for Macintosh format. |
Word 5.1 For Macintosh | Saves the file in the Word 5.1 for Macintosh format. |
Word 6.0/95 | Saves the file so that both Windows and Macintosh systems can open the file using Word 6, and enables Word 95 users to open the file if they're working on Windows 95, Windows 98, and Windows NT systems. |
Word 97-2000 & 6.0/95 - RTF | Saves the file in Rich Text Format, which can be recognizedby Word 6, Word 95, Word 97, and Word 2000. |
WordPerfect 5.0 | Saves the file in WordPerfect 5 format. |
WordPerfect 5.0 Secondary File | Creates a WordPerfect 5 secondary file. |
WordPerfect 5.1 For DOS | Saves the file in WordPerfect 5 for MS-DOS format. |
WordPerfect 5.1 Or 5.2 Secondary File | Creates a WordPerfect 5.1 or 5.2 secondary file. |
WordPerfect 5.x for Windows | Saves the file in a WordPerfect 5.x for Windows format. |
Works 2000 | Saves the file in MS Works 2000 format. |
Works 4.0 For Windows | Saves the file in MS Works 4 for Windows format. |
Note
You might have to install a filter from your Office CD-ROM or a network drive (if you installed Office from a network) before you can save and open files using some of the formats shown in Table 2-8.
Obtaining Additional File Format Converters
At some point, you might find yourself facing the task of converting a document for which Word has not supplied a converter and no converter for the file type is available on the Office CD-ROM. When this situation arises, you'll have to install another converter. In some cases, you can easily obtain a converter from the Microsoft Office Web site or in the Microsoft Office Resource Kit. If you have an Internet connection, you can access the Microsoft Office Web site by choosing Help, Office On The Web. If the Web site or the Office Resource Kit don't provide what you're looking for, your next step should be to dig up a third-party solution. One well-known, third-party, file-conversion solution is Dataviz's Conversions Plus software. In addition, you can search shareware sites (such as http://www.tucows.com) for file conversion programs.
Specifying a Default Save Format
The default setting when you save Word documents is to save the documents using the Word Document (*.doc) format. You have the opportunity to save files as other file types when you save a file using the Save As dialog box (to do so, select another file type in the Save As Type drop-down list.) If you frequently save your documents in a format other than the default .doc format, you can change the default setting to another file format by configuring the Save tab in the Options dialog box. When you change the default file format setting, all documents will be saved with the specified format unless otherwise configured during the save process. To change the default file format setting, follow these steps:
- Choose Tools, Options, and select the Save tab, as shown in Figure 2-12.
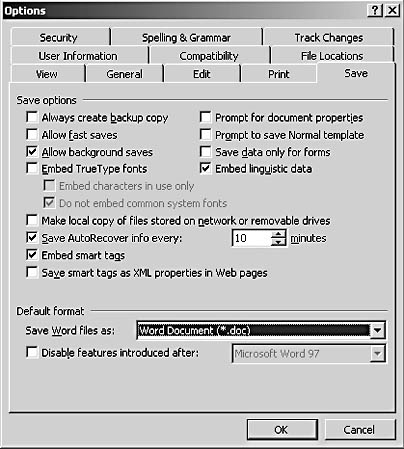
Figure 2-12. The Save tab enables you to configure default Save settings.
- In the Default Format section, select a new default format setting in the Save Word Files As list, and click OK.
Tip
At times, you'll want to create a folder to contain a newly created file. You can easily create a new folder during the save procedure by clicking the Create New Folder button on the Save As dialog box's toolbar.
Saving a File as a Web Page
As Word continues to evolve, creating and saving documents as Web pages in Word is becoming increasingly feasible for Web page developers. In short, you can save any document in Word as a Web page by using the Save As Type drop-down list in the Save As dialog box. In Word 2002, three Web-related file types are available in the Save As Type list:
- Web Page
- Web Page, Filtered
- Web Archive
When you're creating Web pages in Word, you'll probably want to begin by saving the document in the Web Page file type format. This format creates an HTML document and enables you to continue using all the Word editing features while you work. Later, when you're ready to upload your Web page to a network or the Internet, you might want to then save the document using the Web Page, Filtered option to streamline your document's HTML code and create a smaller HTML file than is created by the Web Page option. (The Web Page, Filtered option removes some of the HTML source code that's inserted into Word-generated Web pages for the sole purpose of providing Word editing capabilities.) Finally, when you're ready to archive a Web site or you want to send an entire Web site as a single file to someone, you'd probably use the Web Archive file type, which saves all the elements of your Web site—graphics and text—as a single .mhtml file.
For more information about creating Web pages in Word, see Chapter 31, "Creating Professional Web Sites."
Saving a File on a Network
Saving a file in a network location is similar to saving a file in a folder on your local computer. The main difference is that you navigate to a network location instead of to a local folder within the Save As dialog box. Word 2002 makes saving a file in a network location even easier by providing the My Network Places button on the Places bar. (The Places bar is discussed in the section "Taking a Closer Look at the Places Bar.") Figure 2-13 shows the My Network Places button selected in the Save As dialog box.
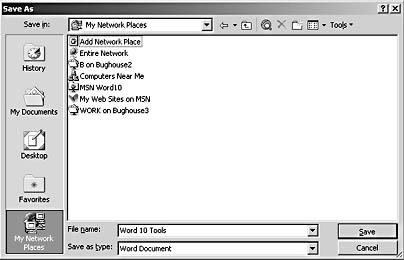
Figure 2-13. The My Network Places button simplifies the process of navigating to networked locations.
Creating Automatic Backups
By default, Word's AutoSave feature stores unsaved changes to a file at specified intervals. For added assurance, you can configure Word to create a backup file every time you save a file. To set this option, choose Tools, Options, Save tab, and select the Always Create Backup Copy check box. When this feature is activated, you'll notice that your folders contain two versions of each document you've saved: one file displays the standard file name, and the other file is named "Backup of file name.wbk." To open a backup file, simply double-click the file in the same manner you double-click other files to open them.
Note
You can't use the fast save feature and the automatic backup feature at the same time. The automatic backup feature creates a backup file each time you save your document. When the Allow Fast Saves check box is selected on the Save tab in the Options dialog box, Word saves only the changes you make to a document (instead of saving the entire document). When the list of changes grows fairly large, Word performs a normal save and integrates all the changes. By default, neither the fast save nor the automatic backup feature is activated.
EAN: 2147483647
Pages: 337