Using Word to Send Faxes
|
| < Day Day Up > |
|
Faxing is yet another fast, convenient way to get information from your office or home computer to other people around the country or around the world. Using Word, you can send faxes using your system's fax modem (if one is installed) or a fax service, which is the recommended process in Word 2003. In both cases, Word provides a Fax Wizard that walks you through most of the process. In addition, with the Office 2003 optical character recognition feature, you can edit online faxes to remove personal information. This part of the chapter addresses creating, sending, and working with faxes in Word 2003. To kick off the discussion, the standard approach of using a fax modem is described first.
| Note | If you use Internet fax services, you'll probably have to pay a fee to a third-party vendor for the service. If you use a fax modem's software, you can send faxes using the Fax Wizard in Word. If you use the Microsoft Fax program with your fax modem, the Fax Wizard in Word 2003 automatically opens the Send Fax Wizard, as described later in this chapter. |
Sending a Fax Using a Fax Modem
Word has long offered the ability to fax a document using a computer's fax modem. Word 2003 continues to offer this capability. To use a fax modem, you must have your fax modem set up on your system in the Printers And Faxes folder. To verify this, display the Control Panel, and then double-click the Printers And Faxes icon.
If a fax modem is installed on your computer, you can send a document as a fax directly to a recipient. To send a document as a fax, follow these steps:
-
Open your document, and choose File, Send To, Recipient Using A Fax Modem. The Fax Wizard appears, as shown in Figure 24-26.
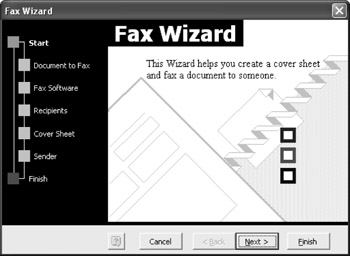
Figure 24-26: The Fax Wizard walks you step-by-step through the process of creating and sending your fax.Tip Start a fax from scratch If you want to send a fax without first creating a new document—for those times when you simply want to send a file as an attachment or send only a cover page with a note—you start by opening the New Document task pane, as follows:
-
Choose File, New. The New Document task pane appears.
-
Click the On My Computer link in the Templates section. The Templates dialog box appears.
-
Click the Letters & Faxes tab, click Fax Wizard, and then click OK. The Fax Wizard welcome page appears, as shown in Figure 24-26.
-
-
After the Fax Wizard opens, click Next to begin the process. The Document To Fax page allows you to specify which document you want to fax. By default, the current document is selected. If you have more than one document open and you want to choose a document other than the one shown, click the arrow for the list and select the document you want to send. You can also choose whether you want to include a cover sheet.
-
After you specify the fax document and your cover sheet preference, click Next to proceed to the Fax Software page of the wizard. The Fax Software page of the Fax Wizard enables you to select the fax program you want to use. You can choose Microsoft Fax or another fax program using the list. If you don't see the program you want to use, click the Other button, and then navigate to the folder containing the fax program you need.
Tip Print a document for faxing If you will be walking down the hall and using the office fax machine to send a fax, you can click the I Want To Print My Document So I Can Send It From A Separate Fax Machine option in the Fax Wizard to tell Word to print the selected document in fax format.
-
Click Next. If you chose to use Microsoft Fax, the Fax Wizard completes, and the Send Fax Wizard opens, which walks you through the process of completing the fax transmission. Otherwise, the Word Fax Wizard continues to the Recipients page. The Recipients page of the Fax Wizard lets you specify who you want to receive your fax. Here you can select individuals from your Address Book or you can type names and fax numbers in the boxes provided.
-
After you specify fax recipients, click Next to access the Cover Sheet page. Word provides three styles for the fax cover sheet—professional, contemporary, and elegant. Each is displayed on the Cover Sheet page of the Fax Wizard (which appears only if you selected a fax program that has cover sheet capability). Make your selection, and then click Next.
-
The Sender page of the Fax Wizard is about you—or your company. Fill in whatever information you want the recipient to know about you in the following boxes: Name, Company, Mailing Address, Phone, and Fax. Click Next to continue.
Tip Save time by using the Address Book If you have created an entry for yourself with your company's information in an address book, you can have Word plug in the information automatically by clicking Address Book, choosing the address book you want to use (such as your Contacts folder in Outlook), and then selecting your name from the list. Word inserts the information you've entered on the Sender page so that you don't have to retype it.
-
The final page of the Fax Wizard simply tells you to click Finish to send the fax. Click Finish. Word starts your fax software, which dials the first number in your recipient list and begins to transmit the fax.
Tip Help the fax program dial correctly If your fax program is having a hard time dialing a number correctly—for instance, it dials 1 before an area code when you'd rather it didn't—you can work around this without reconfiguring your area code rules. To do so, opt to bypass area code rules, and simply type the complete phone number (including area code) for the fax recipient in the fax phone number text box when you complete a fax wizard.
Troubleshooting: I can't find the Fax Wizard
If the Fax Wizard option is missing from the Letters & Faxes tab, you might need to install the Fax templates and wizard in Word. To do so, follow these steps:
-
Choose Start, Control Panel (or Start, Settings, Control Panel if you're using Classic View or a version of the Windows operating system earlier than Windows XP).
-
In the Control Panel, double-click Add Or Remove Programs, click Microsoft Office in the Currently Installed Programs list, and then click Change. The Microsoft Office 2003 Setup dialog box appears.
-
Select the Add Or Remove Features option, and then click Next.
-
Select the Choose Advanced Customization Of Applications check box, and then click Next.
-
Expand Microsoft Office Word, expand Wizards And Templates, click Faxes, and then choose Run From My Computer from the menu.
-
Click the Update button to install the Fax templates and wizard.
If you are using Office on a network, be sure to check with your network administrator before installing any new features.
Troubleshooting: The Microsoft Fax option is unavailable
If the Microsoft Fax option appears dimmed in the Fax Wizard, you might need to install it. To do so, follow these steps:
-
Choose Start, Control Panel (or Start, Settings, Control Panel if you're using Classic View or a version of Windows earlier than Windows XP).
-
In the Control Panel, double-click Add Or Remove Programs, and then click Add/Remove Windows Components. The Microsoft Setup Wizard appears.
-
Select Fax Services, and then click Next.
-
After the installation is complete, click Finish.
In addition, ensure that a fax modem is configured in the Printers And Faxes folder in the Control Panel.
Sending Faxes Using an Internet Fax Service
New Feature If you don't have a fax modem installed on your computer or you'd like to take advantage of features provided with online faxing, you can sign up to use an Internet fax service. Word 2003 works seamlessly with Internet fax services, and you'll find that you have quite a bit of control over faxes you send using this method.
To sign up with a fax service, choose File, Send To, Recipient Using Internet Fax Service. When you choose this option for the first time, you'll see a message box, as shown in Figure 24-27, that states that you must sign up with a fax service provider before you can use a fax service to send faxes. Click OK to access the Office Marketplace Web site, which offers a selection of available fax services.

Figure 24-27: You must sign up with an Internet fax service before you can use Internet fax services in Word.
After you select and sign up with an Internet fax service provider, you can fax a Word document by performing the following steps:
-
Ensure that Outlook is installed, open the document you want to send in Word, and then choose File, Send To, Recipient Using Internet Fax Service. The Sent With Microsoft Office 2003 Fax Service message window opens with the current document name inserted in the Attach text box, as shown in Figure 24-28. Notice that the attached document carries the .tif extension. This is because Internet fax services convert documents into Tagged Image File Format (TIFF) graphic files.
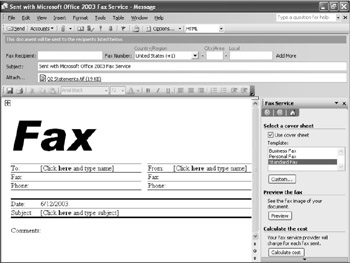
Figure 24-28: The Sent With Microsoft 2003 Fax Service message window opens automatically when you fax a document using an Internet fax service, and it includes the new Fax Service task pane.Note If Outlook is installed but not open when you send a fax, the fax will be placed in Outlook's Outbox, and your fax will be sent the next time mail is sent from Outlook. If you want to send your fax immediately, ensure that Outlook is open before you send the fax.
-
Enter the information in the Fax Recipient area. If you'd like to send the fax to more than one recipient, click Add More, and then enter additional recipient information.
-
In the Subject line, replace the Sent With Microsoft Office 2003 Fax Service text with your own text.
-
In the Fax Service task pane, specify whether you want to use a cover sheet (using a cover sheet is highly recommended). If you opt to use a cover sheet, you can choose from Business Fax, Personal Fax, Standard Fax, or Custom. If you click Custom, the existing fax cover letter is removed, and you can either create or insert a custom cover page. Keep in mind that headers and footers are not supported in blank cover pages.
Note In addition to cover page options, the Fax Service task pane provides options that enable you to calculate the cost of sending the current fax and provides a link to your fax service's Web site.
-
Complete the cover page information. If you have Person Name smart tags enabled, you can use the smart tags to insert the To and From address information.
-
After you complete the cover page information, click Preview in the Fax Service task pane if you want to see how your fax transmission will appear to the recipient. You fax document will appear in the Microsoft Office Document Imaging window, as shown in Figure 24-29.
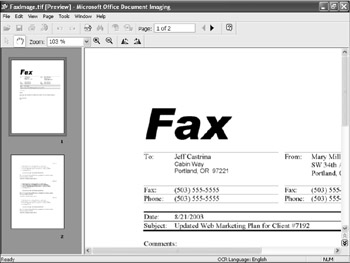
Figure 24-29: After Word creates a TIFF format version of your fax document and cover page, you can preview the information in the Microsoft Office Document Imaging window. -
To view each page in the Microsoft Office Document Imaging window, click each thumbnail image in the Thumbnail pane. If everything looks good, close the Microsoft Office Document Imaging window to return to the fax message window.
-
Click Send in the fax message window's toolbar.
After you send a fax, most Internet fax services send a "success" or "failure" e-mail message to let you know if your fax transmission was successful.
Troubleshooting: I can't align the information on the default cover pages properly
If you experience alignment problems on your cover page, you might be placing your insertion point too close to the label on the default Business Fax, Personal Fax, or Standard Fax cover pages. If this occurs, click farther away from the label before typing. For instance, click below your address in the Fax field instead of clicking immediately after the Fax label. If you want to be sure about cursor placement, display hidden characters by showing the Standard toolbar (choose View, Toolbars, Standard), and then clicking Show/Hide to display hidden table cells and tab settings.
Troubleshooting: I can't send a fax using the Internet fax service
When you send a fax using an Internet fax service, you basically convert your document into a TIFF file and attach it to an e-mail message, which is then sent to the recipient's fax machine or fax modem. The body of the e-mail message contains the cover sheet, and the attached TIFF file is the fax document. By default, you must have both Outlook 2003 and Word 2003 installed and configured on your system to use an Internet fax service. If your fax isn't being sent or if you're not sure whether your fax was sent, you can perform the following checks:
-
Verify whether Outlook 2003 sent your fax. To do so, open Outlook 2003, and then look in the Sent Items folder. Your fax will appear as an e-mail message with an attachment. If your fax message is sitting in the Outbox folder, click Send/Receive in the Outlook toolbar to send the fax.
-
Check the Outlook 2003 Inbox to see if you received a message from your Internet fax service provider that states whether your fax transmission succeeded or failed. Generally, Internet fax services send confirmation messages to your Outlook inbox whenever you attempt to send a fax.
-
Ensure that the Microsoft Office Document Image Writer print driver is installed in your Printers And Faxes folder. If it is missing, you can install it using the Microsoft Office 2003 Setup. To do so, click Start, Control Panel, Add Or Remove Programs, Microsoft Office, and then click the Change button. Then select Add Or Remove Features, click Next, select the Choose Advanced Customization Of Applications check box, click Next, expand Office Tools, expand Microsoft Office Document Imaging, click Microsoft Office Document Image Writer, click Run From My Computer, click Update, and then click OK after the update completes.
-
Ensure that your Internet fax service is properly activated. If you're unsure, visit your Internet fax service provider's online help pages or contact their support group. Usually, after you sign up with an Internet fax service provider, you'll receive a welcome e-mail message verifying your status, user information, and login parameters.
| Tip | Send merged faxes You can send multiple faxes that you create by using the Mail Merge Wizard. Start by opening the document you want to fax, and then choose Tools, Letters And Mailings, Mail Merge. The Mail Merge task pane opens. When the Mail Merge Wizard asks you to specify a print option, choose your fax application in the Name list in the Print dialog box. For more information about creating and working with mail-merged documents, see Chapter 30, "Performing Mail Merges." |
Converting and Faxing Unsupported File Types
New Feature You can use Office 2003 capabilities to convert unsupported file types. To take advantage of this capability, you have to be able to open the unsupported file type in an application—such as opening a Portable Document Format (PDF) file in Adobe Acrobat Reader—and you must have the Microsoft Office Document Image Writer installed as a printer in the Print And Faxes folder in the Control Panel. If your system meets both those requirements, you can convert a file into a TIFF file. To do so, follow these steps:
-
Open the file, and then choose File, Print. The Print dialog box appears.
-
In the Name list in the Printer section, choose Microsoft Office Document Image Writer.
-
Click the Properties button, and then click the Advanced tab in the Microsoft Office Document Image Writer Properties dialog box.
-
In the Advanced tab, choose the TIFF – Monochrome Fax option, and then click OK.
-
In the Print dialog box, click OK. The Save As dialog box appears.
-
Specify a name and location for the TIFF file.
After you create a TIFF file, you can fax the TIFF file from Word. To do so, open Word, choose File, Send To, Recipient Using Internet Fax Service to start the fax service. In the message window, clear the Attach text box (by right-clicking in the text box, and then choosing Clear from the menu), click Attach to open the Insert File dialog box, and then navigate to the TIFF file. When you attach a TIFF file, it will be sent as a fax document. To view how the attachment will appear when it is sent, click Preview in the Fax Service task pane.
| Tip | Send a TIFF File using Microsoft Office Document Imaging To send a TIFF file without opening Word, double-click the TIFF file to open it in the Microsoft Office Document Imaging window, and then choose File, Send To, Recipient Using Internet Fax Service. |
Sending a PDF File
New Feature If your Internet fax service provider supports PDF documents, you can fax PDF documents using Word 2003 without first manually converting the PDF file into a TIFF file. To do this, open Word or Outlook, and then choose File, Send To, Recipient Using Internet Fax Service. In the fax message window, delete the file name in the Attach text box, click the Attach label to open the Insert File dialog box, and then use the Insert File dialog box to locate and insert the PDF file. After you attach a PDF file, complete the cover letter, and then click Send. You'll receive a message box stating that the information will be converted into a graphic. Click OK. Then you'll receive a message box stating that Office can't convert the attached file type, but possibly the Internet fax service provider can. Click Yes to indicate that you want to proceed, and then the document will be sent to your Internet fax service provider for further file conversion.
| Note | Because Office 2003 doesn't support the PDF file format, you can't preview a fax created with a PDF file. If you want to use the fax preview feature, you'll have to convert the PDF file into a TIFF file before you create your fax. |
Forwarding an Online Fax Using Microsoft Office Document Imaging (MODI)
New Feature You can forward an online fax in a couple of ways. First, you can forward a fax as an e-mail with a TIFF attachment by forwarding the Outlook message stored in your Inbox or Sent Items folder in the same way you forward e-mails (select the message, and then choose Forward on the Outlook toolbar). Alternatively, if you'd like to create a new cover page, you can open the fax message's attachment by double-clicking the attachment icon or right-clicking the attachment file, and then choosing Open. By default, the attachment will open in MODI. After you open the fax document, you can create a new fax by choosing File, Send To, Recipient Using Internet Fax Service in the Microsoft Office Document Imaging window.
Removing Personal Information from an Online Fax Using Microsoft Office Document Imaging
New Feature At times, you might want to share parts of a fax document, but remove sensitive or personal information. Using Microsoft Office Document Imaging (MODI), you can black out content in TIFF files or remove pages, such as a fax transmission's cover page. If you want to save changes you make to a TIFF file in MODI, ensure that the Make Annotations Permanent When Document Is Saved option is on. To access this option, in the MODI window choose Tools, Options, and then click the Annotations tab if necessary. In the Annotations tab, you can select the Make Annotations Permanent When Document Is Saved check box, and then click OK.
After you've determined whether you want to save document changes, you can edit a fax document or other TIFF file by performing the following steps:
-
Right-click the TIFF file attached to a fax you received in Outlook, choose Open, and then click Open in the message box. The file opens in MODI by default.
-
To remove a page, click on the page in the Thumbnail pane, and then choose Page, Cut Page (or press Ctrl+Shift+X).
-
To black out information, click the arrow on the Pen button on the Annotations toolbar, choose Pen Settings, select Chisel Marker (10.5 mm) in the Pen Settings tab in the Pen & Highlighter Settings dialog box, and then click OK.
-
With the Pen button selected, drag your cursor over the information you want to hide.
-
After you finish modifying the TIFF file, save the file (if desired), and then click File, Send To, Recipient Using Internet Fax Service to fax the file.
|
| < Day Day Up > |
|
EAN: 2147483647
Pages: 373