Preparing Your Document
|
| < Day Day Up > |
|
In most cases, you'll use the Page Setup dialog box to enter page settings. To display the Page Setup dialog box use any of the following techniques:
-
Choose File, Page Setup.
-
In Print Layout view, double-click anywhere in the vertical or horizontal ruler or in the upper-left corner of the page (or, if you have a language setting such as Japanese enabled, in any corner of the page ).
-
Press Alt+F+U.
-
Click Page Setup on the Header And Footer toolbar.
-
Double-click a Section Break marker.
The Page Setup dialog box in Word 2003 (shown in Figure 15-1) looks similar to the Page Setup dialog box in Word 2002. If you have support for Simplified Chinese, Traditional Chinese, Japanese, or Korean enabled through Microsoft Office 2003 Language Settings (to set this up, choose Start, All Programs, Microsoft Office, Microsoft Office Tools, and finally Microsoft Office 2003 Language Settings), you'll also see the Document Grid tab in your Page Setup dialog box. To summarize, the Page Setup tabs enable you to enter basic page settings as follows:
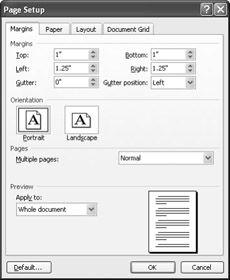
Figure 15-1: The Page Setup dialog box enables you to choose the settings that affect the margins, paper type, layout, and spacing of your document.
-
Margins Allows you to specify settings for the top, bottom, left, right, and gutter margins; choose page orientation; and select the format for multiple pages.
-
Paper Includes options regarding the paper size and the source for the paper and envelopes on which you'll print your information. In addition, you can access the Print dialog box from this tab by clicking Print Options.
-
Layout Enables you to set options for sections, headers and footers, and overall content alignment. In addition, you can access the Line Numbers dialog box by clicking Line Numbers and the Borders And Shading dialog box by clicking Borders.
-
Document Grid Enables you to control the horizontal and vertical text flow as well as line and character spacing in documents that use East Asian languages. Using this tab, you can also specify Drawing Grid settings (click Drawing Grid), which give you control over the grid display and other grid settings.
Setting Up a Document as a Whole
One of the first choices you'll make controls how far-reaching you want a particular set of page setup settings to be. You can apply page settings to an entire document, to the current section, from the insertion point forward, or to selected text. To make your choice, follow these steps:
-
Open the document you want to format and, if desired, position the insertion point where you want the page setup settings to apply, or select the text and objects that you want to be formatted by the new page setup settings.
-
Choose File, Page Setup to display the Page Setup dialog box.
-
In the Margins tab, click the Apply To arrow. Then choose one of the following:
-
To apply settings to the entire document, select Whole Document.
-
To apply settings to the current section if you're working in a document with multiple sections, choose This Section.
-
To apply settings to text starting at the insertion point's current position, choose This Point Forward.
-
To apply settings to selected text, choose Selected Text.
-
To apply settings to selected sections, choose Selected Sections.
Note The This Point Forward and Selected Text/Selected Sections options are mutually exclusive, so either one or the other will be available, depending on whether content is selected or not.
-
Any changes you make in the Page Setup dialog box will be applied to your document according to your selection in the Apply To list.
| Tip | Combine global settings with selected text settings You can apply page setup settings for an entire document along with additional settings for selected text or sections. For example, you can set a specific left margin for an entire document as well as add line numbers or additional indentation for selected sections or blocks of text. |
Working in Sections
If you want to enter page setup settings for a section only, place the insertion point where you want to make the change or select the content (such as text, graphics, sections, objects, or other components) that you want to modify. Then choose File, Page Setup to display the Page Setup dialog box. Click the Apply To arrow, select the appropriate Apply To option, and then make your page setup changes. When you choose the This Point Forward option, the settings you enter are applied throughout the rest of the document. When you specify more than one group of page setup options in a document, Word automatically inserts a Section Break (Next Page) marker at the point at which page setup settings change. You can see Section Break markers in Normal view by default; in Web Layout, Print Layout, Outline, and Reading Layout views, you must click the Show/Hide button on the Standard toolbar to display hidden characters.
| Tip | To view the page setup options that are configured for a section, double-click the Section Break marker to display the Page Setup dialog box. |
If you want to end the page setup settings in a section at a certain point (for example, you increased the right indent for a particular section but want to return to the normal margin after that section), place the insertion point where you want to make the change. Then choose File, Page Setup to display the Page Setup dialog box a second time, click the Apply To arrow, choose From This Point Forward, and return the settings to normal.
| Tip | You can quickly format certain sections differently from the overall document by entering the content and then formatting the sections. To do this, simply enter and select the content that should receive custom page setup settings, and then apply the page setup settings to the selected text. Taking this approach is often quicker than revisiting the Page Setup dialog box each time you want to start or stop applying a particular page setup configuration. |
Saving Page Setup Defaults to the Current Template
After you get the page settings set up the way you want them in your document, you can save the specifications as your page setup default settings in the document's template. When you save page setup settings as default settings, Word saves the settings to the current template. If your document isn't based on a custom template, the changes will be applied to the Normal template (by default, all new Word documents use the Normal template if they aren't based on another template). When you create default page setup settings, your page setup settings will be applied to all new documents that are created based on the template. To save your page setup settings as the default settings, follow these steps:
-
Place the insertion point where you want page settings to take effect or where you've configured the settings you want to use as the default page setup settings.
-
Choose File, Page Setup to display the Page Setup dialog box.
-
Enter the page setup choices you want to apply to the document's template.
-
In the lower-left corner of the Page Setup dialog box, click Default. A message box, shown in Figure 15-2, asks whether you'd like to change the default settings in the current template. To do so, click Yes; if you decide you would rather not alter the template settings, click No.
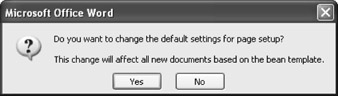
Figure 15-2: Making the current page setup settings the new default alters the existing template. In this figure, the template being altered is named bean. If the current document isn't based on a custom template, the message box shows that changes you're applying will be made to the NORMAL template.Tip Make a backup copy or reset the Normal template For best results, always keep a clean backup copy of your standard template in a directory other than the Template directory on your hard disk or server. That way, if you need to return to earlier default specifications, you can do so without having to reenter the original Word settings. If you want to reset your Normal template, simply exit Word, rename the Normal.dot file (choose an easy-to-recognize name, such as Normal_old.dot), and then restart Word. Word will automatically create a new Normal.dot template based on Word's default settings.
|
| < Day Day Up > |
|
EAN: 2147483647
Pages: 373
- Enterprise Application Integration: New Solutions for a Solved Problem or a Challenging Research Field?
- The Effects of an Enterprise Resource Planning System (ERP) Implementation on Job Characteristics – A Study using the Hackman and Oldham Job Characteristics Model
- Distributed Data Warehouse for Geo-spatial Services
- A Hybrid Clustering Technique to Improve Patient Data Quality
- Relevance and Micro-Relevance for the Professional as Determinants of IT-Diffusion and IT-Use in Healthcare