Internet Connection Sharing
The Internet Connection Sharing (ICS) feature in Windows XP Professional provides a simple solution to allow all of the computers on a home or small business network to share the same connection to the Internet.
You can use the Internet Connection Sharing (ICS) feature of Network Connections to connect your remote office network to the Internet. For example, you might have a home network, with only one of the home network computers connected to the Internet by using a dial-up connection. By enabling ICS on the computer that uses the dial-up connection, you provide Internet access to all of the computers on your home network, with only one computer physically connected to the Internet.
After ICS is enabled and users verify their networking and Internet options, remote office network users can use applications, such as Microsoft Internet Explorer and Microsoft Outlook Express, as if they were already connected to the Internet. If the ICS host computer is not already connected to the Internet, it dials the ISP and creates the connection so that the user can reach the specified Web address or resource.
Using ICS, you designate one remote office computer as the ICS host computer. Typically, this is the computer with the fastest outgoing connection, such as a DSL or cable modem. Use the ICS host computer to establish the connection to the Internet. All of the other computers on your remote office intranet referred to from this point as clients to distinguish them from the ICS host computer use the shared connection on the ICS host computer to access the Internet. In general, this is a three-step process:
-
Configure the ICS host computer for Internet access. How you set up the ICS host computer depends on whether it uses an analog modem or ISDN connection, or a DSL or cable modem connection to the outside world.
-
Enable Internet Connection Sharing on the ICS host computer to provide Internet access to everyone on the branch intranet.
-
Configure your client computers for dynamic IP addressing.
To use the Internet Connection Sharing feature, users on your remote office network must configure TCP/IP on their local area connection to obtain an IP address automatically. ICS provides network address translation, IP address allocation, and DNS name resolution services for all computers on your remote office network or home network that are configured for automatic addressing.
The following protocols, services, interfaces, and routes shown in Table 23-5 are configured when you enable Internet Connection Sharing.
| Item | Configuration |
|---|---|
| IP address 192.168.0.1 | Configured with a subnet mask of 255.255.255.0 on the network adapter that is connected to the small office/home office network. |
| Autodial feature | Enabled. |
| Static default IP route | Created when the dial-up connection is established. |
| Internet Connection Sharing service | Started automatically. |
| DHCP allocator | Enabled with the default range of 192.168.0.2 to 192.168.0.254 and a subnet mask of 255.255.255.0. |
| DNS proxy | Enabled. |
| Note | Throughout this chapter, remote office is defined as any home office, branch office or sole office of a small business connected to either a private network or to the Internet. |
For a detailed scenario about setting up ICS in a branch office network, see ICS Scenario: Connecting Your Branch Office s Intranet to the Internet later in this chapter.
Using DHCP with ICS
The computer functioning as your ICS host maintains two connections. At least one of these is by means of a network adapter, the one which connects the ICS host computer to the other computers within the remote office. The other, whether by means of a second network adapter or a modem, connects your network to the Internet. You need to ensure that ICS is enabled on the connection that connects your remote office network to the Internet. As a result, the ICS host computer, through its local network connection appropriately allocates TCP/IP addresses to its own users, the shared connection connects the network to the Internet, and users outside your remote office network are not at risk of receiving inappropriate addresses from your local network. By enabling ICS on a connection, the ICS host computer becomes a Dynamic Host Configuration Protocol (DHCP) allocator for the remote office network. DHCP distributes IP addresses and other configuration information to users as they start up. If ICS is enabled on the wrong network adapter, users outside your local network might be granted IP addresses by the your network DHCP allocator, causing problems on their own networks.
There are groups of IP addresses that are specifically reserved for small networks. One of the groups of IP addresses is used by ICS 192.168.0.1 to 192.168.0.254. These addresses are used with a subnet mask of 255.255.255.0.
Understanding the IP addressing scheme and using it appropriately can be difficult. The DHCP service enables the ICS host computer to assign IP addresses to its clients automatically. By default, when ICS is installed, the DHCP service begins assigning addresses to computers on the network.
Your ISP might use a DHCP service to assign your computer an dynamic IP address when you connect to the Internet. Quite possibly, each time your computer connects to the Internet, a different, but unique IP address might be assigned to it. Keep in mind that the DHCP dynamic address assignment, referred to here, does not affect the ICS private adapter which always has the same address.
If your ICS host computer has two adapters one for the device connecting you to the Internet and another for connecting to your remote office network an IP address of 192.168.0.1 is always assigned to the network adapter connected to your network. This is assigned permanently and is referred to as a static IP address because it does not change. Next, the DHCP client service is loaded into memory so that a dynamic IP address can be assigned to the computer s external adapter by your ISP.
Each client computer on your remote office network must request an IP address from your ICS computer. It is important that the ICS host computer remains on all the time or is started prior to starting the other computers on your network. Otherwise, the client computers will be unable to obtain an IP address.
For more information about DHCP, see Configuring IP Addressing and Name Resolution in this book.
| Note | Internet Connection Sharing does not work with some versions of AOL. For more information, contact AOL. |
ICS Scenario: Connecting Your Branch Office s Intranet to the Internet
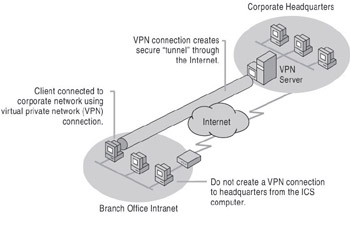
This scenario describes how to connect a branch office of a corporation to the Internet. It also explains the differences between setting up an analog modem or ISDN connection, and setting up a cable modem or DSL connection, and discusses how to configure a computer on the intranet of a branch office to use a VPN to connect to the corporate network. Figure 23-6 shows the initial configuration for a branch office.
Figure 23-6: Initial configuration of a branch office
The Internet Connection Sharing (ICS) feature in Windows XP Professional provides a simple solution to allow all of the computers on a local intranet to share the same outgoing connection to the Internet.
| Note | Never turn off the ICS computer while any of the clients are running, as the ICS computer provides IP address configuration, name resolution services, and a gateway to the Internet. If you do lose power to the ICS computer, the other remote office clients cannot access the Internet because the shared connection on the ICS computer is not available. |
Configuring the ICS Computer
How you configure the ICS host computer depends on whether it connects to the Internet using an analog modem or ISDN connection, or a high-speed device such as a DSL or cable modem.
| Note | The ICS host computer automatically assigns IP addresses, forwards DNS names to the Internet for resolution, and assigns itself as the default gateway for connecting to the Internet. If any of the clients on the remote office s intranet are providing these functions, Internet Connection Sharing might not work. |
Configuring an ICS Computer with an Analog Modem or ISDN Connection
In this configuration, the ICS computer connects to the Internet using an analog modem or ISDN connection. The ICS computer and all of the other computers in the branch office are connected to that office s intranet using network adapters. Figure 23-7 shows how an Internet connection is shared using an analog modem or an ISDN connection.
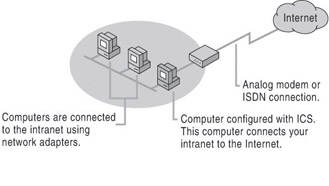
Figure 23-7: Internet Connection Sharing using an analog modem or ISDN connection
Install the analog modem (or make sure you have a modem installed) on the ICS computer you want to use to access the Internet. If you are installing an analog modem in the ICS computer for the first time, Windows XP Professional Plug and Play automatically detects and configures the analog modem.
Open the Network Connections folder, and then double-click New Connection Wizard. The New Connection Wizard sets up the connection to your Internet service provider (ISP). Configure the connection by using the settings provided by your ISP.
After the wizard has created the new connection to your ISP, Windows XP Professional adds a new icon for the connection in the Network Connections folder. Test the new Internet connection by connecting to your ISP and verifying that you can browse the World Wide Web.
To allow other users to connect to your computer
-
In Control Panel, click Performance and Maintenance.
-
In Performance and Maintenance, click System.
-
Click the Remote tab.
-
Under Remote Desktop, make sure the Allow users to connect remotely to this computer checkbox is enabled, and then click Select Remote Users.
-
In the Remote Desktop Users dialog box, click Add.
-
In the Select Users dialog box, click Locations to specify the search location.
-
Click Object Types to specify the types of objects for which you want to search.
-
In the Enter the object names to select (examples) box, type the names of the objects for which you want to search.
-
Click Check Names.
-
When the name is located, click OK. The name now appears in the list of users on the Remote Desktop Users dialog box.
Note You must be logged on as an administrator or a member of the Administrators group to add a user to the Remote Users Group.
Check the configuration of the clients as described later in this section. Finally, verify the shared ICS connection by browsing the World Wide Web from one of the clients on the remote office intranet.
Configuring an ICS Computer with a DSL or Cable Modem Connection
In this configuration, the ICS computer connects to the Internet using a network adapter connected to a high-speed DSL or cable modem. The ICS computer connects to the other computers in the branch office s intranet using a second network adapter. The rest of the computers in the branch office connect to the local intranet using other network adapters. Figure 23-8 shows how an Internet connection is shared by using a DSL or cable modem connection.
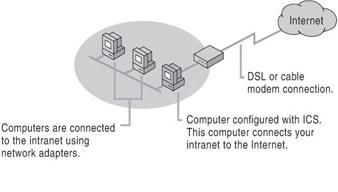
Figure 23-8: Internet Connection Sharing using a DSL or cable modem connection