Verifying a Windows Account
The importance of an accurate Windows account to the creation of a usable resource account may cause you to look at how you might merge information from more than one source. For instance, if you hope to obtain all the information you need from the company address book, and you then discover it isn’t up-to-date, you have a dilemma. Is it worth obtaining the data from this source?
You can browse the Active Directory or NT domains to search for users one by one to find and fill in missing information if you import from a less than complete and accurate source. If your company has used consistent naming through the years, you can likely guess most of these, but dealing with exceptions can become a difficult task when the naming is unpredictable. Therefore, make sure that your potential data source has a valid Windows logon contained in it before you decide to use it as an import basis. If it doesn’t, weigh the consequences of manual cleanup. When you use external data sources, be wary of data containing extended characters and leading and trailing spaces, with leading spaces being more troublesome. During an import, the system doesn’t detect cell values from Excel that contain soft returns, for example, as bad characters in the import process but will cause database errors in production.
Project Professional provides the means to verify Windows logons by connecting to your company address book. Following this path to the address book is different from the one described in the previous topic. Adding the Windows account and e-mail address fields to the Resource Sheet view makes editing the data more convenient. To connect to the company address book, from a resource view double-click a resource to open the Resource Information dialog box. Follow these steps:
-
Click either the Windows Account or Details button to link to your global address book through your local mail client. The Choose Profile selection dialog box displays, as shown in Figure 11-12. (Note: Not all mail clients create mail profiles on a workstation during installation. Lotus Notes, for instance, must have a mail profile configured manually in order for Project to see it on the client machine. Any MAPI-compliant mail client will work.)
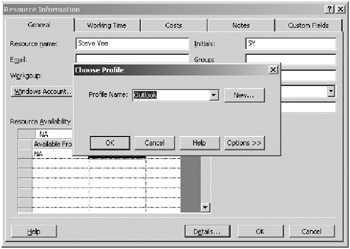
Figure 11-12. Clicking either the Windows Account or Details button opens the Choose Profile dialog box. -
Depending on your mail client security settings, the system may prompt you for a logon. Default Outlook settings will cause a prompt for access to your Outlook client.
-
Project will attempt to match the name with an entry in the address book. The results will display in the Check Names dialog box shown in Figure 11-13.
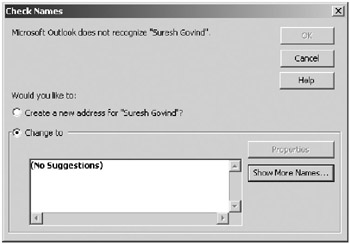
Figure 11-13. The Check Names dialog box displays matches and suggestions in the results pane. -
Project will default to the local default address book. You can change the selection by clicking the Show More Names button in the Check Names dialog box to open the Address Book dialog box shown in Figure 11-14. The pull-down selection box in the upper-right corner of the Address Book dialog box will display all address books in your company’s catalog.
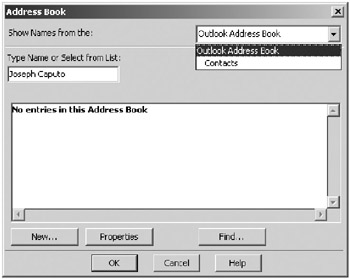
Figure 11-14. The Address Book dialog box allows you to select additional address books.
For the most part, you’ll use your connection to the company address book to populate Windows accounts and SMTP e-mail addresses. The logon name in the format domainname\logonname or the Active Directory name is key information. It must be correct or your import will fail. A bad e-mail address won’t cause an import problem, but it messes up notifications. It’s not worth importing bad data, so you’ll want to get it right.
EAN: 2147483647
Pages: 185