| The most valuable use of Adobe Bridge may be to simplify processing large numbers of images. In previous versions of Photoshop, you could certainly batch-process images in a folder, but the process was rather clumsy and inflexible compared to the workflows possible with Bridge. Bridge integrates and simplifies the tasks of annotating, selecting, opening, and processing files. To take full advantage of batch processing, you'll want to make sure you also understand how to annotate files (see the section "Annotating Files in Bulk") and how to select and open multiple files (see Chapter 7). Once you've selected files in a Bridge browser window, you can batch-process them using the commands on the Tools menu (Figure 6.15). The Tools menu is more powerful than it looks, because you can extend it using scripts and plug-ins that provide a direct line to Photoshop and other Adobe Creative Suite products. Figure 6.15. Commands on the Tools menu. 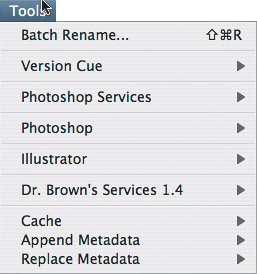
Batch Rename, the first command on the Tools menu, is a Bridge feature that's more than just a way to rename files. The Batch Rename dialog box is designed so that you can easily make your files' new names conform automatically to a given file-naming standard. For example, if you prefer to name all of your images using the date shot, sequence number, and ISO rating, you can use the Batch Rename feature to rename files from their original digital camera names to your standard naming convention. You can read more about the Batch Rename command in the section "Renaming Many Files at Once." Version Cue tracks versions of files you edit, so that you can return to earlier or alternate versions without having to come up with your own way of tracking changes. The Photoshop Services and Photoshop submenus on the Tools menu integrate directly with Photoshop and are some of the most useful commands in the Tools menu. Photoshop Services sends your images to online vendors for prints, books, and other output products. The Photoshop submenu links up with batch operations you may recognize from Photoshop, such as Contact Sheet II. The Image Processor command in the Photoshop submenu is a one-stop shop for converting, resizing, and compressing any number of images, and you should check it out before creating your own actions. For complete control you can use the Batch command in the Photoshop submenu; you can use the Batch command to process selected images through any action available in Photoshop including actions you've designed yourself. If you write your own scripts, you can add them to the Tools menu. I cover scripting in Chapter 19.
Renaming Many Files at Once The Batch Rename dialog box is a powerful way to rename an entire folder of files and is relatively straightforward to use. The key area in the Batch Rename dialog box is the New Filenames section, where you string together building blocks for your new filenames. The files you rename with the Batch Rename command must be in the same browser window. That doesn't mean they have to be in the same folderyou can run Batch Rename on files in Find results or in a collection, which can contain files from different folders. To rename many files: 1. | In a Bridge browser window, make sure the files are in the sequence you want so that they will be numbered properly. If they aren't in the right order, arrange them by choosing a sort order from the View > Sort submenu, or rearrange them manually by dragging.
| 2. | Select the files to rename. (If you don't select any files, Bridge will rename all files in the folder.) Choose Tools > Batch Rename (Figure 6.16).
Figure 6.16. 
| 3. | Click the Copy to Other Folder radio button, click Browse, and set an empty destination folder so that you don't overwrite existing files.
| 4. | In the New Filenames section, select an option for how files are to be renamed. For example, if you want the new filename to consist of the shot date and a sequence number, select Date and Time from the top pop-up menu, click the plus button to add a new naming option and select Sequence Number. For Sequence Number, enter the starting number and the number of digits. The Preview section at the bottom of the Batch Rename dialog box shows you how it's going to turn out.
| 5. | In the Options section, you can choose to keep the original filename in the XMP metadata associated with the file, if the original filename has value. You can also specify the operating system compatibility for the new filenames.
| 6. | When you're done, click Rename.
|
Avail Yourself of Dr. Brown's Services One of the more popular plug-ins for the Tools menu is Dr. Brown's Services, which cram all kinds of useful batch-processing goodness into well-organized dialog boxes. Dr. Brown's Services is a free product you can download from Photoshop guru Russell Brown's Web site: www.russellbrown.com. It's also a great example of how you can enhance the Tools menu with a script. As of this writing, Dr. Brown's Services includes these components: Dr. Brown's Caption Maker, which builds captions from each image's metadata, while also optionally copying, resizing, and sharpening images (Figure 6.18). Figure 6.18. Dr. Brown's Caption Maker from Dr. Brown's Services. 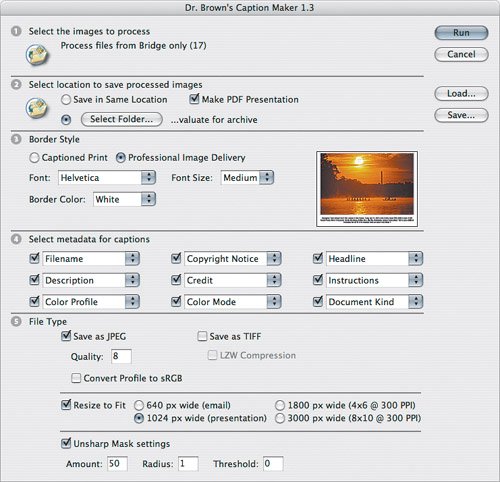 Dr. Brown's 1-2-3 JPEG, which can save three different types of JPEG images in one pass. This is great when you want to convert a Raw, TIFF, or PDF master file to JPEG images suitable for high-, medium-, and low-resolution work such as print, presentation, and Web. Dr. Brown's Merge-O-Matic, which combines selected images into frames of an animation. Dr. Brown's Place-O-Matic, which creates a high-dynamic-range image from a single Raw file. Dr. Brown's Auto Correct, which generates JPEG images from original files after applying automatic image correction. Dr. Brown's Manual Correct, which generates JPEG images from original files after presenting a sequence of dialog boxes that guide you through basic image corrections. Dr. Brown's Black and White, which generates black-and-white JPEG images from original files after giving you the opportunity to control the toning of the black-and-white image (such as sepia toning). Because it includes so many useful batch processes, Dr. Brown's Services is a no-brainer to download, especially because you can't beat the price.
|
Sending Batch Jobs to Photoshop You can use the Tools menu in Bridge to send selected images to Photoshop and apply Photoshop automation tasks to them. Although you can do this in Photoshop alone, you often save time by using Bridge to locate and select the files you want to processespecially when you can take advantage of Bridge's ability to find and collect files according to the metadata in your images. If Photoshop isn't already open when you send a job to Photoshop from Bridge, Bridge opens Photoshop. Once Photoshop starts processing, you can close Bridge if you want to. To send a batch job from Bridge to Photoshop: 1. | In a single Bridge browser window, select the images you want to process. If you want to process all images in a folder, choose either Edit > Select All or Edit > Deselect All. (If one image is selected, that will be the only image sent to Photoshop; if no images are selected, it's assumed you want to process the whole folder.)
| | | 2. | Choose a command from the Tools > Photoshop submenu. Your computer switches to Photoshop, and a dialog box appears for the feature you selected (Figure 6.17). From this point forward, Photoshop has control of the files.
Figure 6.17. 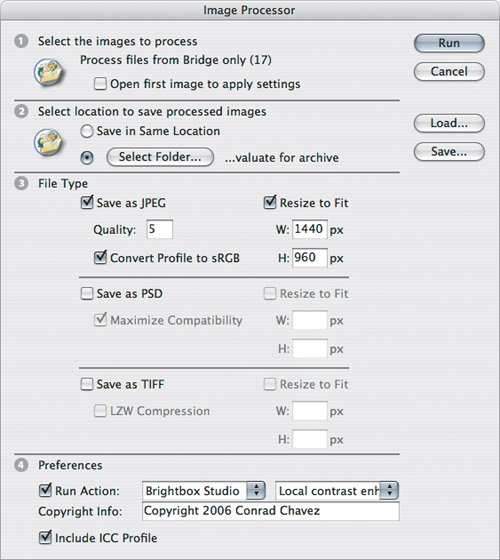
| 3. | Specify options in the dialog box and continue. (I describe the Batch dialog box in detail in Chapter 18.)
|
While Photoshop is busy processing images, you can't use Photoshop yourself. However, you can switch to any other program, including Bridge, and continue working. If you have another batch job that you want to send to Photoshop, you can start selecting files for it in Bridge, but you can't send any more batches to Photoshop until Photoshop is done with the previous batch job. For more information and tips about Photoshop actions, see Chapter 17.  | If you want to stop a batch process, switch to Photoshop and press Esc. There may be a delay in stopping the process if it's in the middle of a lengthy processing task. If you are stopping a batch action, wait until the next image opens in Photoshop; if you cancel while an image is opening, Photoshop may simply try to open the next image. Trying to make bulk edits to Raw camera files? See the section "Copying Camera Raw Settings" in Chapter 11. When batch-processing files, avoid saving the processed files to the same folder as the original files. If by chance you make a mistake in the batch-processing settings, you won't be able to recover your original images if you saved over them with the new, processed images. Always set a destination folder where you can verify that the batch-processing operation went as expected; if there's a problem, you can throw out those images, adjust the batch-processing settings, and run the batch again. |
|