| Let's begin by talking a bit about the game concept and how to go about laying out the assets in Director. The game is divided into four levels, and each level features a different group of aliens or asteroids you need to shoot down, and a refueling tunnel that you navigate through. Each time you make it to a new level, the enemies go faster, making them harder to hit. There are several ways you could implement the four different levels. You could use imaging Lingo, which would free you from using sprites but would also require a good bit of coding. Or you could use a purely score-based approach, but then the enemies would always move in the same manner. Instead, we'll use a hybrid of the Score and Lingo to break the game into levels visually, and use programmatic animation to create random enemy movement. Importing Assets First off, you'll need the assets to be able to lay out the Score. You need your player's ship, some enemies, a couple of asteroids, and a scrolling background or two. What you choose to create the assets with is up to you. Some developers will hand draw them; you might use Freehand or even Flash. I chose to have my brother Brian create them for me. I found this to be the easiest method of all. He used 3ds max and gave them to me as .png files, containing an alpha channel. You can create assets for this project if you like, of course, but they are provided on the CD. 1. | Start Director and, from the start page, create a new movie. Or, if you are in Director, select File > New > Movie. Change the Stage size to 800x400. Change the background color to solid black.
Even though the original gave was played full screen on a television, I thought changing to a letterbox style aspect ratio gives it a modern feel.
| 2. | Create a new internal cast named assets, then import the nine bitmap images from the Lesson11\media folder on the CD into the new assets cast. You can import all of the imagesat 32 bits to make it easier.
The following list of files is what should be imported now:
alien_ship1.png alien_ship2.png asteroid1.png asteroid2.png ground.png mountains.png ship1.png ship2.png ship3.png
Once you have the files imported you can start placing the new cast members in the Score. To keep things organized, game assets will be placed in one cast while scripts are placed in the default internal cast.
|
Setting Up the Score In order to leverage the visibility and readability the Score provides, let's arrange the game's four levels into discrete sections of the Score. 1. | Select the member mountains, then choose Modify > Transform Bitmap. Change the image's color depth to 16 bits, and click the Transform button. Click OK to the warning dialog.

The mountains will be in the far background, so they don't need an alpha channel. Changing the color depth to 16 bits halves the memory requirements for the image.
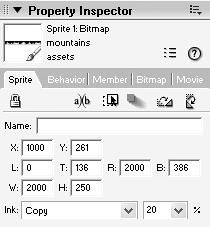
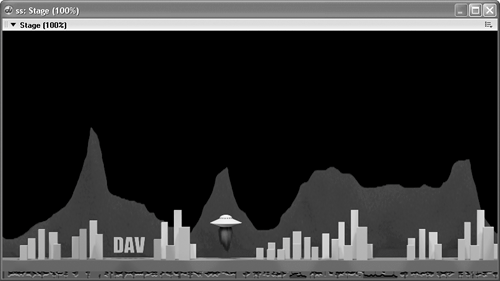
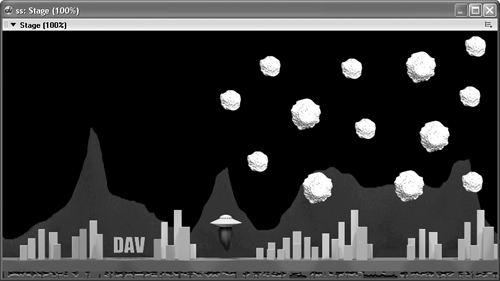
| 2. | Select frame 1 of channel 1 in the Score, then drag the mountains cast member onto the Stage. Use the Property inspector to adjust the sprite's position. Set the X position to 1000, and Y to 261. Finally, change the sprite's blend to 20 percent to fade it into the background, as shown:
This will place the mountains butted up against the left edge of the Stage and just higher than the Stage bottom.
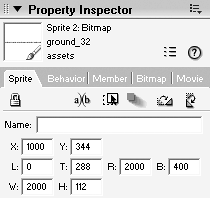
| 3. | Drag the ground cast member onto the Stage and use the Property inspector to set its X position to 1000 and its Y to 344. The new sprite should appear in channel 2 and the mountains and foreground should now look like this:
 Like the mountains, the ground should butt up against the left edge of the Stage, although the bottom of the ground should also be tight against the bottom. You can verify this by making sure the bottom of the sprite's rect is at 400, as shown in the Property inspector: Like the mountains, the ground should butt up against the left edge of the Stage, although the bottom of the ground should also be tight against the bottom. You can verify this by making sure the bottom of the sprite's rect is at 400, as shown in the Property inspector:
| 4. | Select both the mountain and ground sprites in the Score, and then click in the frame bar at frame 100. Press Ctrl/Command+B to extend both sprites at once.
Both the mountains and ground sprites should now span frames 1 through 100. In the next section you'll use imaging Lingo to scroll both of these sprites at different speeds to give the illusion that you're flying over the ground.
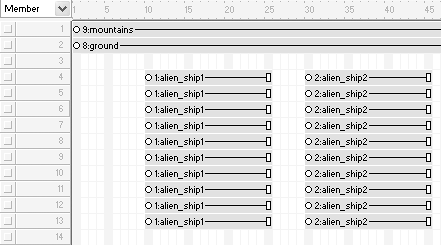
| 5. | Select frame 10 of channel 4, then drag about 10 copies of cast member alien_ship1 onto the Stage. Arrange them as shown, but don't worry about being precise.
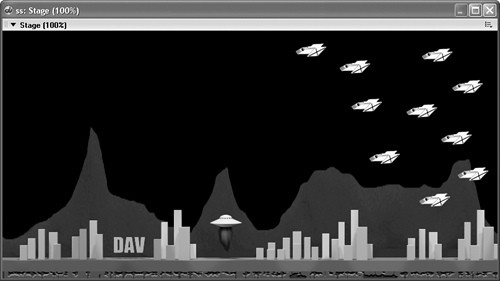 If you placed all 10 copies, the alien ships should occupy channels 4 through 13. If you placed all 10 copies, the alien ships should occupy channels 4 through 13.
The reason you started placing the sprites at frame 10versus placing them at frame 1is because a little room is being left for an intro section that will be added later.
You're using the Score to define the different game levels, so let's lay out the remaining enemy levels now, and then animate them in the next section.
| 6. | Select all the alien ships that you just placed, by clicking the first one in the Score at channel 4 and then Shift-clicking the last one. Click in the frame bar at frame 25 to move the playhead without deselecting the sprites. Press Ctrl/Command+B to extend the sprites.
The alien ships should occupy frames 10 through 25 now. Don't worry about the mountain or ground sprites for now. They will appear throughout the length of the levels, so you can trim them later once you've laid out the levels.
| 7. | With all of the alien ship sprites still selected press Ctrl/Command+C to copy them. Click in the Score at frame 30 of channel 4, then press Ctrl/Command+V to paste in the sprites.
You now have two sections in the Score, although each section contains the same alien shipsfor the moment.
| 8. | Keeping the newly pasted sprites selected, go to the assets cast and single-click the alien_ship2 (the UFO) cast member to select it. Press Ctrl/Command+E to do a member exchange.
When you exchange the members, all selected sprites are exchanged. Result: all the alien ships become UFOs in the second section.
You could have dragged and dropped the sprites into the second section, but copying and pasting them is much faster, especially once using these shortcuts becomes second nature.
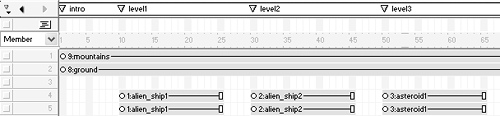
Let's finish this section by creating an asteroid field for Level 3.
| 9. | Single-click in the Score at frame 50 of channel 4. Drag up to 15 asteroids from the assets cast onto the Stage, so that you have something like the following:
 You now have the three levels set up in the Score. Let's add some markers to show them, and then animate the enemies using Lingo. You now have the three levels set up in the Score. Let's add some markers to show them, and then animate the enemies using Lingo.
| 10. | Trim the asteroid sprites so they only occupy frames 50 through 65.
| 11. | Add four markers named intro, level1, level2, and level3. Create these markers at frames 1, 10, 30, and 50 respectively, as shown here:
 The basic sections and enemy sprites are now laid out and ready for animation. You will begin by animating the enemies, and then move onto the ground and mountains. The basic sections and enemy sprites are now laid out and ready for animation. You will begin by animating the enemies, and then move onto the ground and mountains.
|
|