| In this section you'll learn more about keyframes as you animate the curtains of the interface. Let's review what a keyframe is. You'll recall that in the Score, a sprite's span dictates the number of frames the sprite will appear on the Stage. Keyframes placed within the sprite's span tell Director things like where the sprite should be at that particular frame. Between keyframes Director automatically places (interpolates) the sprite, in a process known as tweening. You can place as many keyframes within a sprite's span as you can fit. There could be a keyframe on every frame, which would replace the automatic tweening that Director normally does. For our purposes, however, we'll use Director's tweening abilities. 1. | In the Score, choose the final frame of sprite 6's span. This is the left curtain sprite.

Remember, you choose the last frame by single-clicking directly on the frame. Clicking in the middle of the span chooses the entire span, so be sure you select just the one frame.
When a sprite is only partially selected, as it is now, you'll see a single dotted border around it. When a sprite is fully selected you'll see two dotted borders around it. This helps you to identify selections more easily.
Note If you choose a sprite by clicking it on the Stage, it will always be fully selected. You can only choose individual frames by selecting them within the Score. | 2. | While holding down the Shift key, press the left arrow key repeatedly until the curtain is just hidden behind the edge of the cutout in the sprite above it.
When a sprite is selected, the arrow keys move it a single pixel at a time, in any direction you go. With Shift held down, the arrow keys move the sprite (or selection of sprites) ten pixels at a time, which makes moving larger distances much faster. Adjust the sprite so the curtain is just barely hidden behind the edge. You may have to release the Shift key to move a single pixel at a time for fine adjustment.
As you move the sprite you should see a green dot and a blue dot, with a line connecting them that contains a bunch of smaller black dots. The green dot on the left represents the sprite's starting position, and the blue dot represents the next keyframe. The lines connecting the dots show the th the sprite will travel, and the little black dots on the line represent the individual frames between the keyframes.
As you move the sprite from its initial location to its final location, you will notice the small dots on the path increase their spacing. This happens because you're increasing the distance the sprite must travel per frame to get to its final destination.
Also notice that the final frame in the sprite's span is now a circle, indicating a keyframe.
| 3. | Repeat steps 1 and 2 for the right curtain, which is sprite 7 in the Score. (You'll want to move this one to the right instead of the left, of course.) Again, move it so it's just barely hidden from view.
Both curtains should now slide out of the way, and if you scrub the playhead by dragging it, you'll see the animation.
| 4. | Hit Play or press Enter to play the movie.
With the tempo set to 15 fps, the curtains take two full seconds to move, which seems a little slow.
| 5. | Click and drag just the last frame of the left curtain (sprite 6) so that the span ends at frame 20 instead of 30.
You score should now appear as shown here.
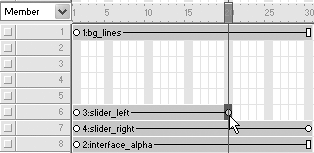
| 6. | Do the same for the right curtain (sprite 7), so that both sprites begin at frame 1 and end at frame 20, and then play the movie.
The curtains now move a little faster, but not too fast. If you do the math, you'll find that the curtains are taking 1.33 seconds to open. At 15 fps, five frames is a third of a second. Since you have 20 frames in the span, this totals one second plus a third of a second.
The interface is beginning to take shape, and you can see how the curtains moving will reveal the portfolio images underneath. But a bit of a problem remains. When the curtains open, they reveal the white background with the lines showing, and it doesn't look quite right. Something needs to be in that space to better differentiate the "outside" from the "inside" revealed by the curtains. A simple shade of gray should do nicely.
| 7. | Single-click in the Score at frame 1 of channel 2 to choose the frame.
In the next step you're going to create a big black rectangle on the Stage that will serve to darken the area behind it. By first selecting the frame in the Score, you're telling Director exactly where the sprite span should begin when it's created.
| 8. | In the Tool palette choose the Filled Rectangle, make the foreground color black, and then drag out a large enough rectangle to fill the cutout section.
If you scrub the playback head now you won't be able to see the curtains move because of the solid black shape below them.
| 9. | In the Score, click the rectangle sprite that you just created, in channel 2. Be sure to click in the middle of the span to choose the entire span. With the sprite selected, use the Property inspector to set the sprite's blend to 20%.
Seeing the background lines through the shape makes for a nice, but subtle, difference between the foreground and the cutout the curtains are revealing. Your Stage should now appear as shown on frame 11 with the curtains partly open.
 Note You left sprite channels 3 through 5 open because this is where the portfolio images will be placedbetween the background and the curtains above. Before moving on, let's give the new shape cast member a name so it's easier to recognize in the Score.
| 10. | Choose the shape in the cast (it should be member 5). In the Cast Member Name field, enter bg_tint as the name of your shape.
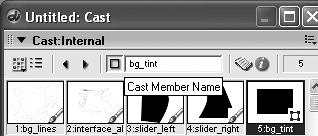
It's a good idea to always name your cast members. Not only does it make it quicker to identify them, it allows you to reference them through Lingo, as you will learn. Although you could simply reference the member by number (5, in this case) if you were to later move the cast member to a new slot or a new cast, any code referencing it by number would break, whereas the name reference would still be fine.
|
|