Scenario 8-3: Securing Device Access
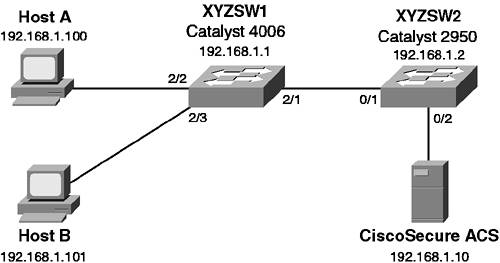
| In this scenario, you secure Catalyst switch ports using the various techniques available. Although in the real world you would generally not configure all of these techniques on a single network, the scenario shows you how to configure each technology. Scenario ExerciseFigure 8-16 illustrates the scenario topology used for this scenario. Figure 8-16. Scenario 8-3 Topology
Corporation XYZ wants to try the various port security techniques available to determine which technique works best for the network. You learn how to configure the following port security techniques:
Scenario ObjectivesThe scenario objectives are as follows:
Additional Equipment NeededThe additional equipment Needed is as follows:
Scenario PlanningSecuring device access is a process that must be well-planned before implementation. Implementing port security techniques without careful planning can cause administrative headaches, with users being unable to connect to certain ports or users being granted access to the network when they shouldn't be. In this scenario, you configure the following methods of securing device access:
Planning Basic Port SecurityBasic port security is easily configured and allows you to secure access to a port based upon a MAC address basis. It does not allow you to dynamically determine the VLAN a port should be placed into, so make sure you understand this. Basic port security is also configured locally and has no mechanism for controlling port security in a centralized fashion for distributed switches. Basic port security is normally configured on ports that connect servers or fixed devices, because the likelihood of the MAC address changing on that port is low. A common example of using basic port security is applying it to a port that is in an area of the physical premises that is publicly accessible. This could include a meeting room or reception area that might have an IP telephone available. By restricting the port to accept only the MAC address of the IP telephone, you prevent unauthorized access if somebody plugged another device into the port. When configuring port security, you should be aware of the default configurations:
Planning 802.1x AuthenticationThe IEEE 802.1x standard provides a framework that allows users (rather than MAC addresses) to be authenticated for switch access to a port. 802.1x can use a centralized security database to provide authentication information, which allows for scalability and ease of management. On Cisco platforms, 802.1x support requires a RADIUS server, so you must configure this server and enable RADIUS support on the switch before proceeding. In recent versions of Cisco IOS and CatOS, RADIUS authorization attributes can also be associated with a user, which define the VLAN a user belongs to as well a port-based access control list that should be applied to traffic received from the user. A restriction of 802.1x is the requirement for the host connecting to the switch port to be 802.1x aware. This means the operating system must have 802.1x client support. Microsoft Windows XP and Windows 2000 are the only operating systems that currently support 802.1x natively, although third-party clients do exist for other operating systems. NOTE 802.1x client support is available for Windows 2000 starting in Service Pack 4. Command SyntaxThe following sections describe the commands used for configuring standard port security and 802.1x security in this scenario. Standard Port Security Command SyntaxThe following commands, which are used to configure port security, are introduced in this scenario:
The set port security Command SyntaxTo enable port security on CatOS, you use the set port security command. The first step you must take is to enable port security on a particular port. You then can allow one or more MAC addresses to use a secured port. You can manually specify these addresses, allow the switch to auto-learn the addresses, or use a mixture of both. Finally, you can specify a violation action (either shut down the entire port or block unauthorized traffic), which occurs when an unauthorized MAC address is detected on the port. The set port security command has the following syntax: set port security mod/port [enable | disable] [mac_addr] [age age_time] [maximum limit] [shutdown shutdown-time] [violation {shutdown | restrict}] Example 8-46 illustrates configuring port security. Example 8-46. Configuring Port SecuritySwitch> (enable) set port security 2/1 enable Port 2/1 port security enabled with the learned mac address. Trunking disabled for Port 2/1 due to Security Mode Switch> (enable) set port security 2/1 maximum 10 Maximum number of secure addresses set to 10 for port 2/1. Switch> (enable) set port security 2/1 00-d0-b5-11-22-33 Mac address 00-d0-b5-11-22-33 set for port 2/1. Switch> (enable) set port security 2/1 violation restrict Port security violation on port 2/1 will cause insecure packets to be dropped. NOTE When following this scenario, do not use the MAC addresses shown in the text; use the correct MAC address of your Host A instead. Example 8-46 sets port 2/1 to allow a maximum of ten hosts. A single static host is permitted, with the remaining nine MAC addresses added dynamically as new hosts send traffic through the port. If an insecure packet is received, the port drops the packets (as opposed to the default configuration of shutting down the entire port). The switchport security Command SyntaxTo enable port security on Cisco IOS, you use the switchport security interface configuration command syntax: switchport port-security [maximum number] [mac-address mac-address] If you omit the optional parameters, port security is enabled and allows for up to 132 secure MAC addresses. The optional maximum keyword allows you to specify the maximum number of MAC addresses allowed on the interface. The optional mac-address keyword allows you to add specific MAC addresses to the secure MAC address list (if you do not do this, then the switch auto-learns the secure MAC addresses). By default, if an unauthorized MAC address is detected on a secure port, the port is shut down and must be administrative enabled. To configure what happens when an unauthorized MAC address is detected on the interface, you use the switchport security violation command: switchport port-security violation {protect | restrict | shutdown} The protect keyword drops any frames from unauthorized hosts, but still forwards traffic for authorized hosts. The restrict keyword generates a trap violation (SNMP and SYSLOG), which is sent to the network management station. Example 8-47 shows a sample configuration that allows only a single host (MAC address of 00-01-02-00-D8-1D) on the switch port. If another host connects to the port, the port is shut down and must be re-enabled by an administrator. Example 8-47. Configuring Port Security on Cisco IOSSwitch(config)# interface fastEthernet0/1 Switch(config-if)# switchport port-security Switch(config-if)# switchport port-security maximum 1 Switch(config-if)# switchport port-security mac-address 00-01-02-00-D8-1D Switch(config-if)# switchport port-security violation shutdown 802.1x Security Command SyntaxThe following commands, which are used to configure 802.1x security, are introduced in this scenario:
The set dot1x and set port dot1x Command Syntax (CatOS)When configuring 802.1x, you must have a RADIUS server configured before enabling 802.1x support. Once you have configured RADIUS support, you must globally enable 802.1x support using the set dot1x system-auth-control command: set dot1x system-auth-control {enable | disable} Once 802.1x is enabled globally for the switch, you can then configure individual ports to use 802.1x security by using the set port dot1x command. By default, each port has a specific 802.1x port state of force-authorized, which means that each port is automatically authorized to forward traffic (in effect, 802.1x is turned off). You must set the port state to auto to enable 802.1x on the port, using the set port dot1x port-control command: set port dot1x mod/port port-control {auto | force-authorized | force-unauthorized} Once you have set the 802.1x port state, you must initialize the port using the set port dot1x initialize command: set port dot1x mod/port initialize TIP 802.1x supports the use of multiple hosts attached to a single port. This can occur when a hub is connected to the switch. To enable support for multiple hosts, you must configure the set port dot1x mod/port multiple-host enable command on the appropriate port. The aaa authentication dot1x Command Syntax (Cisco IOS)To configure 802.1x support on Cisco IOS Catalyst switches, the following prerequisites must be configured:
Once these prerequisites have been configured, you must configure the 802.1x authentication profile to use RADIUS, using the aaa authentication dot1x global configuration command: aaa authentication dot1x default method1 [method2...] Example 8-48 shows how to configure 802.1x using RADIUS authentication. Example 8-48. Enabling 802.1x Authentication Switch(config)# aaa authentication dot1x default group radius NOTE You can configure 802.1x authentication to use the local switch user database by specifying the local keyword. This method is recommended only for testing purposes. The dot1x port-control Command Syntax (Cisco IOS)Once 802.1x authentication has been enabled on a Cisco IOS switch, you must then configure 802.1x on each port that you want to use it. As for CatOS, all ports by default are in the force-authorized state and must be set to the auto state to enable 802.1x support. The dot1x port-control interface configuration command is used to enable 802.1x on a port: dot1x port-control {auto | force-authorized | force-unauthorized} TIP To enable support for multiple hosts on Cisco IOS, you must configure the dot1x multiple-hosts interface configuration command on the appropriate port. Configuration TasksIn this scenario, you perform the following tasks:
Step 1 Configuring Basic Port SecurityBasic port security is supported on both Cisco IOS and CatOS switches. In this scenario, you configure basic port security for the ports connected to Host A and the CiscoSecure ACS server. In this step:
Configuring XYZSW1 for Basic Port SecurityOn XYZSW1 you permit only Host A's MAC address on port 2/2, and block access from any other source MAC addresses detected on the port. On XYZSW1, configure port security for port 2/2, allowing only Host A (MAC address = 00-40-96-39-FA-0A) access to the switch port (see Example 8-49). Example 8-49. Configure Port Security on XYZSW1 XYZSW1 (enable) set port security 2/2 enable 00-40-96-39-FA-0A violation restrict Port 2/2 security enabled, violation mode restrict. Mac address 00-40-96-39-fa-0a set for port 2/2. The restrict keyword configures the port to reject frames from unauthorized MAC addresses (also known as the violation action). The default violation action is to shut down the port if an unauthorized MAC address is detected. Configuring XYZSW2 for Basic Port SecurityOn XYZSW2 you permit only the CiscoSecure ACS server MAC address on port 0/2 and shut down the port if any other source MAC addresses are detected on the port. On XYZSW2, configure port security for port 0/2 allowing only one MAC address on the port, as shown in Example 8-50. Example 8-50. Configure Port Security on XYZSW2XYZSW2(config)# interface fastEthernet0/2 XYZSW2(config-if)# switchport port-security XYZSW2(config-if)# switchport port-security maximum 1 XYZSW2(config-if)# switchport port-security mac-address 00-01-02-00-D8-1D XYZSW2(config-if)# switchport port-security violation shutdown The maximum 1 configuration means that only a single MAC address is allowed on the switch port (the default is 132). The violation shutdown configuration means that any frames received from unauthorized MAC addresses causes a shut down of the port. NOTE The switchport port-security command replaces the port security interface configuration command used in older IOS versions on the Catalyst 2900XL/3500XL switches. Verifying That Port Security Is FunctioningThe following outlines how to verify that port security is functioning:
You should not be able to ping anywhere in the network from Host B, because a security violation has occurred and the port blocks frames from unauthorized hosts.
The show port-security output in Example 8-52 shows the switch has registered a security violation. The show interface command indicates the port has been shut down and must manually be re-enabled by issuing the no shutdown interface configuration command. Step 2 Configuring 802.1x AuthenticationYou now configure 802.1x authentication, which authenticates switch port access based on user credentials rather than MAC address. Cisco's current 802.1x implementation requires the use of a RADIUS server, although the standard allows for any authentication mechanism to be used. In this step:
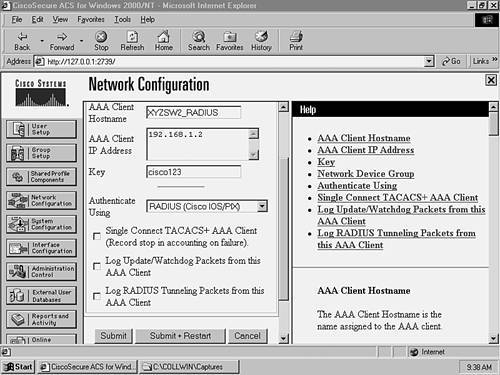
Configuring XYZSW2 for RADIUS SupportIn Scenario 8-1, you configured RADIUS support on XYZSW1. You now need to configure RADIUS support on XYZSW2 to enable 802.1x authentication.
Example 8-54 shows that enabling 802.1x support disables trunking and turns on the spanning-tree PortFast feature on that port.
TIP You can dynamically determine VLAN membership for a user using 802.1x. This is achieved by configuring the following RADIUS attributes on a per-user or per-group basis:
You can also apply per-user ACLs to restrict traffic for a user using either the [11] Filter-ID attribute or the [026/009/001] cisco-av-pair attribute. Configuring 802.1x SupportDo the following to configure 802.1x support:
Example 8-55 shows that the port status of the port is unauthorized, indicating the 802.1x client on the port is not present or is providing invalid credentials.
Configuring Host Operating System Support for 802.1xConfiguring host operating system support for 802.1x is done as follows:
|
 All Programs
  Accessories
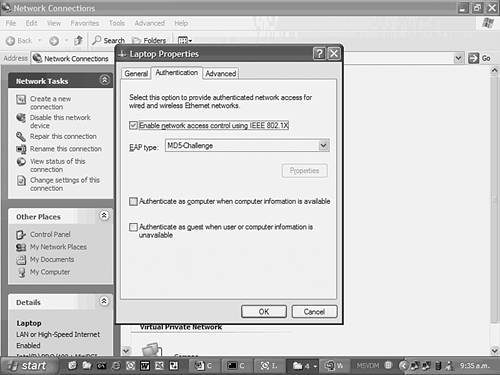
EAN: 2147483647
Pages: 135