Scenario 8-2: Enhancing Security by Using AAA
| In this scenario, you secure both a Catalyst CatOS-based switch and an IOS-based switch. In doing so, you increase the security of each device and consequently the network. This exercise builds on the previous scenarios by including the configuration of AAA. Scenario ExerciseFigure 8-3 illustrates the topology used for this scenario. Corporation XYZ requires their existing switches to be secured using best practices. Corporation XYZ is about to acquire a larger corporation and needs to add new switches to the network. A new CiscoSecure ACS 3.2 server has been installed to allow Corporation XYZ to evaluate the use of both TACACS+ and RADIUS to provide a suitable access control model. It is through the configuration of AAA that the ACS server can be used. Scenario ObjectivesThe scenario objectives are as follows:
Additional Equipment NeededBuilding on the previous scenario, only the following additional equipment is required to complete the following steps:
Scenario PlanningPlanning AAA can seem reasonably complex at first, with many options available for authentication, authorization, and accounting. Many AAA configuration options are designed towards Point-to-Point Protocol (PPP) access (such as dial-up access to an Internet service provider, ISP), so the number of options that you actually need to secure network devices is reduced. The first step in configuring any AAA services is to establish a relationship with a security server on the network. The TACACS+ and RADIUS security server protocols require the IP address of the security server and a shared secret key (password) be defined on the switch. The security server must also be configured with the IP address of the switch and must share the same shared secret key to successfully communicate. Once you have configured security server support, you are ready to complete the implementation of AAA. Planning AuthenticationThe following services can be authenticated on both CatOS and IOS:
For example, login access is required to establish a user mode connection to a switch, while enable access is required to establish privileged access to the switch. Planning AuthorizationThe following services can be authorized on both CatOS and Cisco IOS:
Authorization requires that a user be authenticated so that the switch can query the security server with a username and type of service required. Planning AccountingThe following events can be accounted for on both CatOS and Cisco IOS:
When you configure accounting, you also specify when to create accounting records. The following options are available:
NOTE Wait-Start should be used with great caution. For example, if Wait-Start is configured for EXEC sessions, you will not be able to log on to the network device if the AAA server is unavailable for any reason. Command SyntaxThe following sections describe the commands used for CatOS and Cisco IOS in this scenario. CatOS Command SyntaxThe following new CatOS commands are introduced in this scenario:
The set radius Command SyntaxThe set radius server command is used to define the IP address of a RADIUS server: set radius server ip-address [auth-port port] [acct-port port] [primary] The auth-port and acct-port keywords specify the server User Datagram Protocol (UDP) ports that should be used for authentication and accounting communications (the various RADIUS products available differ; by default, ports 1812 and 1813 are used). If you specify the primary keyword and have multiple RADIUS servers defined, then this RADIUS server is contacted first. You can have up to three RADIUS servers defined. You must also specify a RADIUS secret key by using the set radius key command: set radius key secret This command sets the RADIUS key for all configured RADIUS servers. The set tacacs Command SyntaxThe set tacacs server command is used to define the IP address of a TACACS+ server: set tacacs server ip-address [primary] The primary keyword specifies that this TACACS+ server should always contacted first if multiple TACACS+ servers are defined. You can have up to three TACACS+ servers configured. You must also specify a TACACS+ secret key by using the set tacacs key command: set tacacs key secret This command sets the TACACS+ key for all configured TACACS+ servers. The set authentication Command SyntaxTo configure authentication, you use the set authentication command: set authentication {login | enable} {radius | tacacs | kerberos} enable [all | console | telnet | http] [primary] You can specify the authentication method for either login authentication (access to exec mode) or enable authentication (access to privileged configuration mode). You then specify the use of RADIUS or TACACS+ and can apply the configuration to whichever management interfaces you require. The primary keyword is used when you have multiple authentication methods (e.g., using TACACS+ and RADIUS simultaneously), and you want to specify which authentication method is attempted first. You can also disable local authentication by using the following command: set authentication {login | enable} local disable [console | telnet | http | all] WARNING Be careful when disabling local authentication. If you disable local authentication for every management interface, if your security server is down you will be unable to access the switch. A common practice is to disable local authentication for Telnet access, but leave it enabled for console access. The set authorization Command SyntaxTo configure authorization, you use the set authorization command. To configure authorization for exec mode and/or enable mode access use the following syntax: set authorization {enable | exec} enable option fallback [both | console | telnet] The option parameter specifies which security server protocol to use. Because RADIUS authorization is integrated with the authentication process, only tacacs is a valid option here. The fallback parameter specifies what action you should take if communication with the TACACS+ server fails (for example, you can specify none, meaning the service requested is granted if the TACACS+ server is down). Valid fallback options are tacacs+, deny, if-authenticated, and none. To configure authorization for commands that can be executed use the following syntax: set authorization commands enable {config | enable | all} option fallback [both | console | telnet] Using the config parameter limits command authorization to configuration commands only (i.e., show commands do not need to be authorized). The set accounting Command SyntaxTo configure accounting, you use the set accounting command. To configure accounting for connect, exec, and system events, use the following syntax: set accounting {connect | exec | system} enable {start-stop | stop-only} {tacacs+ | radius} To configure accounting for command events, use the following syntax: set accounting commands {config | enable | all} [stop-only] tacacs+ Notice that your only security server protocol option is tacacs+, because RADIUS does not support command authorization and accounting. Cisco IOS Command SyntaxThe following new Cisco commands are introduced in this scenario:
The radius-server Command SyntaxBefore configuring RADIUS support, you must enable AAA by using the aaa new-model global configuration mode command: aaa new-model The radius-server global configuration command can then be used to configure the IP address of the RADIUS server: radius-server host ip-address [auth-port port] [acct-port port] [key secret] If you do not specify a key using the optional key keyword, you must specify a RADIUS secret key by using the radius-server key global configuration command, as shown here: radius-server key secret This command sets the RADIUS key for all RADIUS servers defined (unless a host has a specific key configured via the radius-server host command). The tacacs-server Command SyntaxThe tacacs-server global configuration command is used to define the IP address of a TACACS+ server: tacacs-server host ip-address You must also specify a TACACS+ secret key by using the tacacs-server key global configuration command: tacacs-server key secret This command sets the TACACS+ key for all configured TACACS+ servers. The key can optionally be configured on a per-server basis using the key parameter to the tacacs-server host global configuration command. The aaa authentication Command SyntaxBefore configuring AAA on Cisco IOS, you must enable AAA support explicitly using the aaa new-model command: aaa new-model To configure authentication for login (exec) access, you use the aaa authentication login global configuration command: aaa authentication login {default | list} method1 [method2..] The preceding command creates a profile that can be applied to different interfaces (e.g., a console port), allowing you to create different policies for different access methods. The default keyword specifies the default login authentication profile that is used for all management interfaces. You can specify multiple methods of authentication (e.g., RADIUS, TACACS+, line, none). To use a custom profile that you have created, you must bind the profile to the management interface that you want to control. The login authentication line configuration mode command is used to bind a profile to a management interface, as shown in Example 8-33 Example 8-33. Creating and Applying an AAA Authentication ProfileSwitch(config)# aaa authentication login PROFILE-A radius line Switch(config)# line con 0 Switch(config-line)# login authentication PROFILE-A In Example 8-33, an AAA authentication profile is created called PROFILE-A that uses RADIUS authentication as its primary method, and line authentication (i.e., the password assigned to the line to which access is being attempted) is used if the configured RADIUS server is down. The profile is then bound to the console port, meaning this profile is applied when access is attempted from the console port. WARNING When you enable AAA by using the aaa new-model command, the default method of login authentication for Telnet access is to use the local method. The local method requires users to be defined locally using the username command. If no users are defined when you turn on AAA, you will be unable to gain Telnet access to the switch. A good rule of thumb is to set the default authentication method as the line method, which uses the line password (e.g., the vty password) as the default mechanism. To configure authentication for enable mode access, you use the aaa authentication enable global configuration command: aaa authentication enable default method1 [method2..] You can create only a single (the default) enable authentication profile, and you do not need to bind this to any management interface because enable mode access is independent from a management interface. The aaa authorization Command SyntaxTo configure authorization, you use the aaa authorization global configuration command: aaa authorization {network | exec | commands level} {default | list} method1 [method2..] Similar to authentication, the preceding command creates a profile that can be applied to different interfaces. You can control authorization for either exec access (i.e., starting a command session on the switch), or you can control authorization for commands entered at a specific privilege level. Example 8-34 shows a sample AAA authorization configuration: Example 8-34. Creating and Applying an AAA Authorization ProfileSwitch(config)# aaa authorization exec PROFILE-EXEC radius none Switch(config)# line vty 0 4 Switch(config-line)# authorization exec PROFILE-EXEC In Example 8-34, an AAA authorization profile called PROFILE-EXEC is created that authorizes exec access using RADIUS. If the RADIUS server is down, the switch permits the access as indicated by the use of the none keyword. TIP When configuring both AAA authentication and authorization, it is good practice to configure backup methods, as shown in Example 8-34. It is important to understand that these methods are invoked only if the primary security server is down. If the primary security server rejects a request, the switch rejects the requested access (and does not try the second method). The aaa accounting Command SyntaxTo configure accounting, you use the aaa accounting global configuration command: aaa accounting {network | exec | connection | system | commands level} {default | list} {start-stop | stop-only | wait-start} method1 [method2..] Similar to both authentication and authorization, the preceding command creates a profile that can be applied to different interfaces. You can specify accounting for exec, connection, system, or command events. You can also control when the accounting events are created. Configuration TasksIn this scenario, you perform the following tasks:
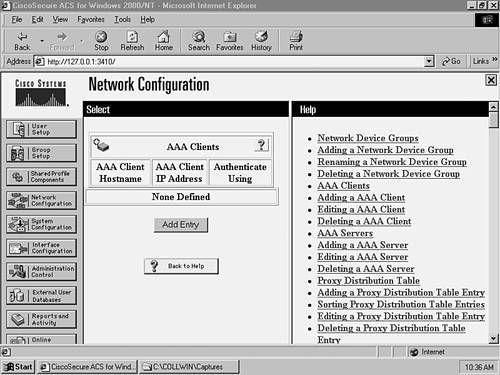
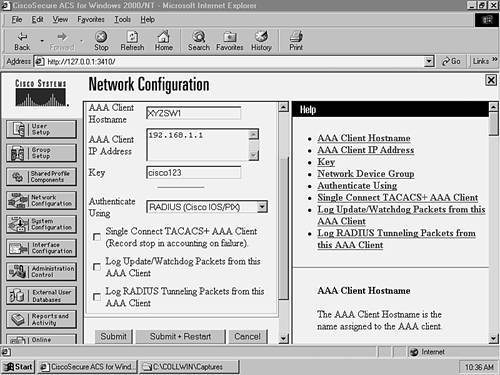
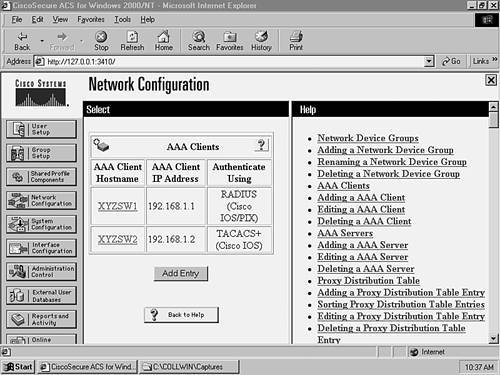
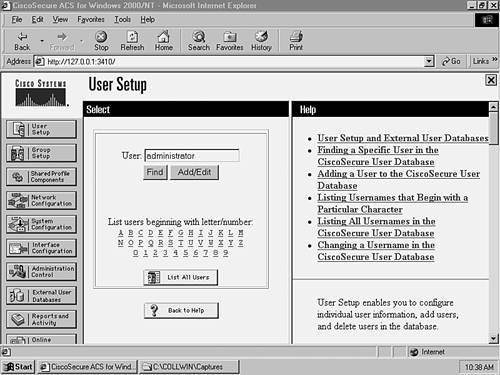
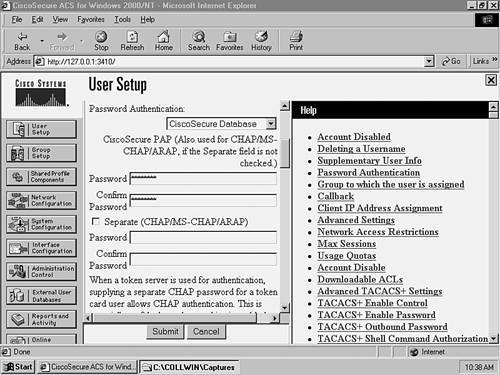
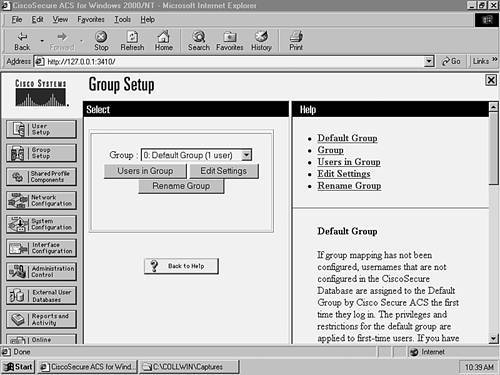
Step 1Configuring the CiscoSecure Server for AAA SupportThis scenario assumes that you have installed CiscoSecure ACS and performed preliminary switch configurations from Scenario 8-1. CiscoSecure ACS 3.2 must be installed on a Windows 2000 Server. Once you have installed CiscoSecure ACS, you need to create an AAA client definition for each switch and then create user accounts for network administrators.
Step 2Configuring Each Switch for AAA SupportIn this section, you configure each switch to use AAA. The following actions are required:
Configuring the Appropriate Security Server Protocol SupportIn this section, you configure both RADIUS (on XYZSW1) and TACACS+ (on XYZSW2) support.
Configuring Each Switch to Use AAA for AuthenticationIn this section, you learn how to use AAA authentication for management access on each switch.
In Example 8-37, the use of the telnet keyword enables RADIUS authentication for Telnet access only.
In Example 8-38, notice that you have to globally enable AAA by using the aaa new-model command. The next command tells the switch to use the locally configured line password as the default login authentication mechanism. Next, you create a login authentication profile called TELNET, which uses TACACS+ as the authentication method, and uses the line authentication method as a backup in case the TACACS+ server is down. The last step is to apply the profile (TELNET) to the vty lines, which then enables TACACS+ authentication for Telnet access. WARNING Be careful when setting the default authentication mechanism as the line password. If your console port does not have a line password configured, access is denied to the console port. Ensure that you set a line password for the console port if you are using line password as the default authentication mechanism. Configuring Each Switch to Use AAA for Management Access AuthorizationIn this section, you learn how to use AAA authorization to allow enable mode management access on each switch and to deny the use of the erase command on XYZSW2 using TACACS+. NOTE You can enable mode authorization with two approaches. The first is to apply enable mode authentication when an authenticated user types in the enable command. The second is to authorize enable mode access when a user first attempts management access (e.g., authenticates at a Telnet prompt), which takes the user straight to enable mode if authenticated and authorized. TACACS+ supports both of these methods, while RADIUS supports only the second method (RADIUS does support the first, but not very well). For this reason, we look exclusively at the second method of enable mode authorization.
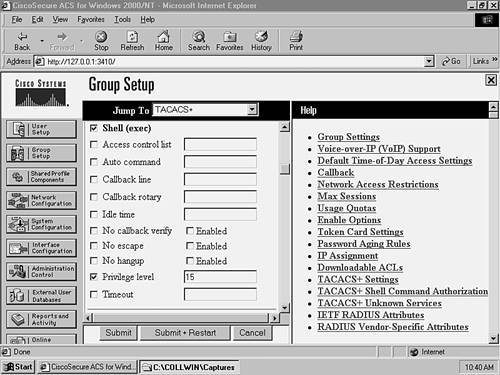
In Example 8-39, you use the exec keyword to tell the switch to contact the TACACS+ server for authorization when a user starts an exec process. Notice the use of the none keyword to ensure the user can at least get user mode access if the TACACS+ server is down (if you omitted this and the TACACS+ server is down, you would not be able to access the switch via Telnet).
In Example 8-40, you use the commands keyword to tell the switch to contact the TACACS+ server for authorization of commands when in enable mode (privilege level 15). Notice that this authorization is used only for Telnet access because we have created a specific AAA profile (TELNET) and applied it only to the vty lines. Configuring Each Switch to Use AAA for Management Access AccountingIn this section, you learn how to use AAA accounting to audit exec events (e.g., starting a Telnet session) and command events (invoked each time a command is issued).
You create two separate profiles for each event category you are accounting and then apply the profiles to the vty lines. Notice the use of the wait-start keyword to ensure enable mode command events are always audited.
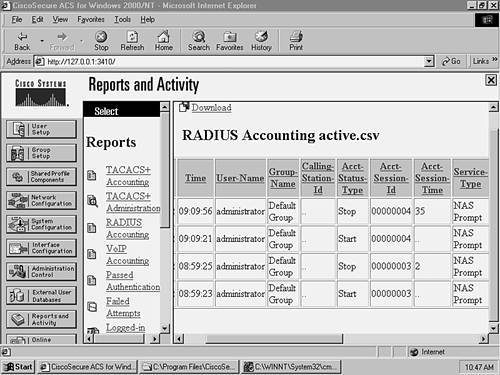
Figure 8-13 shows a start and stop record around 09:09 a.m. The Service Type column indicates this is a NAS Prompt (exec) event, and the Acct-Session-Time column for the stop record indicates the session lasted for 35 seconds. The User-Name column indicates that the user administrator established the exec connection.
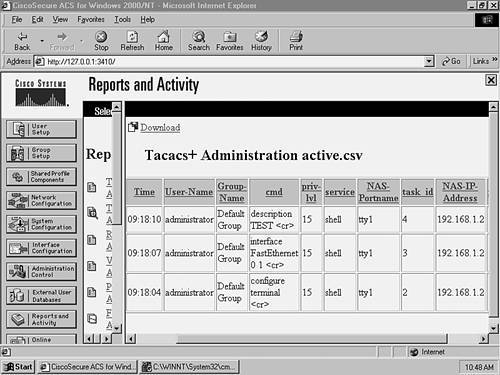
Figure 8-14 shows a start and stop record around 09:18 a.m. The Service column indicates this is a shell (exec) event, and the elapsed time column for the stop record indicates the session lasted for 10 seconds. The User-Name column indicates that the user administrator established the exec connection, and the Caller-Id column indicates that the exec session was initiated from 192.168.1.100 (Host A). Notice that no events are related to commands in Figure 8-14. This is because command accounting records are stored in the TACACS+ Administration database on CiscoSecure ACS. On the CiscoSecure ACS server, click on the Reports and Activity button, then click the TACACS+ Administration hyperlink, and then click the TACACS+ Administration active.csv hyperlink. Figure 8-15 shows the accounting information that you should see. Figure 8-15. Viewing TACACS+ Administration Information
Figure 8-15 shows three command events that occurred around 09:18 a.m. The events indicate that the user administrator configured a description of TEST for interface fastEthernet0/1. The NAS-IP-Address column indicates the configuration was performed on 192.168.1.2 (XYZSW2). Step 3Confirming Your AAA ConfigurationNow it is time to test your configuration by attempting Telnet access to both switches and requesting various services.
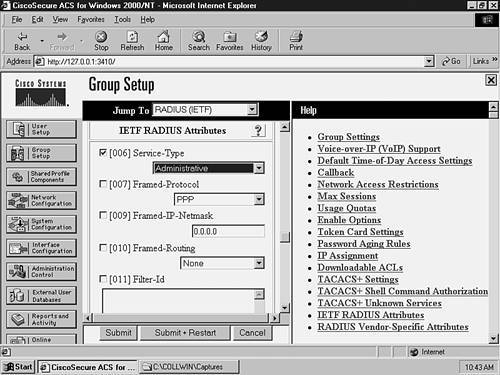
Notice that once you have successfully authenticated, you are taken directly to enable mode on the switch. This is because the RADIUS server returned the 006 Service-Type attribute with a value of Administrative, which tells the switch to grant the user enable mode access.
Again, you have been granted enable mode access directly. This is because you configure the switch to authorize exec access, and the TACACS+ server authorized the user with a privilege level of 15 (enable mode).
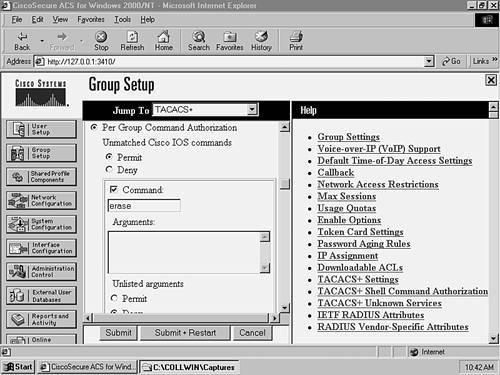
In Example 8-45, notice how you can execute normal configuration commands, but once you attempt to execute the erase command, you cannot. This is because every time the user executes a command, the switch contacts the TACACS+ server to authorize the command and we had previously denied it.
|

EAN: 2147483647
Pages: 135