| In Chapter 1, "Introduction to Plone and Content Management," you learned that Plone slots are defined as part of the overall template, and you were introduced to the standard Plone slots that appear when viewing an out-of-the-box installation. In this section, you'll learn how to move those slots around, disable them for certain user types, and remove them altogether. Changing the Location of Slots The location of the left-side and right-side slots within the standard Plone template is controlled via a simple form in the Zope Management Interface (ZMI). To get started, log in to the ZMI with your manager account and select your Plone instance from the navigation frame. The contents populate the workspace frame, and you will see several tabs across the top of that frame. Click the Properties tab; a form is displayed that controls various overall properties for your Plone site, including what elements populate the left side and right side of the templates (see Figure 5.1). Figure 5.1. Viewing the properties of the Plone site. 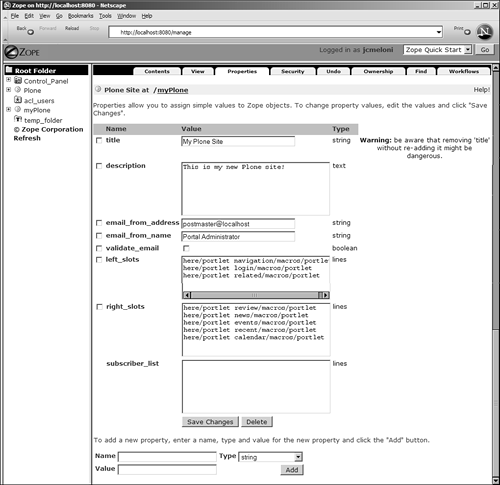
The two form fields of most interest here are left_slots and right_slots . Each line in the content of these form fields represents a call to a specific Plone portlet, which displays the appropriate information in the template. For example, the left_slots field calls the following:
here/portlet_navigation/macros/portlet here/portlet_login/macros/portlet here/portlet_related/macros/portlet
These items correspond to the content displayed in the Navigation slot, the Login slot, and the Related Information slot, respectively. Similarly, the right_slots field calls the following:
here/portlet_review/macros/portlet here/portlet_news/macros/portlet here/portlet_events/macros/portlet here/portlet_recent/macros/portlet here/portlet_calendar/macros/portlet
These items correspond to the Review slot, the News slot, the Events slot, the Recent Items slot, and the Calendar slot, respectively. The order in which the calls to portlets are entered in the form fields corresponds to the order in which they are displayed in the Plone template. For example, on the left side of the template, the Navigation slot always appears at the top, followed by the Login slot, based on the previous entry. Note The information that you see in your Properties form might differ , depending on what add-on modules you have installed. For instance, if you installed CMFMessage and CMFUserTrackTool, you will see the following in the right_slots field, at the end of the list: here/message_list_slot/macros/messagesBox here/activeusers_slot/macros/activeusersBox
Removing and reordering the appearance of standard slots is as simple as modifying the entries in this form. For example, to remove all slots on the right side, simply delete the entries in the right_slots form field and press the Save Changes button. The change occurs immediately, and the right side of your template then is empty, as shown in Figure 5.2. Figure 5.2. All right-side slots have been removed. 
You can use this same process for moving around the location of your standard slots, not simply removing them from your template. For example, if you wanted the Calendar and Events slots to appear under the Navigation slot, and you wanted the Login slot to be at the top of the right-side slots, your left_slots field would look like this:
here/portlet_navigation/macros/portlet here/portlet_calendar/macros/portlet here/portlet_events/macros/portlet here/portlet_related/macros/portlet
Similarly, the right_slots field would contain this:
here/portlet_login/macros/portlet here/portlet_review/macros/portlet here/portlet_news/macros/portlet here/portlet_recent/macros/portlet
Using the handy Undo function, you can immediately revert to the previous usage of right-side slots by clicking the Undo tab in your ZMI, selecting the check box of the last action you performed, and pressing the Undo button. Figure 5.3 shows an Undo screen, complete with selectable entries. Figure 5.3. How to undo an edit to Plone properties. 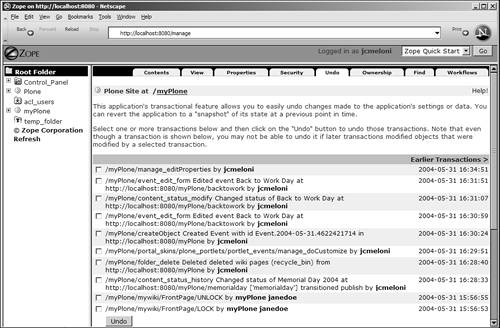
After you roll back the edit to Plone properties, the right-side slots reappear throughout your template. Next , you can take this concept one step further and modify the behavior of the template at the folder level. Modifying the Visibility of Standard Slots The modifications discussed earlier were to the Plone template as a whole, meaning the front page and all subsequent pages, pages inside member directories, directories for add-ons, and so forth. In this section, you'll learn how to modify the appearance of standard slots on a per-directory basis. The sample directory in this case is for an installed ZWiki living in the mywiki directory within the sample Plone site. Using the ZMI and looking at the contents of your Plone site, select the folder in which you want the changes to occur ”in this case, the mywiki folder. After you view the contents of this folder in the workspace frame, click the Properties tab, just as you did in the previous section. The properties for this directory look different than the properties for the overall Plone template. The properties for the mywiki folder are significantly fewer, as shown in Figure 5.4. Figure 5.4. The properties of the mywiki folder. 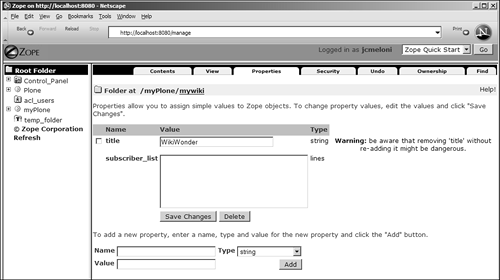
Note The brevity of the properties page for the mywiki folder is not tied to the fact that it is a folder holding a wiki. Any folder in the Plone hierarchy has fewer properties than the overall Plone properties.
In this case, there are no form fields called left_slots or right_slots because those areas are controlled by the master Plone properties seen previously. Thus, to modify these areas of the template, within this individual folder, you must make new form fields that will override the master settings. To remove the standard right-side slots, within the mywiki folder, follow these steps: -
At the bottom of the properties page, look for the text "To add a new property...," followed by three form fields.
-
In the Name field, enter right_slots as the name of the new property.
-
In the Type field, select Lines as the type of the new property.
-
Press the Add button, leaving the Value field blank.
The changes are saved, and you no longer have right-side slots on any pages in the mywiki folder, as shown in Figure 5.5. Figure 5.5. The mywiki display, without right-side slots. 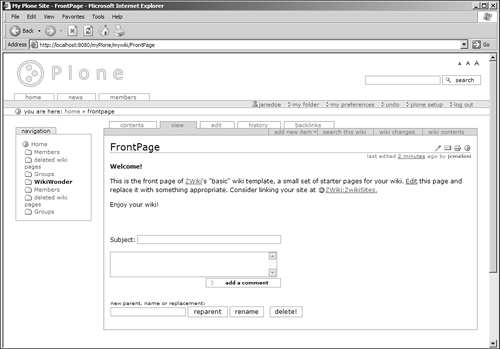
You succeeded in replacing the value of the right_slots property within the mywiki folder with blank values ”no slots. Because no slots are present, you can see in Figure 5.5 that the page content expands to fill that now-empty space. If you wanted to keep content in the right side of the template within the mywiki folder, the previous instructions are still valid. After you create the right_slots property, you can give it a value (or enter a value during creation). If you assigned the following value to the right_slots property, for example, the only slot present in the right side of the template within the mywiki folder would be the Calendar slot:
here/portlet_calendar/macros/portlet
In the next section, you'll see how to modify the template so that only members of the site see particular slots. Making Slots Visible to Members Only Perhaps you have a Plone site that caters to registered, logged-in members, but it enables anonymous users to browse some freely available content. You can modify your Plone template so that certain slots are shown for only logged-in members. For example, perhaps you do not want to show the Events slot until a user is logged in. This requires a few different modifications to Plone properties and templates, but when you get the hang of it, the task won't seem so daunting. The first step is to add a new property within the site_properties object. To access this object, log in to the Zope Management Interface and click on your Plone instance in the navigation frame. Then click on the portal_properties object in the workspace frame and then the site_properties object in the workspace frame. You should see a form like Figure 5.6 that scrolls for a bit because it's quite long. Figure 5.6. Modifying the site_properties object. 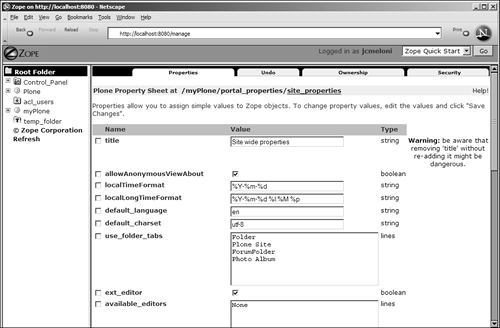
At the bottom of this form, you can add a new property, much as you did in the previous section. In this case, the new property is a true/false option specifically for viewing the Events slot as an anonymous user. -
In the Name field, enter allowAnonymousViewEvents as the name of the new property. You can call it anything you like, but this makes sense.
-
In the Type field, select Boolean as the type of the new property.
-
Press the Add button, leaving the Value field blank.
Now that you have added this property (and it is unchecked, which means that it is false), you have completed the first part of the process. Next on the list is to modify the Events portlet itself, to make it aware of this property and act accordingly . In the ZMI, navigate to your Plone instance in the navigation frame, then to the portal_skins object in the workspace frame, and then to the plone_portlets object in the workspace frame. You will see a list of available portlets, as shown in Figure 5.7. Figure 5.7. Portlets available for modification. 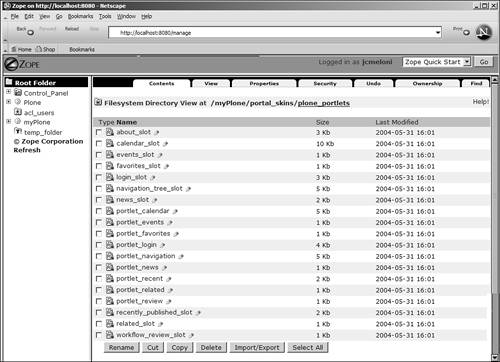
Tip The only portlets that you should work with are those that begin with portlet_*. The rest are deprecated but remain part of the installation for any backward-compatibility issues.
Because you need to modify the functionality of the Events slot, you need to work with the portlet_events portlet. Click on this object to view the existing code and to make a custom copy for your purposes. To make a custom copy, press the Customize button. This makes a copy of the portlet, which will be shown in edit mode, as in Figure 5.8. Figure 5.8. Custom version of portlet_events . 
The code, written in Plone template language, has a tag at the top that defines this portlet:
<div metal:define-macro="portlet" tal:define="results python:here.portal_catalog.searchResults( portal_type_operator='or', portal_type=('Event', 'ATEvent'), end={'query': here.ZopeTime(), 'range': 'min'}, sort_on='start', review_state='published')[:5];" tal:condition="results">
Replace the last line of the tag, the one with the tal:condition statement, with the following:
tal:condition="python:test(not site_properties.allowAnonymousViewEvents and site_properties.portal_membership.isAnonymousUser(), 0, 1)">
The tag should now read:
<div metal:define-macro="portlet" tal:define="results python:here.portal_catalog.searchResults( portal_type_operator='or', portal_type=('Event', 'ATEvent'), end={'query': here.ZopeTime(), 'range': 'min'}, sort_on='start', review_state='published')[:5];" tal:condition="python:test(not site_properties.allowAnonymousViewEvents site_properties.portal_membership. is Anonymous User (7,0,1)">
This new condition says that if the allowAnonymousViewEvents property is not checked (that is, you do not want to allow anonymous viewing) and the viewer of the page calling the object is anonymous (that is, not yet logged in), do not show this slot. If you want to allow anonymous viewing of this slot, you can simply go back to the allowAnonymousViewEvents property in site_properties , check the box (Boolean true ), and save the change. No further changes would have to be made to the portlet because it is already customized to react to the value of allowAnonymousViewEvents. You can repeat the process of creating a Boolean property and then modifying the portlet to check for this value for any standard slot ”or any slot of your own creation. In the next section, you'll learn how to create your own slot using tools you've already seen. |